Last Updated on May 12, 2026
Since Microsoft is constantly updating Windows 11 and adding new features (and taking way old ones like WordPad for example), you may have noticed that you are getting prompted to answer questions and reconfigure your computer more than you would like.
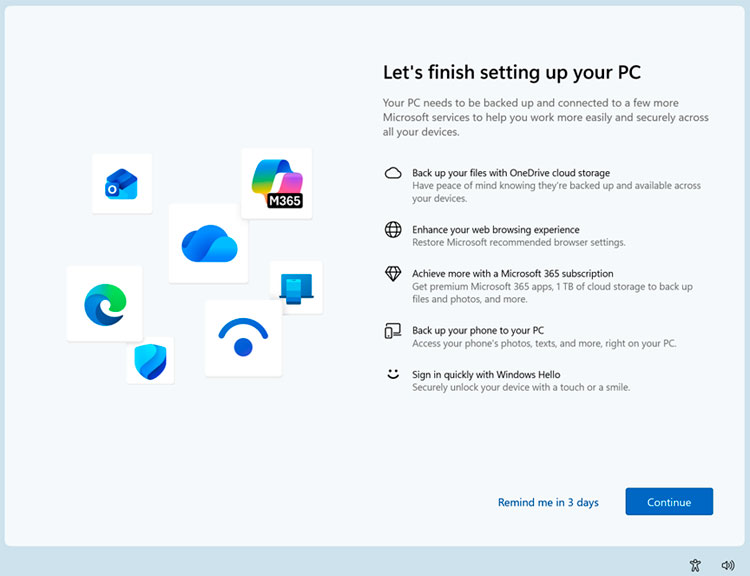
One of these configuration processes that you have most likely experienced is the “Let’s finish setting up your PC” prompt that you get when you log into your computer.
This is known internally as SCOOBE (Second Chance Out of Box Experience). It’s designed to nudge you toward Microsoft services you might have skipped during the initial setup. They use this as another way to try and get you to sign up for things you probably don’t want or need!
If you have installed Windows on your own, then you have gone through the OOBE process where you do things such as configure your keyboard, network and user account settings.

If you want to disable the Let’s finish setting up your PC screen so you are not bothered with it, then it’s very easy to do.
When you log in and see the screen, you will have the option to have it remind you in 3 days, or you can click the Continue button to deliberately go through all the settings before you disable it for good.
Exploring the Setup Configuration Options
You may want to carefully run through the wizard one more time before completely disabling it just to make sure you have all the settings configured exactly the way you like. The options you see here tend to stay fairly consistent, but keep in mind they might have changed slightly since this article was written. Here are the typical settings screens you will see if you click the Continue button.
1. Use Recommended Browser Settings
You will likely see a prompt asking you to Use recommended browser settings for your system. This will set Microsoft Edge as your default web browser and also automatically pin it to the desktop and Start menu. If you prefer to use Chrome or Firefox, you should skip this recommendation to keep your current default browser preferences intact.
2. Let’s Customize Your Experience
The next screen will often say Let’s customize your experience and ask you to select a few categories. This is a targeted survey that lets Windows profile your personal interests (like gaming or business) to pre-configure app suggestions, desktop tips, and targeted ads tailored specifically to your choices. You can simply skip this screen if you prefer a cleaner, less personalized operating system.
3. Protect Your Files with Windows Backup
You will then be prompted to Protect your files with Windows backup using the cloud. This will enable the OneDrive cloud storage account on your computer and aggressively sync your personal files to the cloud servers. Many people don’t like this specific feature because it changes your default user folder paths (Documents, Photos etc.) and it can be incredibly difficult to safely restore these folder settings later.
4. Use Your Phone From Your PC
Another common prompt is the option to Use your phone from your PC to sync your mobile device. If you want to seamlessly connect your Android or iPhone to your computer to do things such as view photos, make phone calls or send text messages, you can configure this integration right here. Or you can simply enable the Phone Link app manually later if you ever change your mind.
5. Upgrade to Microsoft 365
Microsoft will also inevitably use this screen to ask you to Upgrade to Microsoft 365 for premium productivity tools. If you do not already have an active Microsoft 365 account (Word, Excel, PowerPoint etc.) then you can sign up for a paid subscription here. If you use alternative office suites or simply do not need it, you can safely decline the generous offer and move to the next screen.
6. Discover Tips for Microsoft Apps
The final configuration screen usually invites you to Discover tips for Microsoft apps on your desktop. Here you will be shown various helpful Windows tips that you can readily apply to your everyday computing tasks to save time. Once you pass this final screen, you will finally be dropped back onto your standard Windows desktop environment.
Disabling the Let’s Finish Setting Up Your PC Prompt
7. Open the Windows Settings App
To turn off this recurring feature permanently, all you need to do is open the primary Windows Settings app on your computer. You can easily do this by clicking on your Start menu and selecting the gear icon, or by pressing the Windows Key + I shortcut on your keyboard.
8. Navigate to the Notifications Menu
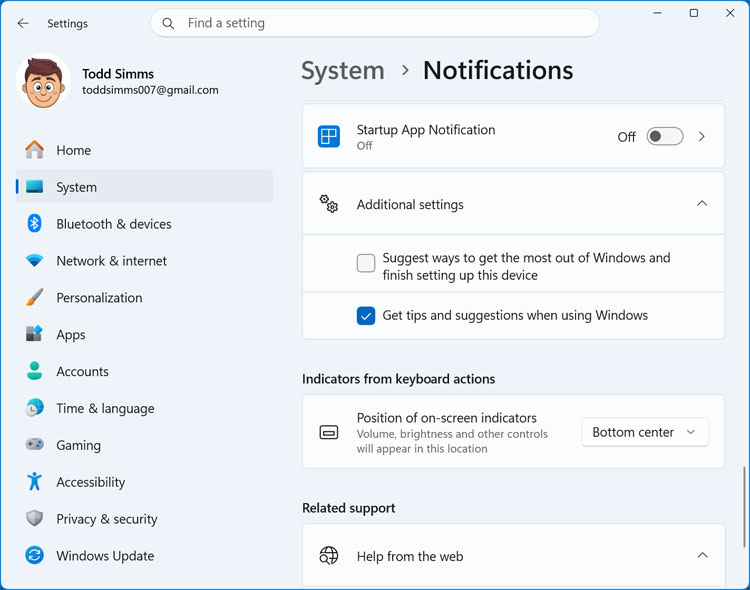
Once the main settings window is open, ensure you are on the System tab located on the left-hand navigation pane. Then you can navigate to System and then click on Notifications to access your detailed alert preferences. Scroll down to find the Additional settings section located near the very bottom of the page.
9. Uncheck the Device Setup Suggestion
Here you will find a specific checkbox labeled “Suggest ways to get the most out of Windows and finish setting up this device”. You will want to completely uncheck this box to make absolutely sure you are not bothered with this intrusive wizard when logging into your computer. Disabling this immediately stops the SCOOBE screen from hijacking your startup process.
10. How to Re-Enable the Prompt Later
If you ever change your mind and decide that you actually want to start seeing the “Let’s finish setting up your PC” screen again, the reversal process is incredibly simple. You can simply come back here to this exact same notifications menu and check the box again to restore the original startup functionality.
11. Beware of Major Windows Updates
You should also be highly aware that there is a strong chance this box will mysteriously get checked again after a major Windows feature update. Microsoft frequently resets certain privacy and notification preferences during large system overhauls, so you may unfortunately have to repeat this process or come back here to carefully check its status in the future.
For additional training resources, check out our online IT training courses.
Check out our extensive IT book series.