Last Updated on May 18, 2026
Managing storage in Windows 11 is a fairly simple task if you have just one hard drive installed within your computer. This drive will contain Windows as well as your programs and personal files. But many times, your computer will have more than one drive such as an SSD drive for Windows and a larger SATA spinning disk for your files. Or if you are the type of person who likes to build their own computer, you may even have more than two hard drives.
If you have more than one extra hard drive in your computer and want to use all the space as a single logical drive, you can create a spanned volume out of two or more hard drives. And if you want to get some extra performance out of your drives, you can create a spanned volume instead. In this article, we will be showing you how to create a spanned or striped volume (known as RAID 0) in Windows 11.

Creating a Spanned Volume
1. Open the Disk Management Tool
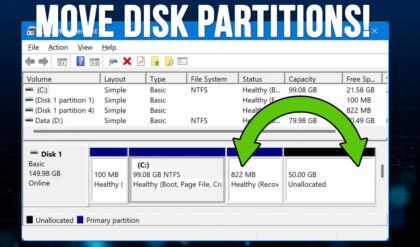
To create a spanned volume in Windows we will begin by opening the Disk Management tool. You can access this built in utility by searching for it directly from the Windows taskbar search box. Once you have Disk Management open you will see all the physical hard drives in your computer alongside any active volumes.
2. Identify Your Target Disks
This specific computer has a main hard drive labeled Disk 0 that contains the core Windows 11 installation. Then we have Disks 1 through 3 that we will be using for our massive spanned drive. Disk 2 is already in use and has the drive letter E assigned to it.

3. Delete Existing Hard Drive Volumes
You must delete the current volume on Disk 2 to include it in the new spanned array. Deleting a volume destroys everything. All files vanish permanently. Make absolutely sure to back up anything you want to save before proceeding. Right click the volume and choose Delete Volume.

4. Initialize a New Spanned Volume
You can right click on any of your three blank drives to begin the setup process. Choose the New Spanned Volume option directly from the context menu. This action opens a dedicated wizard to help you configure the combined storage space.

5. Add Physical Drives to the Array
The setup wizard allows you to add one or more of your blank hard drives to the new spanned volume. Select your target disks from the left pane. Click the Add button to push them over to the selected right pane.

6. Review Your Total Combined Space
Now all three drives are set to merge into the new spanned volume. You can look at the bottom of the window to see the total massive space available after creation. The system calculates this exact megabyte count automatically.

7. Assign a Dedicated Drive Letter
The next step involves assigning the spanned volume a completely new drive letter. You can use any letter of the alphabet that is not currently in use by another internal or external drive. Pick a letter near the end of the alphabet to avoid conflicts with future USB flash drives.

8. Format the New Spanned Volume
We will name our new volume Spanned to easily identify it in the future. Choose the Perform quick format option to format the new file system. Skipping the quick format option forces Windows to run a painfully slow sector check across all three physical disks.

9. Convert Basic Disks to Dynamic
Click the Next button and then hit Finish to trigger a final popup warning message. Windows requires dynamic disks to run spanned volumes and will ask to convert your basic disks to dynamic. You will not see this specific message if your drives are already configured as dynamic architecture.

10. Verify the Dynamic Disk Status
Once the conversion process completes you will see the new spanned volume inside Disk Management. All three physical disks now share the exact same drive letter. The storage bars also changed to a distinct purple color instead of the standard basic black.

11. Check the Total Capacity in File Explorer
Open Windows File Explorer to verify the operating system sees the new massive storage volume. You will see the assigned drive letter and the combined total space. The 230GB size comes directly from merging the 80GB, 50GB, and 100GB physical drives together.

12. Understand Spanned Volume Risks
Data written to this specific volume spans across all three physical drives even though Windows treats it as a single disk. You will lose every single file if just one of those mechanical drives suffers a hardware failure so be sure to back up your files. Disk spanning does not offer fault tolerance. Zero redundancy exists here. You can remove the setup later by right clicking any drive and choosing Delete Volume.
Creating a Striped Volume
1. Understand Striped Volumes and RAID 0
Now we will use the exact same disk configuration to create a high speed striped volume. A striped volume splits data evenly across two or more drives. This massively improves performance by enabling faster read and write speeds. This RAID 0 configuration provides zero redundancy. It remains popular for high speed scratch disks but fails completely as a permanent backup solution.
2. Initialize a New Striped Volume
The process to create a striped volume feels very similar to creating a basic spanned array. Right click on any of your empty unallocated disks. Choose the New Striped Volume option from the popup context menu.

3. Select Drives for the Stripe
Add all three available blank disks to the new volume using the wizard interface. You will immediately notice a massive difference in the math. The total available space sits significantly lower than what we had for the previous spanned volume.

4. Understand Striped Capacity Limits
A striped volume strictly limits its total capacity. The smallest physical drive dictates the ultimate size. Our smallest connected drive holds exactly 50GB of storage. Combining three drives with a strict 50GB limit means we only get 150GB of total usable space. The rest goes unused.
5. Format the RAID 0 Array
We will use the drive letter S for this specific striped array. Make sure the perform a quick format box remains checked. Click through the wizard screens to finalize the high speed file system.

6. Accept the Dynamic Disk Conversion
You will receive another warning message about dynamic disks. Click Next and then Finish. Striped volumes strictly require dynamic disk architecture. Accept the prompt to complete the configuration.
7. Review the Unallocated Leftover Space
Look back at the Disk Management console. The system consumed the entire 50GB drive and extracted exactly 50GB from the two larger drives. This mathematical limitation leaves chunks of unallocated space sitting empty. The larger physical disks now have leftover room.

8. Check File Explorer for the Striped Drive
Open Windows File Explorer to verify the operating system mounted the high speed storage. We can clearly see the new striped drive holding 150GB of free space. It is fully formatted and ready to accept heavy read and write workloads.

9. Utilize the Remaining Free Space
You do not have to waste the unallocated space left sitting on your two larger drives. Right click on that specific empty black space in the Disk Management console. Select the option to create a new simple volume to reclaim that missing storage.

10. Specify the Leftover Volume Size
The setup wizard will ask how much of the unallocated chunk you want to format. We will choose to use all the available leftover space which totals roughly 30GB. You can split this into even smaller chunks if you require multiple partitions.

11. Assign a Letter to the Leftover Partition
We will assign this newly carved out drive the letter E. This allows Windows to treat the leftover space as an entirely independent storage location. Hit the next button to proceed to the formatting screen.

12. Format the Reclaimed Storage
Give the new partition a recognizable name like Data to avoid confusing it with your high speed array. Ensure you choose the quick format option to save time. Hit finish to finalize the creation of the simple volume.

13. Verify the Separate Partitions
Now when we go back to Disk Management we can clearly see the new E drive volume. It exists right alongside the high speed striped volume on the exact same physical drive. It acts as a totally separate partition that can contain its own independent files and folders.

14. View Both Drives in File Explorer
Launch File Explorer one last time to confirm your final setup. You will see both the main high speed striped volume and the smaller standard volume listed separately. The operating system treats them as two entirely different hard drives.

15. Understand RAID 0 Failure Risks
You will instantly lose all your data if just one hard drive fails. A RAID 0 striped configuration offers zero protection. If our 100GB physical drive dies, the entire striped volume drops offline completely. The 30GB E drive remains perfectly intact because it sits on a different physical hard drive that is still working.

As you can see, its easy to create a spanned or striped volume in Windows 11 and the method you will use will be based on your needs.
For additional training resources, check out our online IT training courses.
Check out our extensive IT book series.