
Last Updated on May 7, 2026
Windows 11 receives updates on a regular basis and some of these updates will be for security patches or driver updates and then others will be major build updates which are also known as feature updates. These Windows updates should be automatically downloaded and installed on your computer without requiring any intervention from you.
If you are on an older version of Windows 11 such as 23H2 or 24H2 and Windows Update doesn’t give you an option for the 25H2 update or it never finishes installing or fails with an error, then there is a way to get around this. In this article, we will be showing you how to manually install the Windows 11 25H2 upgrade. Before performing this upgrade or any major update to Windows, you may want to consider backing up your personal files just to be safe.

Why Manual Installation is Required for 25H2
Microsoft typically rolls out major feature updates like 25H2 in deliberate “waves” across the globe to monitor system stability. This means even if your computer hardware is fully compatible, you might not automatically see the update in your settings for weeks or even months after the official release date.
By using the manual ISO installation method, you are effectively “jumping the line” and bypassing Microsoft’s staged rollout schedule. This manual approach is also the absolute best way to fix a stubborn 25H2 installation that keeps failing or continuously getting stuck at 0% inside the standard Windows Update menu.
1. Check Your Current Windows Version
Before starting the manual upgrade process, you should verify exactly which build of the operating system you are currently using. If you go into the Windows 11 settings app and then navigate to System and click on About, you will be able to clearly see what version of Windows you are running. For our specific example in this tutorial, we are going to be updating a computer that is currently running the older version 23H2.

2. Verify Your Available Storage Space
To ensure the 25H2 installation goes smoothly and doesn’t unexpectedly roll back halfway through, you must check your available drive space first. Major feature updates require significant “breathing room” to unpack all of the temporary installation files. Ensure you have at least 30GB of completely free space on your primary C: drive before attempting to run the setup application.
3. Confirm TPM and Secure Boot are Enabled
Another critical check is making sure your system security settings are properly configured for the newest Windows 11 requirements. Even if you are already on Windows 11 perfectly fine, ensure that TPM and Secure Boot are still actively enabled in your system BIOS. Occasionally, a routine firmware update can accidentally reset these settings, causing the 25H2 installer to falsely flag your PC as incompatible.
4. Unplug Non-Essential USB Devices
Before starting the upgrade, it is highly recommended to physically disconnect any unnecessary peripherals from your computer. External hard drives, complex USB hubs, or gaming controllers can sometimes confuse the Windows installer during the multiple reboot phases. To prevent these random boot errors, simply unplug everything from the machine except your standard mouse and keyboard.
5. Download the Windows 11 25H2 ISO File
The first actual step in manually installing the Windows 11 25H2 update requires downloading the official 25H2 installation media directly from the Microsoft website here. Once you navigate to their download page, you will need to scroll down to the specific section that says download Windows 11 disk image (ISO) for x64 devices. Simply choose the correct version from the drop-down menu to proceed.
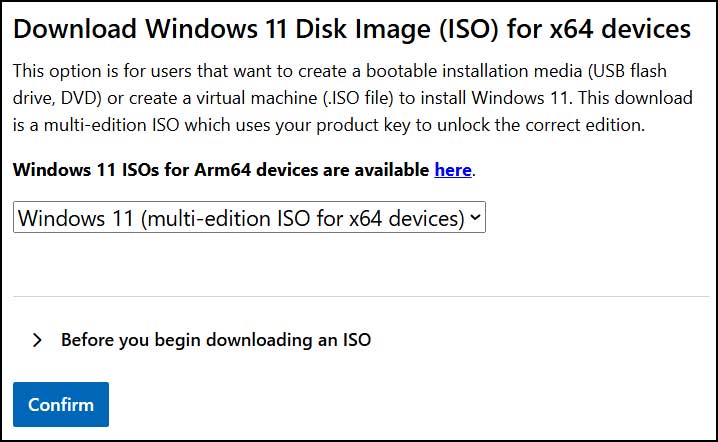
6. Select Your System Language
After selecting the Windows 11 edition, the Microsoft website will prompt you to finalize your localized settings. You will then need to accurately select your preferred system language from the second dropdown selection menu before being able to formally download the ISO file. Once confirmed, you will be provided with a direct download link to begin saving the large image file to your hard drive.
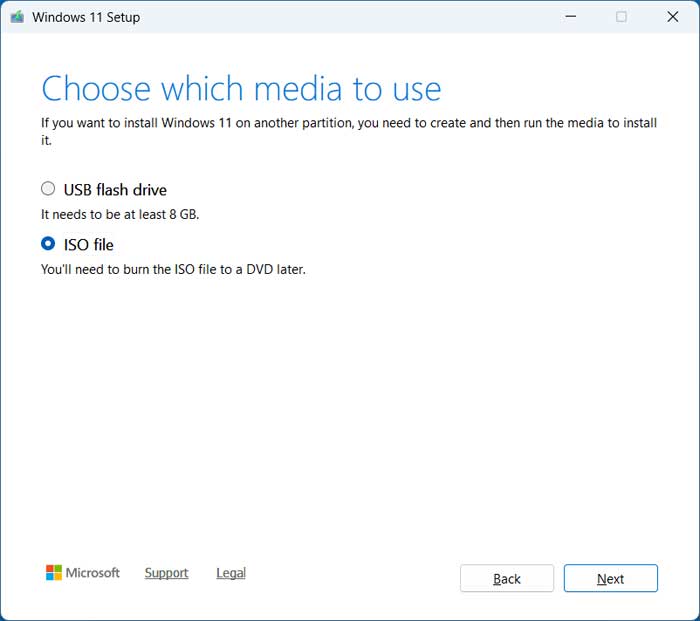
7. Use the Media Creation Tool if Needed
If you are having unexpected network issues downloading the large ISO file directly through your web browser, there is an alternative method. You can also securely use the official Windows 11 Media Creation Tool to download the exact same ISO file. Just be absolutely sure to carefully choose the “ISO file” option rather than the “USB flash drive” choice during the tool’s setup wizard.
8. Mount the Downloaded ISO File
It is extremely important to note that for a proper “In-Place Upgrade” to 25H2, you should stay fully logged into your active desktop environment. By simply right-clicking the downloaded ISO file and choosing the Mount option, Windows will treat it like a physical virtual DVD drive. Mounting the file ensures that the crucial “Keep files and apps” option remains completely available during the setup process. If you are missing the mount option for ISO files, then check out the fix in this video.
9. Avoid Booting from a USB Drive
If you were to completely restart and boot your computer from a USB flash drive containing these files, Windows will often think you want to do a full “Clean Install,” which might accidentally wipe your programs. You can alternatively use file extraction apps such as 7-Zip or WinRAR to extract the contents of your ISO file directly to a folder on your hard drive. However, mounting is generally the fastest and most reliable method for an in-place feature upgrade without data loss.
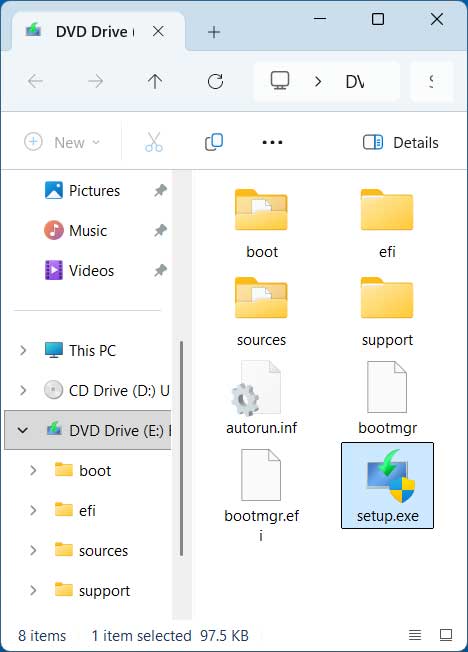
10. Run the Windows Setup Executable
Once you have full access to the extracted or mounted contents of the ISO file, you will need to double-click on the setup.exe file to officially begin the upgrade process. Again, you have to do this specific procedure directly from within your active Windows desktop. You cannot boot to the Windows 11 installation media from the BIOS, because you will not have the option to keep your personal files and apps if you do it that way.
11. Adjust the Setup Download Settings
Once you double-click the setup.exe file and pass the initial loading screen, the Windows upgrade process will formally begin. On this first screen, you can click on the small text link that says “Change how setup downloads updates” if you do not want it to download any minor patches during the main upgrade process. Skipping these immediate downloads should make the overall installation time quite a bit faster, and you will still be able to easily download those updates once the 25H2 installation is fully complete.

12. Accept the Software License Agreement
The Windows setup application will then perform a quick automated check of your PC to make absolutely sure it meets the strict hardware requirements for the Windows 11 25H2 update. It should easily pass these built-in checks if you already have a previous version of Windows 11 installed and running on the machine. You will then need to read through and accept the official Microsoft software license agreement to continue moving forward.
13. Confirm Your Data Retention Options
Before the installation begins copying system files, the setup wizard will present a final summary screen of your chosen settings. The default options should clearly say to keep your personal files and apps intact during the upgrade process. However, if you deliberately do not want to save them for some reason and prefer a fresh start, you can simply click the blue link that says “Change what to keep” to adjust those preferences.

14. Wait for the Installation to Process
After confirming your settings and clicking the Install button, you will then see a full-screen blue display that says “Installing Windows 11,” along with a percentage indicator. This critical step will take quite some time to complete as it transfers gigabytes of data to your system drive. Please make sure your computer remains plugged in and powered on throughout this entire phase to avoid catastrophic data corruption.

15. Allow the System to Reboot Automatically
During this heavy installation phase, your computer will reboot one or more times entirely on its own without any warning. You may also see a black screen with a system message talking about updates being installed and warning you not to turn off your PC. Just be patient and let the automated setup process finish doing its job in the background while the system securely restarts.
16. Finish the User Profile Configuration
Once the major system update is totally complete, you can finally log onto your computer using your normal login credentials. You will most likely see the typical pulsing text messages you would see when logging into Windows 11 for the very first time. This final process is just carefully configuring your new user profile features and will typically take a few minutes. You will commonly see this extended setup screen only for major Windows feature updates like 25H2.


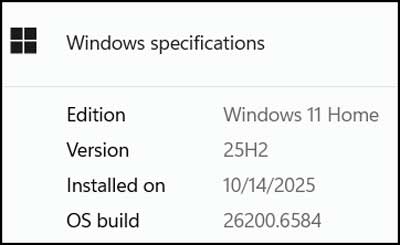
17. Verify the Successful 25H2 Installation
Once you are finally back on your familiar desktop environment, you can then go back to the Windows settings menu to confirm the update applied correctly. Navigate back to System and click on About to view your current system specifications. You should now clearly see that you have 25H2 listed for your currently installed version of Windows 11, indicating a completely successful manual upgrade.
Windows 11 25H2 Manual Upgrade FAQ
How long does the 25H2 upgrade take?
The amount of time required for the upgrade heavily depends on your internet speed for the initial ISO download and your internal SSD speed for the actual install. Generally speaking, you should expect the entire process to take anywhere from 45 to 90 minutes. Older machines with much slower hard drives may take considerably longer to unpack and install the massive feature update.
What if I get a “PC does not meet requirements” error?
This frustrating error usually happens if your primary system drive is simply too full to accommodate the temporary installation files. It can also occur if a specific hardware driver is actively being blocked by a Microsoft “Safeguard Hold” for compatibility reasons. Always ensure all your current hardware drivers and BIOS firmware are fully updated before trying to run the setup application again.
Can I go back to 24H2 if I don’t like 25H2?
Yes, you can easily revert the changes if you run into stability issues or simply prefer the older operating system build. Windows automatically keeps a complete backup of your old version in a hidden root folder called Windows.old. You typically have exactly 10 days to go into your Windows Settings, navigate to System, click on Recovery, and seamlessly choose the “Go Back” option to restore your previous state.
For additional training resources, check out our online IT training courses.
Check out our extensive IT book series.


