
Last Updated on May 13, 2026
If you are a Windows 11 user, then you know how often Microsoft likes to change things around as well as add or remove features, sometimes ones we even like! For example, WordPad has been removed from Windows 11 but there are a couple of ways to get WordPad back on your computer.
The Windows Start menu is where you go to find your installed programs, as well as where you can go to log off, shut down and reboot your computer. There have been some subtle changes to the Start menu and you may even find that you have a new section for the Windows Phone Link feature.

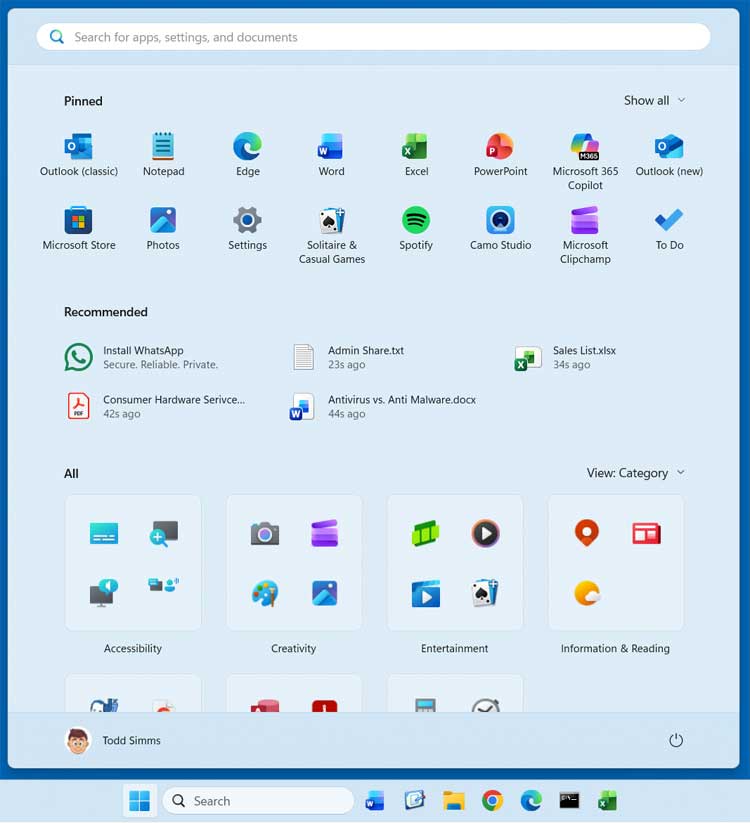
One massive visual change introduced with the Windows 11 25H2 update is that the Start menu now actively categorizes your installed programs, which can also be toggled into a clean grid or a structured list view. Plus, the classic “All” button has been completely removed since you can now view a comprehensive list of all your apps directly at the lower part of the Start menu interface. However, many people are discovering that they are strangely not getting this specific Start menu redesign after upgrading to 25H2. In this helpful article, we will be showing you exactly how to forcibly enable the new updated Start menu in Windows 11 25H2.
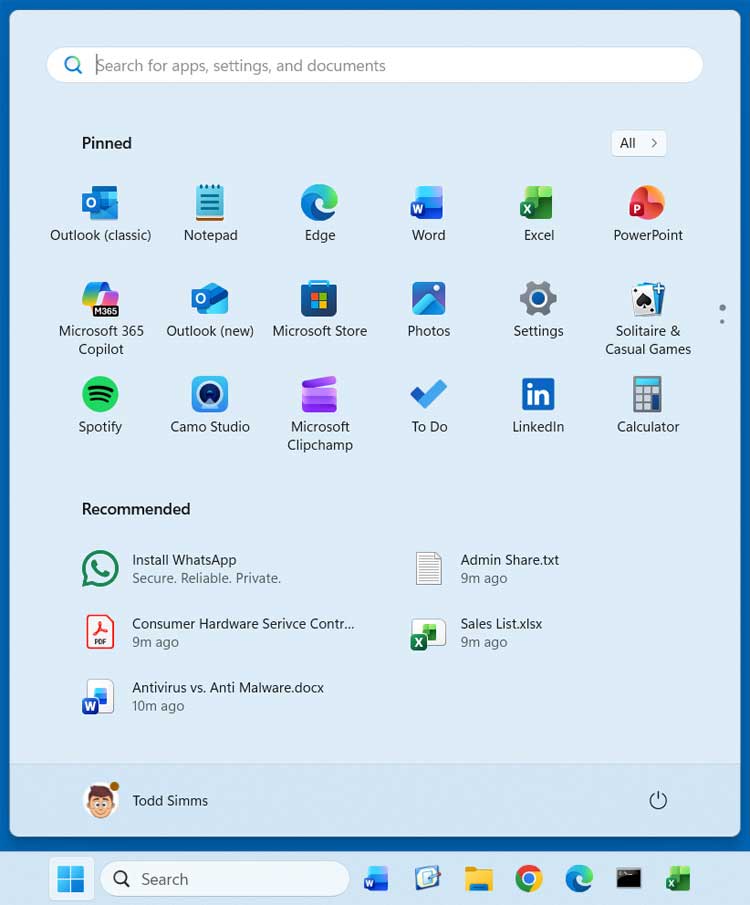
The image provided just below shows the older, classic Windows 11 Start menu layout, which you may still currently have active on your computer. As you can see, it features a prominent search box at the top, the standard All apps button, your manually pinned apps, and also a controversial Recommended section which can be disabled or completely removed if desired.
1. Download and Extract the ViVeTool Utility
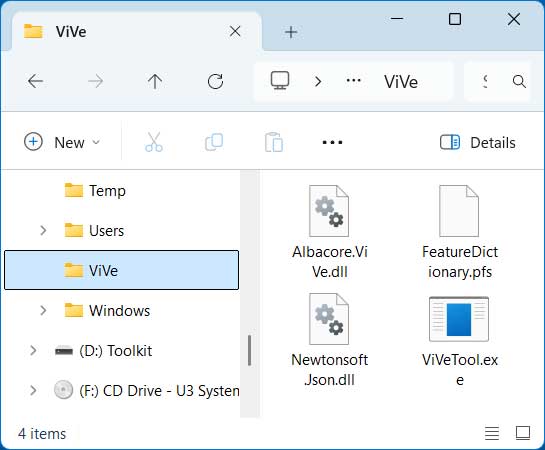
If you want to immediately enable the newly updated Start menu in Windows 11 25H2 without waiting, you essentially have two options. You can either patiently wait until the interface change naturally gets rolled out to your specific computer in a future patch, or you can manually enable it today using the ViVe Tool. The ViVe Tool is a brilliant open‑source command‑line utility originally designed for Windows 10 and 11 that safely lets you enable, disable, or configure hidden and experimental Windows features using their internal Microsoft Feature IDs. To use the ViVe Tool, you will first need to download it directly from its official repository and then carefully extract the downloaded zip file to a dedicated folder on your local hard drive.
2. Locate the Executable File
Once you have successfully extracted the contents of the zip archive, you will see that there is a specific application file called ViVeTool.exe sitting inside the folder. It is very important to understand that this is strictly a command-line utility, meaning it is not something that you can simply double-click on to open a standard graphical program interface. Instead, this specific executable file will need to be explicitly run from an administrative command prompt window in order to properly pass the correct feature ID arguments to your operating system.
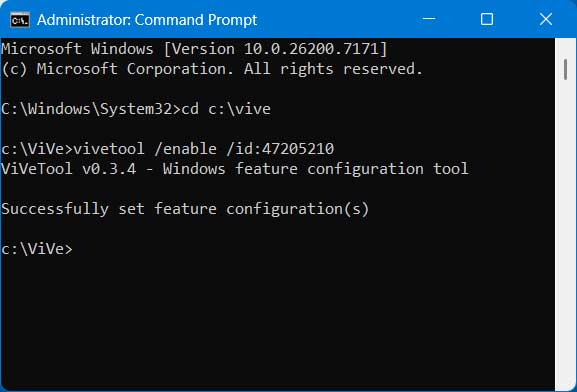
3. Open an Elevated Command Prompt
To properly launch the required command-line environment, you will first need to click on your taskbar search box and type the letters CMD to locate the built-in tool. When the Command Prompt application appears in the search results, be sure to right-click on it and choose the Run as administrator option, or simply click that exact option on the right-hand preview pane. Running this app with elevated administrator privileges is an absolute requirement, otherwise, the system will actively block the ViVe Tool from making the necessary registry-level feature adjustments.
4. Execute the Feature Enable Command
Once your black Command Prompt window is open and actively running as an administrator, you will need to manually navigate your directory path to the exact folder that currently contains your extracted ViVe Tool files. After you have successfully pointed the command prompt to the correct directory, you will need to carefully type in the following command exactly as it appears: vivetool /enable /id:47205210. Pressing the Enter key will run the ViVe Tool and officially enable ID 47205210, which is the specific internal trigger used by Microsoft to enable the categorically updated Windows 11 25H2 Start menu.
5. Reboot Your Computer to Apply Changes
After the command prompt displays a success message stating that the feature configuration was set, the heavy lifting is completely finished, but you will not see the visual changes right away. You will actually need to completely reboot your computer so the Windows Explorer shell can properly restart and load the brand new interface elements into your system cache. Once your machine boots back up and you log into your desktop again, you should instantly see the beautifully categorized new Start menu the very next time you click on the Windows Start button.
6. Revert Back to the Classic Start Menu
If you test out the new categorized layout and ultimately change your mind, you can easily go back to the older, classic Start menu configuration whenever you like. To successfully revert the visual changes, you simply need to repeat the exact same command-line process detailed above, but this time you will use the disable version of the command string instead. Simply type in vivetool /disable /id:47205210 and hit Enter, then reboot your computer one final time to completely restore the factory default menu layout.
7. Understand Forced Microsoft Updates
One crucial thing to keep in mind when actively playing around with these internal Microsoft Feature IDs is that if you disable them and then try to enable them again later, the toggle might not always work as smoothly as expected. And for this specific Start menu redesign, you may easily find that you end up with the newer Start menu layout eventually anyway, even if it is currently disabled via the ViVe Tool. This happens because Microsoft routinely pushes out mandatory background updates, and eventually, this categorized interface will undoubtedly be forced upon all Windows 11 users universally.
For additional training resources, check out our online IT training courses.
Check out our extensive IT book series.


