Last Updated on July 6, 2026
If you use the free Oracle VirtualBox desktop virtualization software, then you know how easy it is to create multiple virtual machines that you can then run simultaneously on your computer. One thing you may find that you need to do is transfer files between your host computer that is running VirtualBox and your guest computers (VMs).
Fortunately, it’s a fairly easy process to do these types of file transfers using built in software tools. We will show you exactly how to use the dedicated VirtualBox File Manager to securely transfer files between your host and guest computers without relying on complicated shared network folders. This native method works perfectly even if your virtual machine lacks a standard internet connection.

Accessing the VirtualBox File Manager
1. Boot the Target Virtual Machine
To begin the actual transfer process, you will absolutely need to have the virtual machine running actively on your screen. You simply cannot transfer files to a completely powered off or suspended guest operating system. Boot the target virtual machine to the standard desktop and wait for all the background services to load.
2. Launch the File Manager Tool
Look directly at the top menu bar from your active VM console screen. Go straight to the Machine menu and then choose File Manager from the drop down list. This action immediately opens a dedicated file management window completely separate from your active virtual desktop.
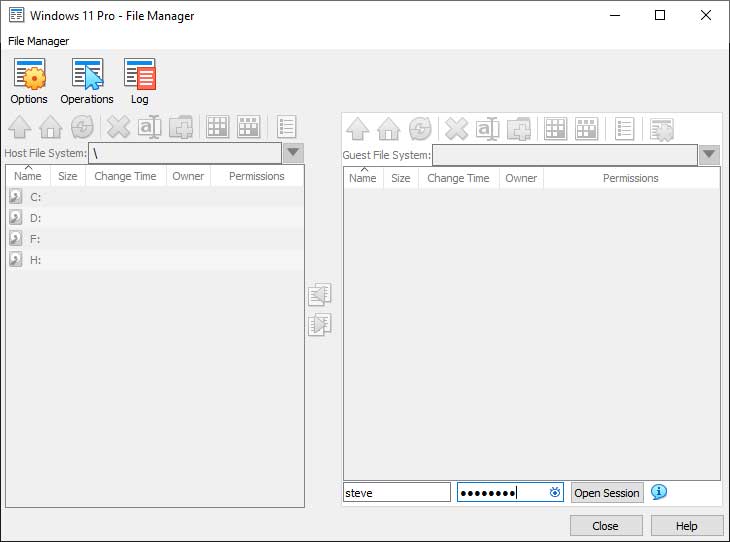
3. Authenticate the Guest Session
Look closely at the bottom right corner of the newly opened file manager window. You will need to put in the exact username and password for a valid user account residing on the virtual machine itself. Do not use the specific login credentials you use on your physical host computer. Click directly on the Open Session button once you securely enter the local VM name and password.
Navigating the File Transfer Interface
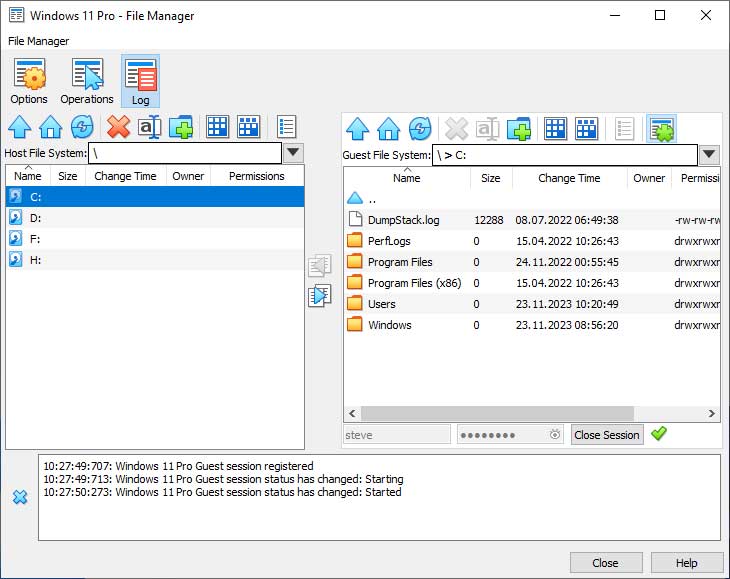
1. Understand the Dual Pane Layout
Now you will be explicitly shown the physical drives from your host computer sitting completely within the left pane. The virtual drives from your running guest VM will simultaneously populate on the right pane. You can then simply double click any of these specific drives to instantly see the files and folders contained within them.
2. Navigate Your Directory Structures
You can explicitly use the blue up arrow button to take you up to the prior folder directory. This makes it incredibly easy if you simply need to go back a single step. Clicking on the Home button will instantly jump you straight to the active user folder. This works perfectly for the exact user logged in on your host computer or the specific account used to make the VM connection (C:\users\username).
3. Manage Your Local and Virtual Files
The red X button is explicitly used to permanently delete your currently selected files or folders. You can also easily rename files using the rename button or create entirely new folders using the folder button with the green plus sign on it. The other interface buttons can be used to safely execute commands such as select all, invert selection, and display detailed properties for a specific file.
4. Configure Advanced File Options
Clicking on the Options button at the very top of the window will give you crucial additional configuration choices. These specific toggle boxes will immediately appear directly at the bottom of the screen. You can actively force the software to ask before executing a delete command or reveal hidden system objects.

5. Toggle Background Process Panes
The Operations and Log buttons will instantly toggle these specific information panes on and off right at the bottom of the screen. Leaving them visible helps you actively track massive file transfers between the entirely separate physical and virtual drives.
Executing the File Transfer Process
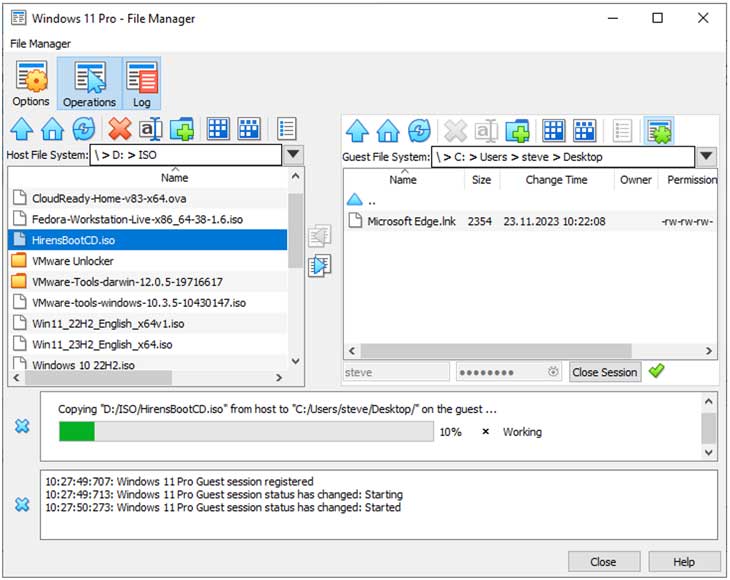
1. Move Files Between Environments
To copy files or folders over from one computer to the other, you simply need to highlight the target data. Select one or more files from either your physical host or your active virtual machine. Click the blue directional arrow button sitting right in the middle to start instantly copying those files over to the other computer.
2. Terminate the Active File Session
Once you are completely finished with your file transfers, you can simply click on the Close button to end the active session. This securely locks down the bridge between the two operating systems. You can also make absolutely sure that your standard VirtualBox copy and paste functionality is enabled for easy host to VM text copying in the future.
For additional training resources, check out our online IT training courses.
Check out our extensive IT book series.