Last Updated on May 20, 2026
When it comes to creating bootable flash drives to do things such as install operating systems such as Windows or Linux or even make flash drives for system recovery tools such as Hiren’s Boot CD or Medicat, Rufus is the go-to app to use for this purpose.
Without a tool such as Rufus, you would not have a way to create bootable USB flash drives to use with your ISO image files. Of course there are other bootable USB flash drive creator tools, but Rufus tends to be the most popular.

Getting Started with Rufus Version 4.14x
1. Choose Your Rufus Version
Starting with version 4.14, the developers of Rufus have added some additional features that can be used when creating your USB flash drive to install Windows 11. Rufus is available as an installable app or as a portable version, and both work exactly the same way. To use the portable version, you simply install the file that has the letter P on the end such as rufus-4.14p.exe.
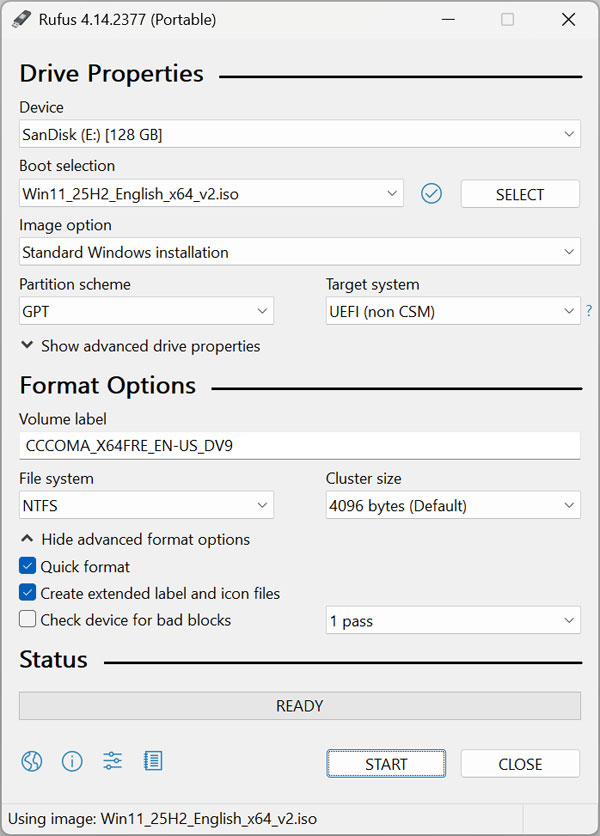
2. Configure the Main Screen
When you open Rufus, you will see that the new version looks identical to previous versions. Then once you choose your USB flash drive and ISO image file, you can configure any additional options from the main screen. The base interface remains entirely familiar to veteran system administrators.
Exploring the Windows User Experience Dialog
1. Access the Customization Options
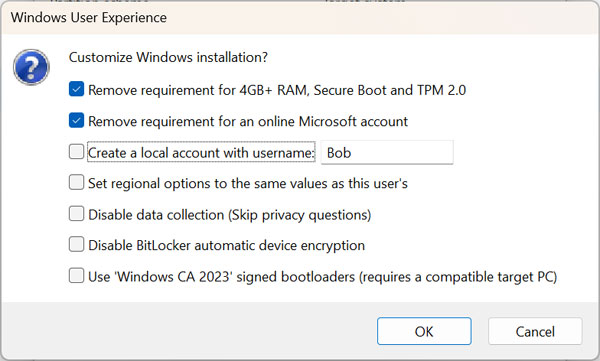
Once you click the Start button, you will see the available options that can be configured in the Windows User Experience section. The image below shows the choices from the previous version of Rufus. You can clearly see the older menu had far fewer automation toggles.
(Image: Windows User Experience options for older Rufus versions)
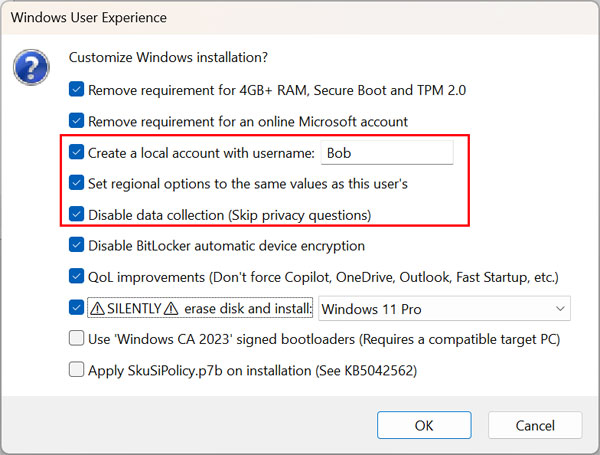
2. Review the New Automation Toggles
When you use the latest version of Rufus, you will see that you have many more options to choose from. One thing to note is that to use the Silently erase and install Windows option, you will also need to check the boxes for Create a local account with the username, Set regional options to the same values as this user’s and Disable data collection (Skip privacy questions). The software strictly requires these specific dependencies to execute a zero touch installation.
When you use the latest version of Rufus, you will see that you have many more options to choose from. One thing to note is that to use the Silently erase and install Windows option, you will also need to check the boxes for Create a local account with the username, Set regional options to the same values as this user’s and Disable data collection (Skip privacy questions).
1. Bypass Hardware Restrictions
Remove requirement for 4GB+ RAM, Secure Boot and TPM 2.0: Bypasses hardware restrictions so Windows 11 can be installed on older or “unsupported” computers. This specific feature saves perfectly good hardware from ending up in a landfill. You can confidently upgrade legacy machines without triggering Microsoft block screens.
2. Skip the Online Account Requirement
Remove requirement for an online Microsoft account: Allows you to set up Windows without being forced to sign in to a Microsoft account or connect to the internet during installation. Local accounts give you ultimate control over your own privacy. You never have to hand your personal data over to cloud servers just to reach your desktop.
3. Automate Local Account Creation
Create a local account with username: Automatically creates a user account for you (e.g., “Robert”) so you can skip the account creation screens. The utility builds the administrative profile in the background during the initial setup phase. This completely eliminates the need to type out user credentials on a fresh install.
4. Clone Your Regional Settings
Set regional options to the same values as this user’s: Automatically applies your current time zone, keyboard layout, and language settings to the new installation. The software pulls these exact variables straight from your host machine. You skip all those tedious geographic selection menus entirely.
5. Disable Invasive Data Collection
Disable data collection (Skip privacy questions): Automatically answers “No” or “Disable” to all the privacy invasive questions (location tracking, advertising ID, etc.) that usually pop up at the end of setup. Telemetry gathering drains system resources and compromises your data. This toggle locks down your operating system before it ever connects to the internet.
6. Prevent Automatic Drive Encryption
Disable BitLocker automatic device encryption: Prevents Windows from automatically encrypting your drive, which can be helpful if you want to avoid recovery key headaches later. Microsoft aggressively pushes silent encryption on modern hardware setups. Disabling this feature ensures you never lose data due to a missing BitLocker key.
7. Apply Quality of Life Improvements
[NEW] QoL improvements: A “Quality of Life” toggle that prevents Microsoft from forcing apps like Copilot, OneDrive, and Outlook onto your system. It also disables Fast Startup, which can help with dual-booting or system stability. Stripping out forced bloatware keeps your computer running significantly faster.
8. Enable Silent Disk Erasure
[NEW] SILENTLY erase disk and install: This is a fully automated mode. If checked, the installer will automatically wipe your hard drive and install the selected version of Windows without asking for any user input. This true zero touch deployment saves IT departments hundreds of hours.
9. Secure the Boot Process
Use ‘Windows CA 2023’ signed bootloaders: Updated security support to ensure the bootable USB works on the very latest 2024 to 2026 hardware that requires modern digital signatures. Old bootloaders trigger fatal security errors on brand new motherboards. Checking this box guarantees maximum compatibility with current generation processors.
10. Configure Secured Core PCs
[NEW] Apply SkuSiPolicy.p7b on installation: A specialized technical feature that applies specific Microsoft security policies (KB5042562) to the installation, primarily used for better compatibility with “Secured-core” PCs. Enterprise environments rely on these strict firmware policies to block rootkits. Home users rarely need to touch this specific advanced setting.
Hardware Limitations for the Silent Install Feature
1. Understand New Feature Bugs
At the time of this writing, these options are brand new and the process to silently erase your disk and install Windows may not work correctly on every machine. This automated process can be heavily affected by your specific hardware configuration. Minor firmware conflicts easily derail zero touch deployment tasks.
2. Identify Storage Controller Conflicts
For example, if you are installing on unsupported hardware, or your computer uses a very specific RAID controller or Intel VMD that Windows doesn’t recognize out of the box, the silent install will fail. This happens because the installer won’t naturally “see” any disks to erase without manual driver intervention. You must inject those missing storage drivers into the ISO file manually before running Rufus.
For additional training resources, check out our online IT training courses.
Check out our extensive IT book series.