Last Updated on August 15, 2026
When network issues strike, knowing how to diagnose the connection quickly saves hours of trial and error. Whether a local file share becomes unreachable, a remote server rejects incoming traffic, or a workstation loses internet access completely, Windows includes powerful built-in tools to help you pinpoint the root cause. While legacy Command Prompt utilities have been the standard for decades, modern IT environments demand more flexibility and automation than simple text output can provide.
PowerShell networking cmdlets provide a modern, object-oriented way to inspect network adapters, verify router communication, test open TCP ports, and audit active connections. Unlike older command-line tools, PowerShell outputs structured objects that you can filter, sort, and pipe directly into scripts or log files. This guide covers five essential PowerShell networking cmdlets: Get-NetIPConfiguration, Test-NetConnection, Test-Connection, Resolve-DnsName, and Get-NetTCPConnection. You will learn what each command does, how to use optional switches, and how to interpret real-world diagnostic output.

Get-NetIPConfiguration: Local Network Interface Auditing
1. The Modern ipconfig Replacement
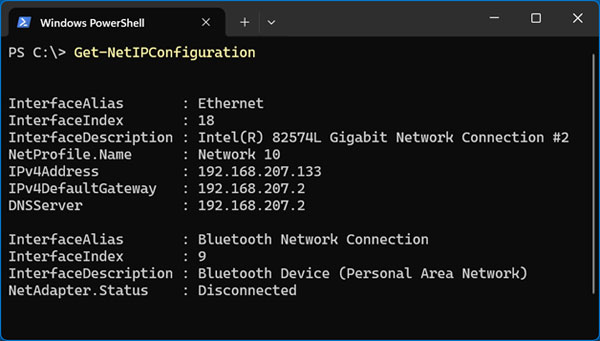
The Get-NetIPConfiguration cmdlet serves as the modern replacement for the legacy ipconfig tool. It queries your operating system network stack to report active IP addresses, subnet routing, default gateways, and configured DNS servers for your network adapters in a clean, organized summary.
2. View Baseline Network Settings
Running Get-NetIPConfiguration by itself immediately displays your primary connected network interfaces. Unlike legacy ipconfig, which separates DNS server listings into a separate command switch, Get-NetIPConfiguration automatically groups the assigned DNS servers and default gateways directly underneath each corresponding network adapter.
3. Identify Gateway Issues
When reviewing your adapter configuration, always check the default gateway and assigned IPv4 address. If the IPv4DefaultGateway field is completely blank, your computer cannot route traffic outside the local network segment to reach the internet.
4. Spot an APIPA Address
If the IPv4 address begins with 169.254, the computer failed to communicate with a DHCP server on the local network. It assigned itself a fallback APIPA address that cannot access the internet. You will need to manually renew the lease or check your router settings.
5. Display Detailed Adapter Information
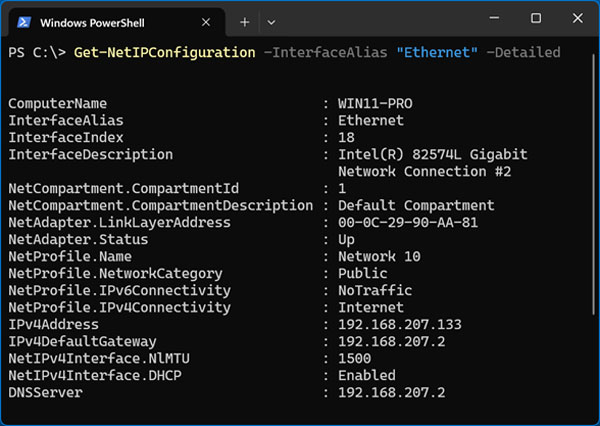
To view hardware-level adapter settings, add the -Detailed parameter. This displays the physical MAC address, network category, MTU packet limits, and DHCP lease status. This is incredibly useful for deep dive troubleshooting.
6. Target Specific Network Interfaces
If your system has multiple active physical or virtual adapters, you can isolate output for a specific network card using the -InterfaceAlias parameter. You can pass any valid adapter name such as “Ethernet”, “Wi-Fi”, or a custom virtual switch name. To list disconnected or hidden network interfaces alongside active ones, add the -All switch.
Test-NetConnection: TCP Port and Route Testing
1. The PowerShell Swiss Army Knife
The Test-NetConnection cmdlet is often called the network Swiss Army knife of PowerShell. It combines ICMP ping testing, hop-by-hop route tracing, and remote TCP port verification into a single command. It completely eliminates the need to install Telnet or third-party port scanners just to check if a firewall is blocking network traffic.
2. Test Remote TCP Port Access
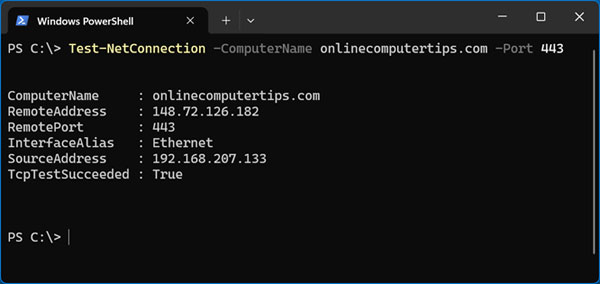
To test whether a remote server or web application is accepting traffic on a specific port, specify the target destination with -ComputerName and the port number with -Port. The -ComputerName parameter accepts website domain names, public IP addresses, local network IP addresses, or local Windows hostnames.
3. Read the TcpTestSucceeded Result
Pay close attention to the TcpTestSucceeded line in the results. If it says True, the destination host is online, the application service is listening, and all firewalls along the path are permitting traffic. If it says False, the host is down, the target service is not running, or a local or perimeter firewall is dropping the packets.
4. Use Built-In Common Port Shortcuts
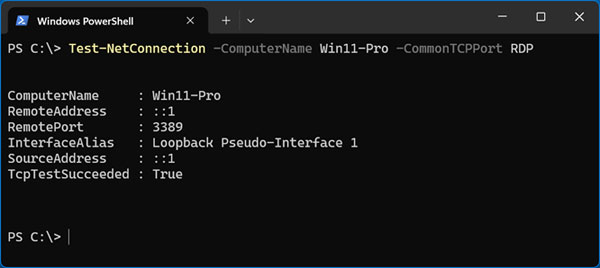
Instead of having to memorize standard port numbers, PowerShell provides the -CommonTCPPort parameter. This switch includes built-in shortcuts for widely used enterprise protocols. Use HTTP for port 80, HTTPS for port 443, RDP for port 3389, and SMB for port 445.
5. Trace Network Packet Paths
You can also use Test-NetConnection to perform an automated route trace to any remote destination by adding the -TraceRoute parameter. PowerShell will verify basic reachability and then list every intermediate router hop along the path. For example, you can run Test-NetConnection -ComputerName 8.8.8.8 -TraceRoute to map the exact path to Google’s public DNS servers.
Test-Connection: Structured Ping Diagnostics
1. The Modern Ping Command
The Test-Connection cmdlet sends ICMP Echo Request packets to test host reachability, round-trip latency, and packet loss. While legacy ping.exe prints text lines directly to the screen, Test-Connection outputs structured PowerShell objects that can be sorted, measured, or exported to CSV files for long-term network monitoring.
2. Send Multiple Echo Requests
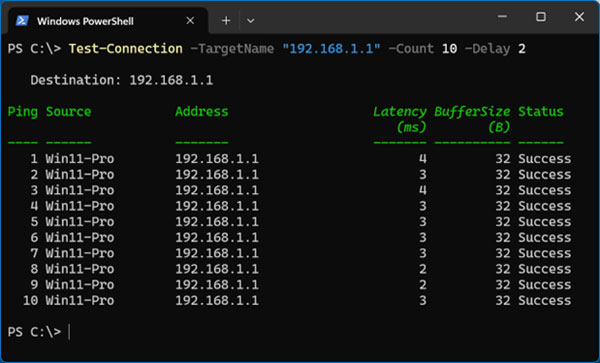
By default, Windows ping sends four rapid packets. With Test-Connection, you can use -Count to define the exact number of echo requests. You can also use -Delay to set the pause interval in seconds between each packet. This makes it easy to monitor connection stability while restarting routers or reseating cables.
3. Ping Multiple Targets Simultaneously
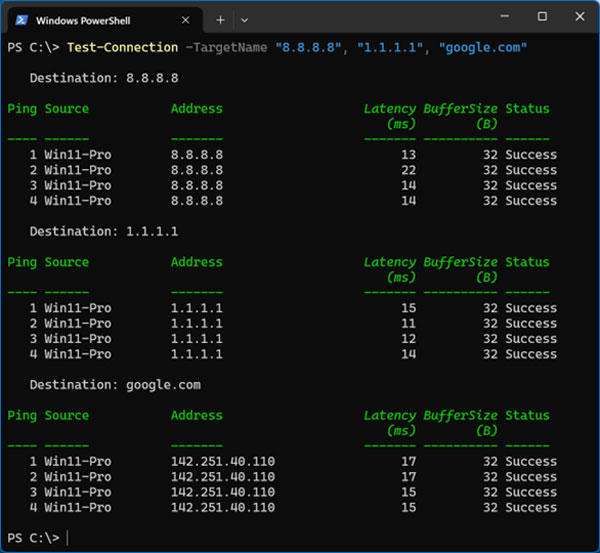
You can pass a comma-separated list of IP addresses and domain names into a single command. PowerShell will cycle through every host sequentially and output clean response tables for each destination. This is much faster than running multiple individual ping tests.
4. Understand Parameter Differences
When using Test-Connection, keep in mind that the parameter name for the target destination depends on your PowerShell version. Windows PowerShell 5.1 uses the parameter name -ComputerName. PowerShell 7+ uses the parameter name -TargetName. You can omit the parameter name completely to ensure your command runs across all PowerShell versions without error.
5. Fast Script Automation
If you are writing an automated diagnostic script, you can use the -Quiet parameter. This suppresses table output and returns a simple boolean value based on whether the destination responds. For example, running Test-Connection -ComputerName “192.168.1.1” -Quiet returns a clean True or False for your script to process.
Resolve-DnsName: DNS Record Inspection
1. The Modern NSlookup Replacement
The Resolve-DnsName cmdlet replaces the older nslookup utility. It communicates directly with Domain Name System servers to resolve hostnames to IP addresses, perform reverse lookups, and query public DNS records.
2. Forward DNS Resolution
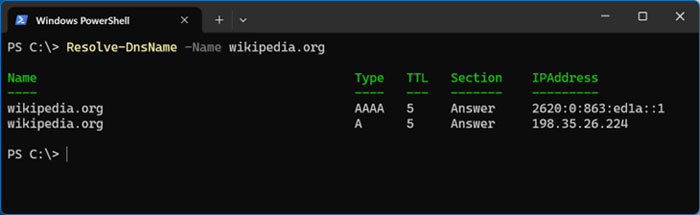
Running Resolve-DnsName against a domain name returns its active A (IPv4) and AAAA (IPv6) address mappings. The output includes the record type, section status, and the Time To Live value in seconds. This TTL shows exactly how long the record will remain cached locally before requesting an update.
3. Query Specific DNS Record Types
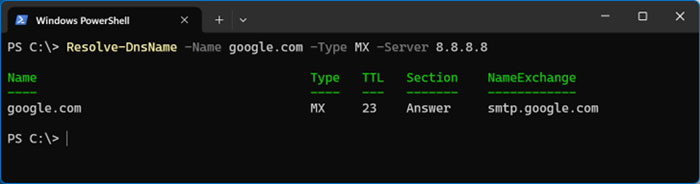
You can filter queries for specific DNS record types using the -Type parameter. This includes MX (Mail Exchanger), TXT (SPF and DKIM email security), CNAME (Aliases), and NS (Name Servers).
4. Query External Servers
To verify if DNS changes have propagated globally or to test if your local DNS server is malfunctioning, use the -Server parameter. This routes the query through an external DNS resolver such as Google at 8.8.8.8 or Cloudflare at 1.1.1.1.
5. Perform Reverse DNS Lookups
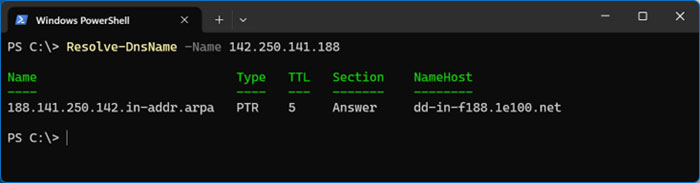
If you encounter an unfamiliar IP address in your firewall logs or active connection tables, you can perform a reverse DNS lookup by passing the IP address into the -Name parameter. This reveals the actual hostname tied to that specific IP address.
Get-NetTCPConnection: Active Sockets and Port Auditing
1. The Modern Netstat Replacement
The Get-NetTCPConnection cmdlet replaces the legacy netstat tool. It provides real-time visibility into all active TCP sockets, open listening ports, remote connections, and owning Process IDs.
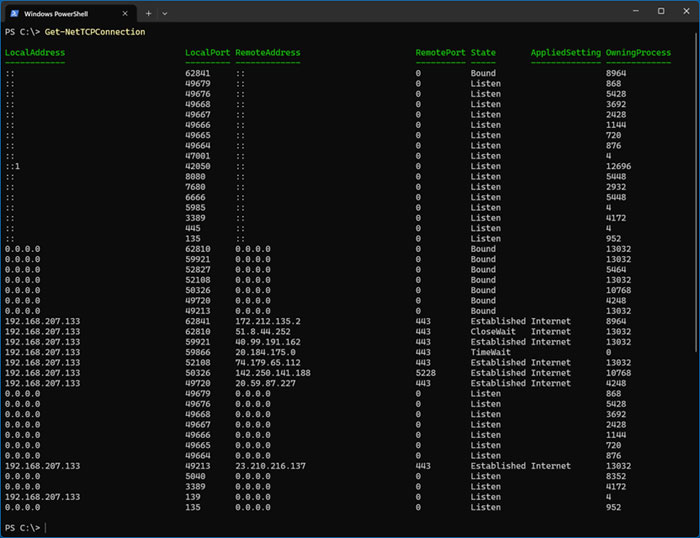
(Image: Auditing active TCP connections, local addresses, remote addresses, socket states, and Process IDs.)
2. Audit Active Network Sockets
Running Get-NetTCPConnection lists every TCP socket along with its operational state. Listen means a local service is waiting for incoming network traffic. Established means an active data stream is connected. TimeWait means sockets are finalizing termination. Bound means an application has reserved a socket exclusively.
3. Filter by Connection State
To view all background applications listening for inbound traffic, filter using the -State parameter. Running Get-NetTCPConnection -State Listen instantly filters out the noise and shows only the open ports waiting for connections.
4. Inspect Specific Local Ports
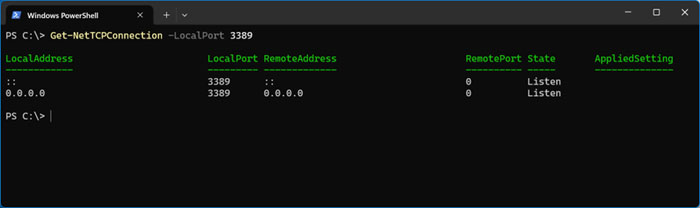
Use the -LocalPort parameter to check ports that your local machine is hosting or listening on. This is perfect for verifying if port 3389 is open for Remote Desktop or port 135 is open for Windows RPC.
5. Inspect Specific Remote Ports
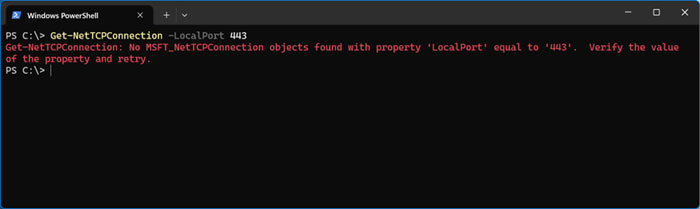
Use the -RemotePort parameter to inspect outbound connections to remote servers. This is useful for checking port 443 for HTTPS web browsing or port 80 for standard HTTP traffic. If you query a port that currently has zero active connections, PowerShell returns an error stating that no matching objects were found.
6. Link Connections to Process Names
With legacy netstat, you only see a numerical Process ID and must open Windows Task Manager to match the ID with a running application. In PowerShell, you can pipe Get-NetTCPConnection directly into Get-Process to print the executable name alongside each active connection. This single command cross-references every live network connection with the exact background executable responsible for creating it.
7. Master PowerShell Networking
Mastering these five cmdlets transforms how you approach Windows network troubleshooting. Ditching the old command prompt tools in favor of PowerShell gives you deeper insights and much cleaner data. You can easily script these commands to monitor server health automatically. Start integrating them into your daily workflow to solve connectivity issues faster than ever.
Check out our free PowerShell training course on YouTube.
You might also want to check out our article on the 5 essential networking commands using the standard Windows command prompt.
For additional training resources, check out our online IT training courses.
Check out our extensive IT book series.