
Last Updated on May 21, 2026
PC troubleshooting is a very common practice for many computer users, especially if you are running Microsoft Windows. For those who prefer to fix their computers themselves and not pay someone to do it for them, there are plenty of troubleshooting tools available to use for free. These tools can come in handy if you are helping others on their computers as well.
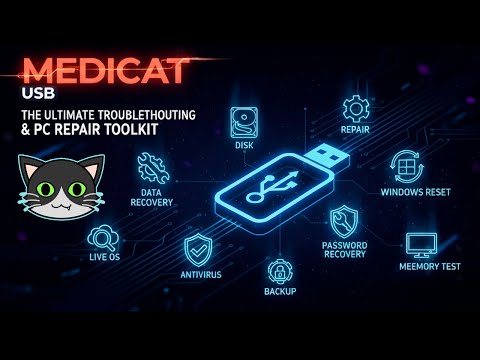
One powerful and popular troubleshooting tool is called Medicat. It’s a toolkit that contains a large variety of tools for thing such as general repair tools, disk and boot tools, antivirus and malware scanners, password recovery, hardware diagnostics, OS recovery, backup, hard drive partitioning, booting into live operating systems, windows resets and more. In this article, we will be discussing Medicat USB, the ultimate portable PC repair toolkit.
1. Download the Medicat USB Installation Files
In order to actually use Medicat, you will first need to download the official Medicat USB installation files directly from their website here. Then you will need to actively create a bootable USB flash drive using the provided installation file. There are various operating system versions available to use depending on your machine, but we will be specifically using the Windows version for our example today.
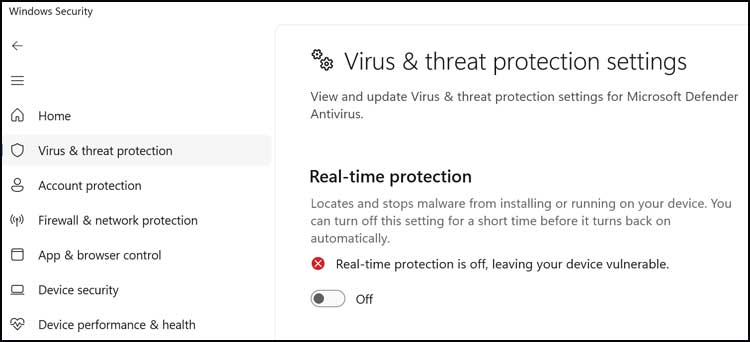
2. Disable Microsoft Defender Real-Time Protection
One crucial thing you really should do before creating the Medicat USB drive is disable the Microsoft Defender real-time protection from your built-in Windows Security app. Because Medicat uses powerful low-level system tools, Windows will often falsely flag the installer as a virus and delete the files before you can finish. Just be absolutely sure to enable it again once you are completely done making your flash drive to keep your PC secure.
3. Run the Medicat Installer Batch File
The specific file we previously downloaded to safely install Medicat on our USB drive is a batch script called Medicat_Installer.bat. You will need to carefully right-click on the Medicat_Installer.bat file and specifically choose the “Run as Administrator” option from the context menu. You will then need to click on Yes at the UAC prompt, so you must be logged into an administrator account on the computer to use this tool properly.
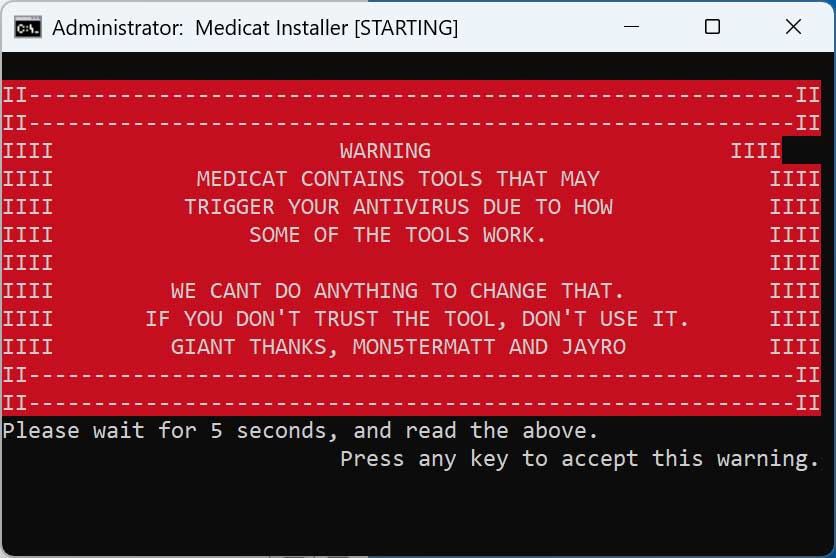
4. Acknowledge the Antivirus Warning Prompt
Once the black command terminal opens, you will immediately see a bright red warning block explicitly telling you that the tools used on this flash drive can easily trigger your antivirus program. This is exactly why you should proactively disable your security software before starting the installation process. Also, remember that even though Medicat is a highly trusted application used by thousands of IT professionals, it is still a “use at your own risk” tool due to the powerful utilities it contains.
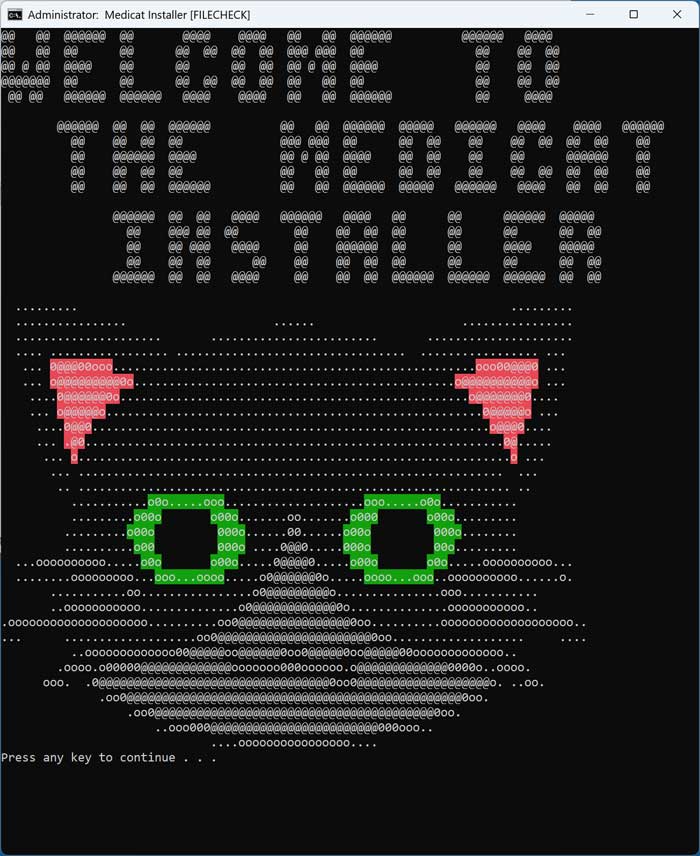
5. Begin the Main Installation Process
After waiting a few mandatory seconds to read the warning, you can press any key on your keyboard to formally accept the disclaimer. The background installer script will then automatically reach out to the internet and download the initial core files needed for the main installation. You can then simply press the Enter key at the main ASCII art Medicat screen to finally begin the primary installation process.
6. Accept the Software License Agreement
Before the software allows you to write anything to your connected drives, it requires a formal agreement to its usage terms. You will quickly be presented with a wall of text outlining the tool’s acceptable use policies. You will simply need to accept the standard software license agreement by pressing any key on your keyboard to move forward to the graphical interface.
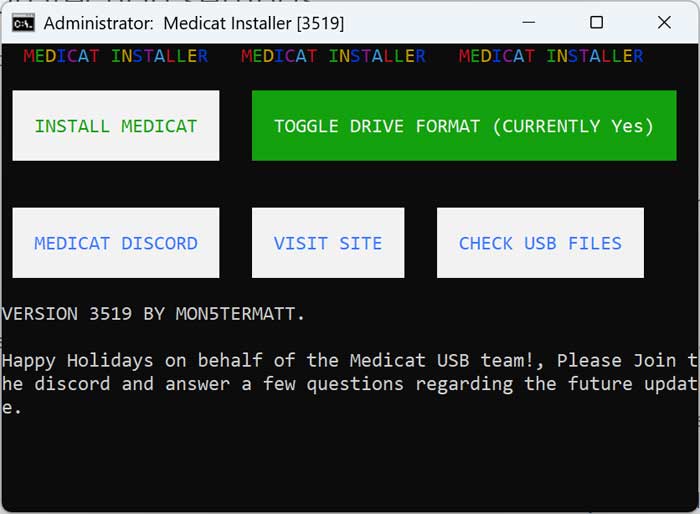
7. Click the Install Medicat Button
After bypassing the text-based terminal screens, a new graphical window with brightly colored buttons will pop up on your desktop. On this next screen, you will carefully want to click the specific button labeled “Install Medicat” on the left side. This action will actively begin preparing the utility to download the massive amount of files needed to create the bootable Medicat USB drive.
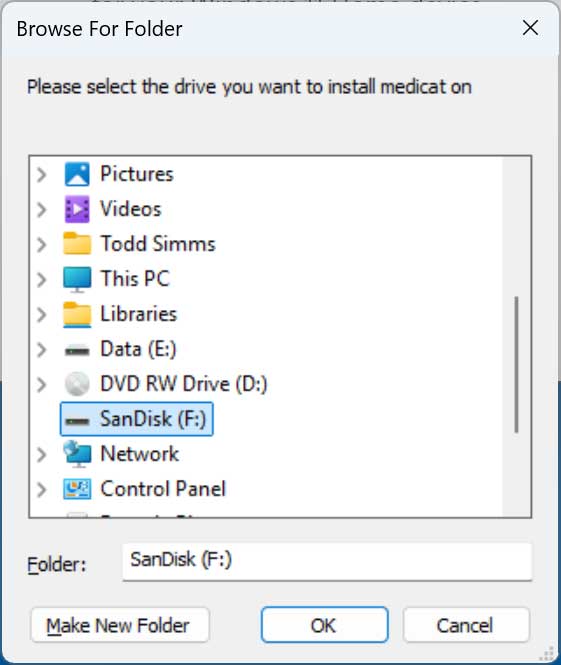
8. Select Your Target USB Flash Drive
Then you will be presented with a standard Windows folder browser where you need to select the specific flash drive you want to use to continue. You must be extremely careful during this critical step to highlight the exact USB thumb drive you plugged in for this project. Just make absolutely sure you select the correct one, because all of the existing data currently sitting on that selected drive will be permanently erased during formatting.
9. Confirm the Target Drive Letter
After making your selection in the folder menu, you will be kicked back to the black command prompt terminal. You will then need to type a confirmation to verify that you have successfully selected the correct drive letter to securely install Medicat on. If you realize you accidentally chose the incorrect drive, you will have the convenient opportunity here to manually type in the correct drive letter to fix the mistake.
10. Choose GPT and Secure Boot Options
You will then be prompted by the terminal to decide if you actively want to use the modern GPT partition style or not. You should definitely type and select “Yes” for this prompt unless you are planning to use this drive on a very old, legacy computer that specifically does not support it. Next, it will ask if you want to use Secure Boot compatibility, and you should highly consider selecting “Yes” for this crucial option as well.
11. Confirm the Ventoy Installation
Next, the Medicat script will automatically install a popular multi-boot tool called Ventoy directly onto the formatted flash drive. Ventoy is the underlying software engine that allows the USB drive to seamlessly boot multiple different ISO files without constantly reformatting. Once again, you will be prompted by the system to explicitly confirm that you are using the correct drive letter before it writes this boot partition.
12. Proceed to Download the Medicat Files
Unless you have previously downloaded the massive Medicat asset files manually from another location, the script will notice that your local folder is currently empty. You will clearly see a terminal prompt explicitly telling you that the system “could not find the Medicat files” locally. You will simply need to click the green “YES” button on the screen to tell the installer to fetch them from the internet for you.

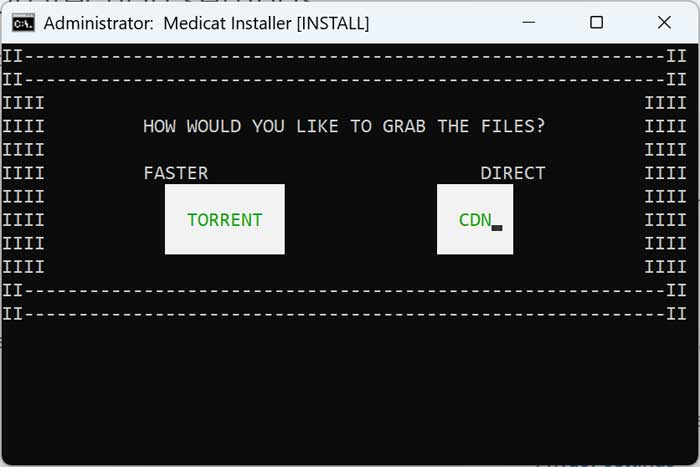
13. Choose the Torrent Download Method
Here you will finally have the option to download the massive tool repository either as a peer-to-peer torrent or as a CDN (Content Delivery Network) direct download. Because of the enormous file size and server bandwidth limits, many times the direct CDN method will completely fail halfway through the transfer. Due to this high failure rate, you will almost certainly want to use the much more reliable Torrent method to grab the files.
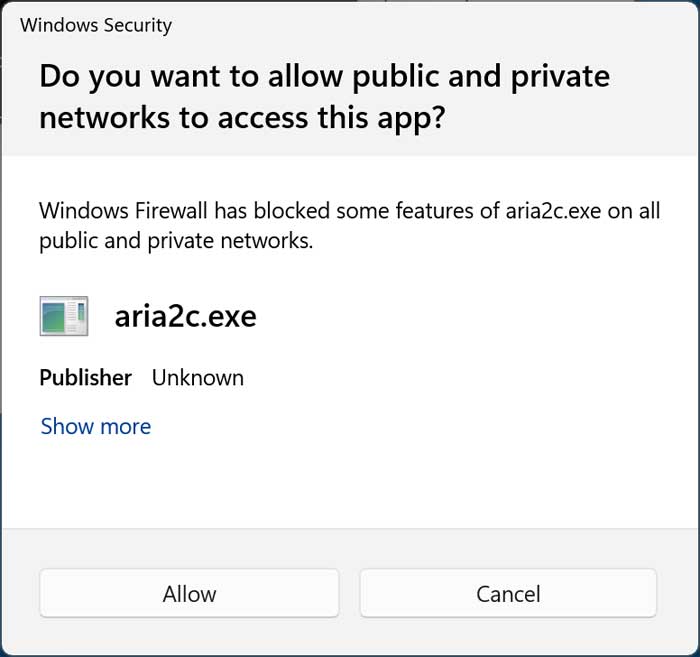
14. Allow the Application Through Your Firewall
If you smartly choose the torrent method as recommended, a small background application called aria2c.exe will attempt to manage the peer-to-peer download process. Because it behaves like a torrent client, you will quickly get a Windows Security popup warning you about the connection request. You will need to explicitly click “Allow” to grant the aria2c.exe application access through the strict Windows Firewall to actually continue downloading the data.
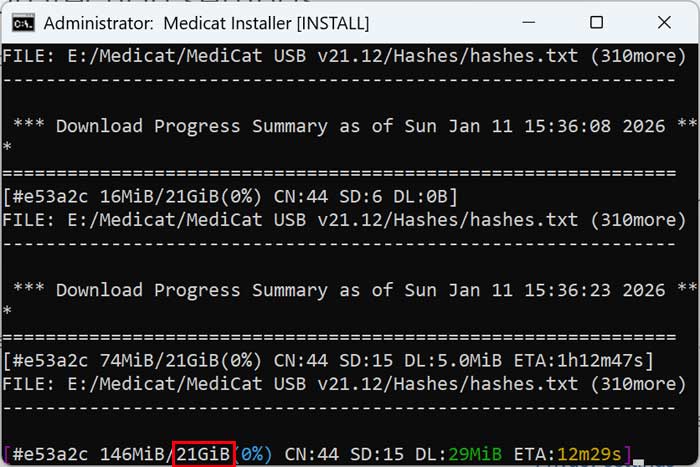
15. Wait for the Massive File Download
The overall Medicat download process will unfortunately take quite a bit of time to complete, depending heavily on your personal internet connection speeds. This is entirely expected, since the script will most likely need to download well over 20GB of compressed files directly onto your flash drive. Just leave the black terminal window open and let your computer sit idle until the status bar finally reaches 100 percent.
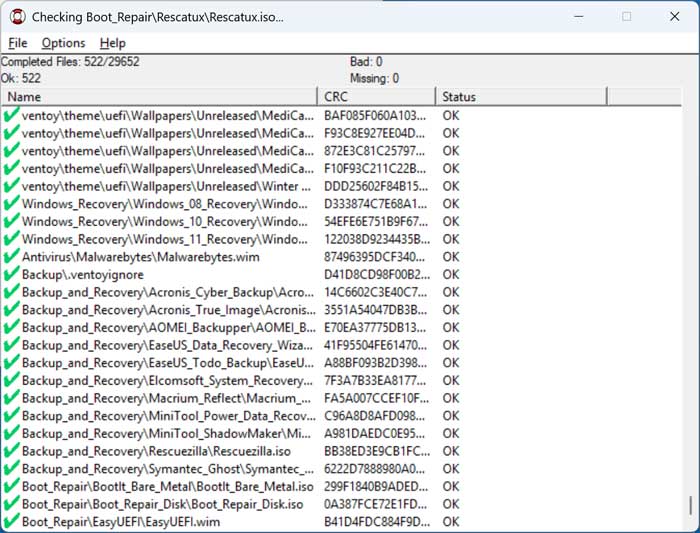
16. Complete the Installation and Check Files
When the lengthy installation and extraction process is fully complete, the terminal will prompt you to press any key to safely exit the script. You will then most likely see another small graphical window pop up that begins systematically checking the hashes of the tools that were just installed. This verification process ensures that none of the files were corrupted during the massive torrent download, guaranteeing your toolkit will function perfectly.
17. Boot Your Computer from the Medicat USB
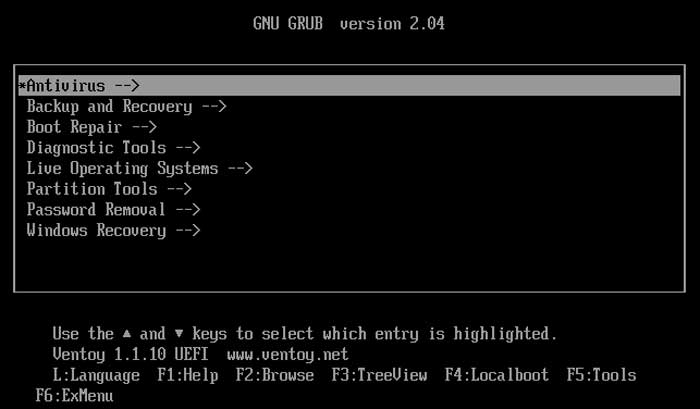
To actually use the completed Medicat USB toolkit in a real-world scenario, you will need to configure your computer’s BIOS or UEFI settings to boot directly from the flash drive rather than the internal OS hard drive. Once your system bypasses Windows and successfully loads the Medicat environment, you will be greeted by a gorgeous, highly visual interface. You will clearly see all of the available software tools categorized and separated into various logical menus.
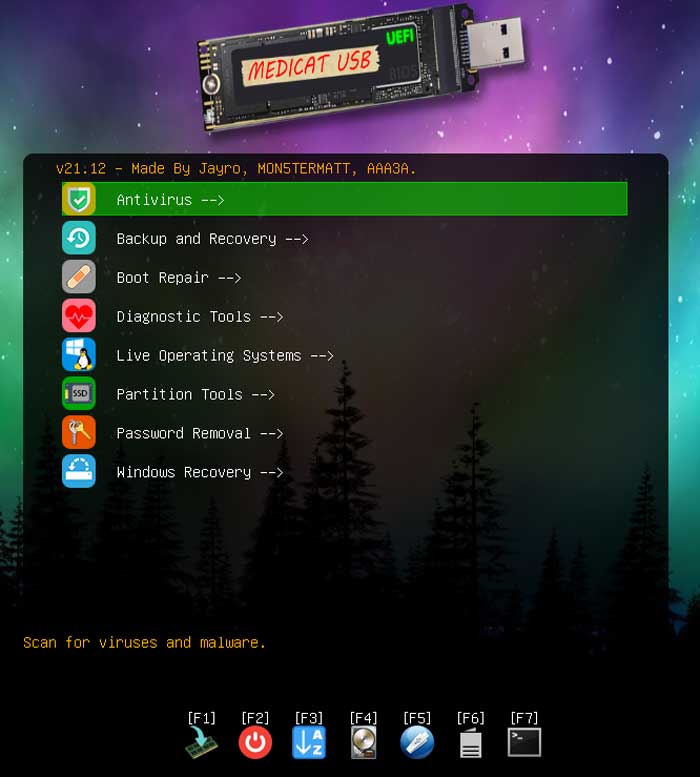
18. Navigate the Available Boot Tools
The main interface makes finding the exact utility you need incredibly simple and straightforward. For example, if we were having startup problems and decided to go into the “Boot Repair” category, we would instantly see a list of tools specifically related to fixing that exact category of errors. You can then simply use your keyboard arrows or mouse to select that specific tool to instantly launch it into memory.
19. Access Antivirus and Backup Recovery Tools
The toolkit is absolutely packed with industry-standard software across multiple different troubleshooting disciplines. If you need to heavily scan an infected system for malware, the toolkit includes Malwarebytes Bootable for deep virus removal. For backup and recovery situations, you are heavily covered with enterprise-grade options like Acronis Cyber Backup, Acronis True Image, and AOMEI Backupper. You also have instant access to EaseUS Data Recovery Wizard, EaseUS Todo backup, Elcomsoft System Recovery, Macrium Reflect, MiniTool Power Data Recovery, MiniTool ShadowMaker, Rescuezilla, and Symantec Ghost.
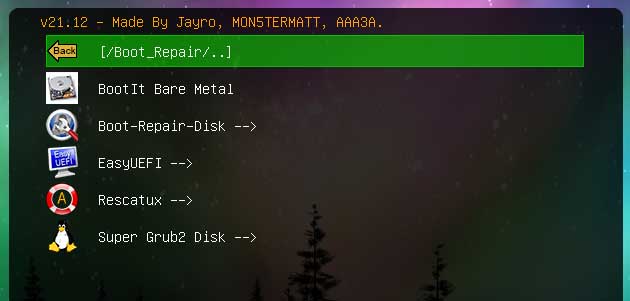
20. Utilize Boot Repair and Diagnostic Tools
When dealing with a machine that simply refuses to load Windows, the Boot Repair category is an absolute lifesaver. It offers powerful recovery utilities like BootIt Bare Metal, Boot-Repair-Disk, EasyUEFI, Rescatux, and the incredibly popular Super Grub2 Disk. Additionally, if you need to deeply test failing hardware components, the Diagnostic Tools section is packed with stress-testing utilities such as HDAT2, PassMark MemTest86, MemTest86+, Sprinrite, and the Ultimate Boot CD to ensure your RAM and hard drives are functioning properly.
21. Run Live Operating Systems and Partition Tools
If you simply need a clean, secure environment to confidently work from, the Live Operating Systems menu allows you to seamlessly boot right into Active@ Data Studio, Mini Windows 10, or SystemRescue without touching the internal hard drive. When you need to aggressively manage your storage volumes, the Partition Tools section provides full access to Acronis Disk Director, AOMEI Partition Assistant, DiskGenius, EaseUS Partition Manager, MiniTool Partition Wizard, Paragon Hard Disk Manager, Parted Magic, and ShredOS.
22. Perform Password Removal and Windows Recovery
For frantic users completely locked out of their local machines, the Password Removal section features Jayro’s Lockpick to easily bypass standard Windows login screens. Finally, if you just need to gently restore your corrupted operating system files, the Windows Recovery menu is perfect. It provides dedicated Microsoft recovery environments built specifically for Windows 8, Windows 10, and Windows 11 architectures.
23. Use the F1 Through F4 Function Keys
At the very bottom of the main Medicat interface, you will find several helpful F-key keyboard shortcuts that you can quickly use for additional troubleshooting functions. Pressing F1 immediately displays helpful text information and deeper details about the boot menu, while F2 lets you manually browse and natively boot files directly from the local disk. You can also press F3 to show a convenient master listing of all the tools in one giant place, or press F4 to completely bypass Medicat and boot normally from the computer’s internal hard drive.
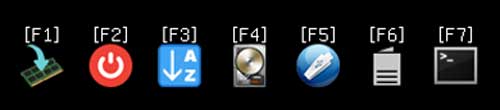
The remaining function keys strategically provide even more advanced backend options for the power user. Pressing F5 will bring up a secondary menu of other miscellaneous backend utilities you can use, while F6 will open up additional boot options for highly custom configurations. Lastly, you can press F7 to instantly switch the entire visual interface between the standard graphical user interface (GUI) and a classic text mode, depending entirely on your personal visual preference
As you can see, the Medicat USB portable PC repair toolkit has just about everything you will need to hopefully fix your computer when you are in a pinch.
For additional training resources, check out our online IT training courses.
Check out our extensive IT book series.


