
Last Updated on July 3, 2026
With today’s extra-large hard drives, many people tend not to be too worried about running out of disk space on their computer. But this can lead to having duplicate files and folders on your computer which can be hard to sort out. You may also be in a situation where you have a backup drive or hard drive from another computer that has similar files on it, and you want to do remove these duplicates to get your space back.
Unfortunately, Windows does not come with a built in method to find duplicate files but there are third party apps out there that can. In this article, we will be showing you how to find duplicate files and then instantly copy, move or delete them.

The program we are going to be using to find these duplicate files is called Fast Duplicate File Finder. They have two versions of the app that you can use. There is a free version that will let you find duplicates and then copy, move or delete them Then there is a Pro version with extra features such as the ability to find files with similar names or attributes as well as the ability to export the results to an XML or CSV report.
Many duplicate file finders on the market rely on checksums to compare files. Since different files can produce the same checksum (a hash collision), these tools may incorrectly identify completely different files as duplicates, potentially leading to data loss.
MindGems Duplicate File Finder is praised for its accuracy, reliability, features and performance because it uses an optimized byte-by-byte comparison to verify file contents, guaranteeing 100% accurate duplicate detection. Continuously developed since 2001, it is regarded as one of the best duplicate file finders on the market and is trusted by millions of users worldwide.
MindGems Duplicate File Finder Test & Performance Benchmark
MindGems Duplicate File Finder has been actively developed since 2001, and that maturity is reflected in its performance, reliability, and extensive feature set. To evaluate its speed, stability, and accuracy, I tested the software on a real-world Windows system containing more than 1.3 million files.
Performance & Stability
Test Environment
| Component | Specification |
|---|---|
| Operating System | Windows 11 Pro 24H2 (64-bit) |
| CPU | Intel Core i7-14700K |
| Memory | 32 GB DDR5 |
| Storage | 500 GB NVMe SSD |
| Drive Tested | System Drive (C:) |
| Total Files | 1,345,379 |
| Total Folders | 317,628 |
The benchmark was performed on a 500 GB system drive containing 1,345,379 files organized in 317,628 folders. Using the default settings, the application completed the scan in just 5 minutes and 17 seconds and produced the following results:
44,158 duplicate groups found.
110,065 duplicate files found.Warning: Some folders were skipped because the Protect System Files and Folders option or a file filter was enabled.
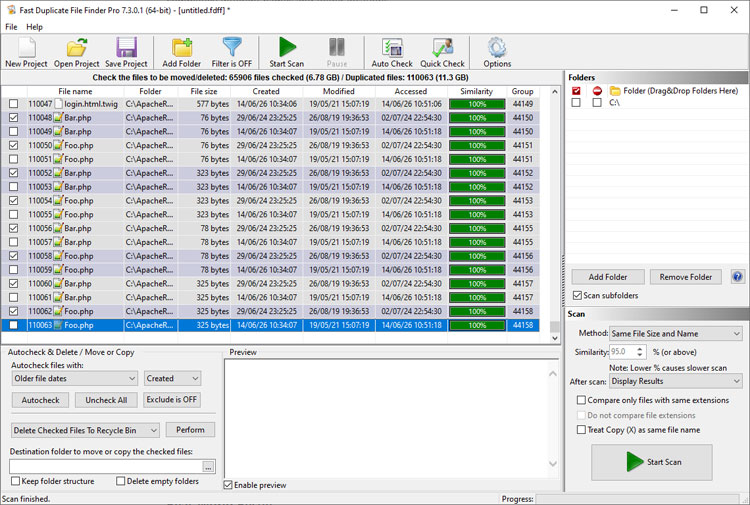
Of the detected duplicates, 110,065 files occupied approximately 11.4 GB of disk space. The automatic selection options marked 65,906 duplicate copies for removal, representing approximately 6.78 GB of recoverable storage while always preserving at least one file from every duplicate group.
MindGems states that the software is highly optimized and uses multi-threading to compare multiple files simultaneously. My testing confirmed those claims. The application processed 1,345,379 files and 317,628 folders in only 317 seconds, achieving an average throughput of 4,244 files per second (over 254,000 files per minute) while traversing more than 1,000 folders every second. This makes it one of the fastest duplicate file finders I have tested.
MindGems Duplicate File Finder Test Results at a Glance
| Metric | Result |
|---|---|
| Drive Size | 500 GB |
| Files Scanned | 1,345,379 |
| Folders Scanned | 317,628 |
| Scan Time | 5 min 17 sec |
| Duplicate Groups Found | 44,158 |
| Duplicate Files Found | 110,065 |
| Duplicate Data Found | 11.4 GB |
| Space Recoverable (Auto-selected) | 6.78 GB |
| Files Processed per Second | 4,244 |
| Files Processed per Minute | 254,649 |
| Folders Processed per Second | 1,002 |
| Folders Processed per Minute | 60,119 |
| Duplicate Groups Found per Minute | 8,361 |
| Duplicate Files Found per Minute | 20,833 |
| Average Files per Duplicate Group | 2.49 |
Features Tested
| Feature | Result |
|---|---|
| Exact Duplicate Detection | ✔ Passed |
| Byte-by-byte Verification | ✔ Passed |
| Hash Collision Protection | ✔ Passed |
| Renamed Files Detection | ✔ Passed |
| Automatic File Selection | ✔ Passed |
| Recycle Bin Protection | ✔ Passed |
| Compare Folders Mode | ✔ Passed |
| Large Dataset Stability | ✔ Passed |
Memory Usage
Despite scanning more than 1.3 million files, memory usage remained surprisingly low throughout the test. The application stayed responsive at all times and did not consume excessive RAM while scanning or displaying the results.
CPU Utilization
CPU utilization remained consistently high across all processor cores, confirming that the application makes effective use of multi-threading. On modern multi-core processors this translates directly into significantly faster scan times than tools limited to a single processing thread.
Handling Large Duplicate Groups
Many duplicate groups contained numerous identical files spread across multiple folders. The application grouped them correctly, making the results easy to review. Sorting, filtering, and automatic selection worked flawlessly even with more than 110,000 duplicate files listed.
Usability
The user interface deserves special mention. Even with an extremely large result set, navigation remained fast and intuitive. Duplicate groups can be sorted instantly, files can be previewed before deletion, and the automatic selection options greatly reduce the time required to clean large drives.
Compare Folders
One feature I particularly liked is Compare Folders. Instead of scanning an entire drive, it allows you to compare one folder against another and find duplicates only between those locations. This is especially useful when synchronizing backups, migrating data to a new drive, or verifying copied files.
Safety & Reliability
By default, the application protects users from accidentally deleting important Windows files by skipping system and program folders. Since many system files are intentionally duplicated by Windows, this is a sensible default setting. Advanced users can disable this protection if necessary.
MindGems also claims to perform a true byte-by-byte comparison before reporting duplicate files. To verify this, I tested the application using a collection of specially crafted files that produce hash collisions for CRC, MD5, and other common hash algorithms.
I have used this same test set to evaluate many duplicate file finders over the years, and surprisingly, several well-known applications incorrectly identify these completely different files as duplicates because they rely solely on hash values. While such collisions are rare in everyday use, incorrect duplicate detection is unacceptable for software designed to delete files.
MindGems Duplicate File Finder passed the test perfectly. Every reported duplicate was correct, and none of the collision files were falsely identified as duplicates, confirming that the application performs the additional byte-by-byte verification as advertised.
Another welcome safety feature is that files are deleted to the Recycle Bin by default. Alternatively, duplicates can be copied or moved instead of deleted, allowing users to review the results and easily restore files if they accidentally remove something important.
Accuracy with Renamed Files
To verify that the application compares actual file contents rather than filenames, I created duplicate files with completely different names and stored them in different folders. MindGems Duplicate File Finder correctly identified every duplicate regardless of filename or directory structure.
Scanning for Duplicate Files
Once you download Duplicate File Finder and install the app, you will see that there are several configuration options that can be set for your scans. If you come across a feature that is not supported in the free version, you will be asked to upgrade to use that feature but for basic duplicate file tasks, the free versions should work just fine.
1. Add Target Folders
To begin the duplicate file search process, look at the main toolbar at the top of the program. Click on the Add Folder button. This opens a new window to add the folders you want to compare against each other.

2. Select Folder Paths
You will then be able to browse the folders on your computer. Check the boxes next to the specific ones you want to add to the program to be analyzed. You can select entire drives or just specific user folders like Documents or Downloads. Click OK to load them into the main interface.

3. Start the Scanning Process
Once you have your folders loaded, simply click on the green Start Scan button at the lower right. The program will parse through the data based on your specific drive speed. When the scan is complete, you will be shown a summary of how many duplicate groups and files it found.

Reviewing the Scan Results
1. Understand Duplicate Groups
You will then see these duplicate groups and files shown in the main screen of the program. The groups are duplicate files that have matching attributes and are grouped together so you can compare them.
2. Analyze the Matched Files
If you look at lines 11 through 13 in our example image, you will see that there are three files in the group that match. They are flagged as duplicates even though they all don’t have the exact same name. The software looks at the actual file data, not just the file title.

3. Adjust Scan Similarity Options
At the bottom right of the program you will see some scan options with the default being 100% equal files. There are also options for similar files, similar file names and file size. When you choose one of these other options, you can change the similarity percentage as needed.
Managing Your Duplicate Files
1. Autocheck Your Files
Before taking any actions on your duplicate files, you will need to check the files you want to act on. At the bottom left, you have several options you can take on the checked files. The Autocheck files with option will automatically check files based on the selection you choose. The default is to check files with older file dates.

2. Configure the Autocheck Parameters
You can change the Autocheck parameters to target specific files. You can target smaller file sizes, bigger file sizes, newer file dates, or shorter file names.

3. Choose the Final Action
Once you have selected your files, you can then choose an action to the left of the Perform button. The default option is Delete checked files to the Recycle Bin. If you want to copy or move the files instead of deleting them, you can choose one of the other options and then select a folder to copy or move the files to in the destination folder box.

4. Configure Advanced Exclusions
Clicking on the Advanced button will show you options you can configure for file exclusions. The professional version will allow you to use the filter tool to really fine tune the duplicate finding process.

5. Execute the Perform Command
Once you have your options configured, you can then click on the Perform button to have the configured action taken on your files. You will then be shown a confirmation message telling you what action is going to be taken on the selected files. Click Yes to execute the command.

6. Review General App Settings
There is an option section that you can go to if you want to configure some of the other settings of the Fast Duplicate File Finder app. Click the Options button on the main toolbar. You can change which columns are displayed within the interface and configure system protection parameters.

Conclusion
Pros & Cons
| Pros | Cons |
|---|---|
|
|
MindGems Duplicate File Finder proved to be an exceptionally fast, reliable, and accurate duplicate file finder. Processing more than 1.3 million files in just over five minutes while maintaining low memory usage and excellent responsiveness is an impressive achievement.
The software combines outstanding performance with numerous safety features, flexible filtering options, multiple scan modes, and powerful automatic selection rules. The byte-by-byte verification provides an additional level of confidence that many competing products lack, ensuring accurate results even in edge cases involving hash collisions.
Overall, this is one of the best duplicate file finders I have tested. The free version already provides everything most users need for a thorough and safe disk cleanup, while the Professional edition adds advanced export capabilities and scan modes for finding similar files. Whether you need to clean a home PC or process millions of files on a large drive, MindGems Duplicate File Finder is a tool I can confidently recommend.
Free Download: MindGems Duplicate File Finder
Here is another app you can use to find duplicate files on your computer.
For additional training resources, check out our online IT training courses.
Check out our extensive IT book series.


