
Last Updated on April 24, 2026
We all have countless videos sitting on our phones and hard drives. But sometimes, a video isn’t actually what you need. Maybe you captured the perfect family moment, an action shot in sports, or a crucial slide from a recorded presentation, and you just want a high-quality still image.
Trying to pause a video at the exact right millisecond to take a screen capture is incredibly frustrating. Furthermore, screenshots usually result in blurry, heavily compressed images.
Fortunately, there is a much faster way. Instead of manually pausing and sniping screenshots, you can use automated software to pull hundreds of perfect, full-resolution frames from a video in just a few seconds. Here is exactly how to do it.

Choosing the Right Frame Extraction Tool
For this process, we highly recommend a Windows utility called VOVSOFT Video to Photos. It is incredibly lightweight and does exactly what the name implies without forcing you to learn a complicated video editing timeline. You can grab it directly from their official website.
They offer a standard installer, but if you prefer keeping your system clean, they also provide a portable version. The portable version runs directly from a downloaded folder without needing a formal installation on your hard drive. You can download Video to Photos here.
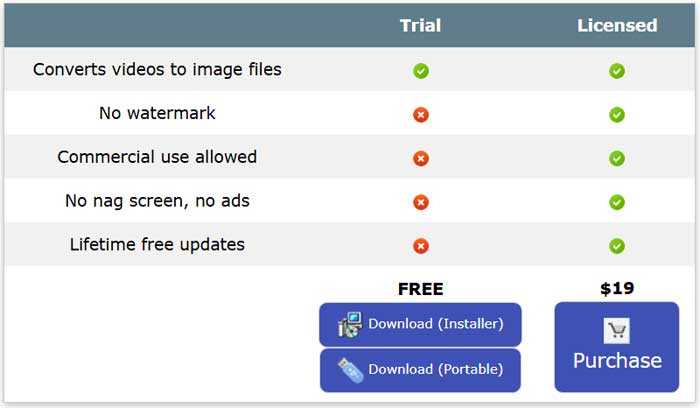
Free Trial vs. Paid License
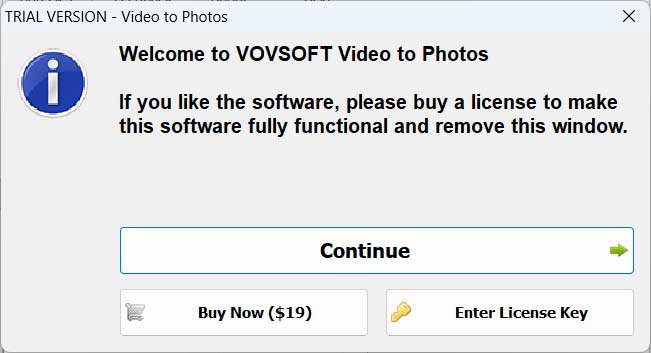
The software offers a free trial that works perfectly fine for quick projects. Just be aware that the free version will prompt you with a small “nag screen” asking you to click Continue before you start. If you end up using the tool frequently, the full lifetime license is currently only $19 and removes that popup completely.
If you choose the installable version, you will download the installer file and install the software just like any other app. If you choose the portable version, you will download the zip file, extract it and then run the video2photos.exe contained within that zip file.
If you are using the trial version, you will be shown a nag screen with a Continue button that you will need to click on to start the program every time you use it.
How to Convert Your Video into Images
Once you open the program, the interface is extremely straightforward. Follow these quick steps to pull your frames:
- Click the Add Files button, or simply drag and drop your video file directly into the blank white box on the left. The app will calculate the total duration of your video.
- Look at the Image Duration setting. This tells the software how often to snap a picture. (We will break down the math for this in the next section).
- Choose your Image Output Format. Selecting JPG is great for saving hard drive space, while selecting PNG will give you the absolute highest uncompressed image quality.
- Adjust the quality slider. By default, it might sit at 90 percent. Bump that up to 100 percent to ensure your photos look just as crisp as the original video.
- Pick a Destination Directory (like a new folder on your Desktop) and click Convert.
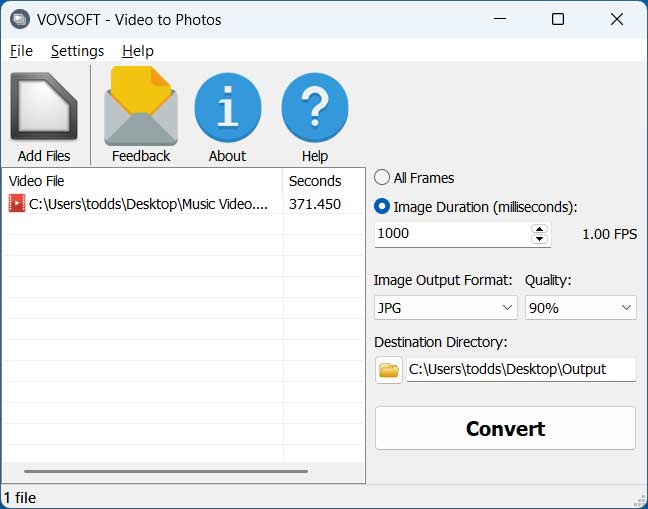
The default options for how often an image will be created from the video is determined by the Image Duration settings which are in milliseconds. You can increase the number to create fewer images or lower it to increase the frequency of how often an image is taken from the video. You can also use the All Frames option which will significantly increase the number of image files extracted from the video.
For the Image Output Format selection, you can choose between JPG, PNG and BMP image file types. You can also change the default quality level from 90% to a higher or lower number to increase or decrease the size of the image files. You can also change the Destination Directory path to tell the app where to save the image files.
Understanding Milliseconds and Frame Counts
The biggest mistake people make with this app is choosing the wrong extraction rate. Since the settings are based on milliseconds, a setting of 1000 means the program will capture exactly one image every single second.
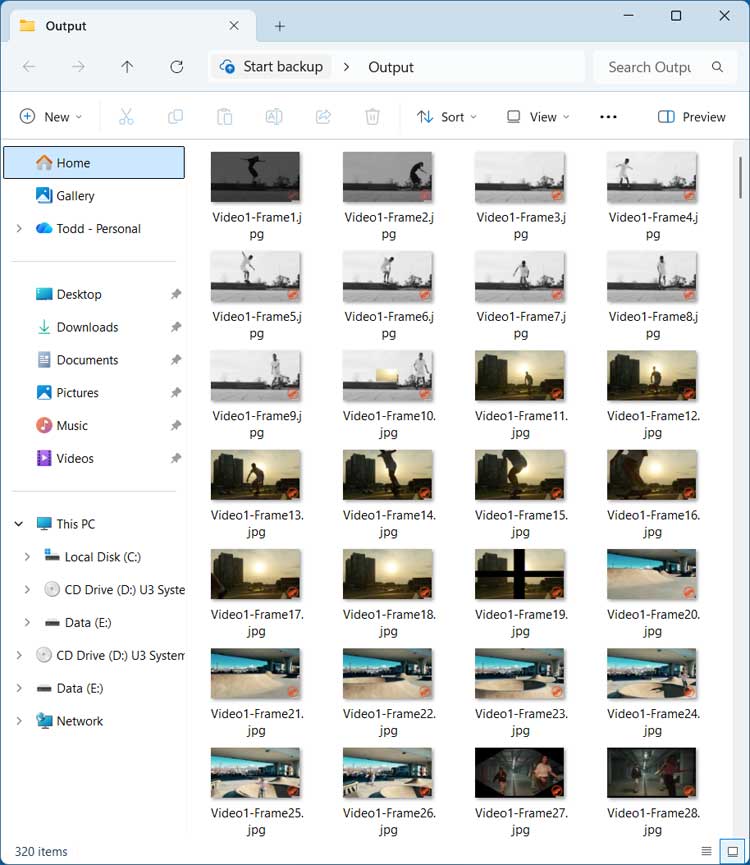
If you have a 6-minute video and use the 1000 millisecond setting, your output folder will instantly fill up with about 320 photos. If you increase that setting to 2000 milliseconds, it takes a photo every two seconds, resulting in roughly 185 images.
A Warning About “All Frames”
Be extremely careful with the All Frames option. Modern videos shoot at 30 or even 60 frames per second. If you select All Frames on a simple 6-minute video, the software will generate over 11,000 individual image files. This will take a long time to process and will completely flood your hard drive. Always start with a higher millisecond number and work your way down.
Pro Tips for the Best Results
Clear your folders first: Because the conversion is so fast, you will likely test a few different settings to get the perfect shot. Always delete the rejected photos from your output folder before hitting Convert again so you don’t mix up old and new frames.
Start with a trimmed clip: If you are dealing with a massive hour-long video file, don’t put the whole thing into the software. Use a free video trimmer first to cut out the specific ten-second scene you care about. Running massive files through a frame extractor eats up a lot of processing power.
For additional training resources, check out our online IT training courses.
Check out our extensive IT book series.


