
Last Updated on May 19, 2026
If you are like most people, you use your computer on a daily basis for things such as work, shopping, social media and so on. And when you start your computer, you log in with your Windows account and password. You are most likely using a Microsoft account to log into your computer with but it’s also possible to use a local account if that happens to work better for you.
There may come a time when you are unable to log into your computer because of things such as user profile corruption or even forgetting your password. When that happens, you will need a way to get into your computer to at least save your personal files if nothing else just in case you need to reinstall Windows. One way you can get your files back is to boot to a Live Linux CD or flash drive and then copy your files to a USB drive as explained here.

Another excellent method you can use to get back into your computer if you get locked out is to enable and log in with the built-in Windows Administrator account. Once you have this specialized admin account enabled, you can then use it to see if you can fix the issue with your primary account or even reset your password entirely if possible. You can also use it to add a brand new Microsoft or local account to your computer that you can then use to safely log in with moving forward.
What is the Hidden Windows Administrator Account?
Most standard users do not realize that Windows comes with a hidden “God Mode” account that is disabled by default for security reasons. This unique account has full, unrestricted access to the entire operating system and does not trigger those annoying User Account Control (UAC) pop-up prompts when making major system changes.
While you absolutely should not use this account for daily tasks or browsing the web, it is the ultimate “skeleton key” for deep system troubleshooting. Whether your main profile is heavily corrupted or you have been completely locked out by a forgotten password, enabling this account allows you to get back into the desktop interface. From there, you can safely back up your data and create a fresh user profile to fix the overarching problem.
To successfully enable the built-in Windows Administrator account from outside of the operating system, we will be using the popular Hiren’s Boot CD tool. Once you download the Hiren’s ISO file, you will need to burn it to a CD or create a bootable flash drive to load the recovery environment.
1. Prepare a Second Working Computer
Since you are currently locked out of your primary PC, you will need to borrow or use a second, fully working computer to prepare your specialized “rescue” media. You cannot create the necessary bootable drive on the computer you are locked out of, so make sure you have temporary access to another Windows machine.
2. Obtain a 4GB or Larger USB Flash Drive
You will need a dedicated USB flash drive that has a storage capacity of at least 4GB or larger to hold the recovery files. Please note that all existing data on this drive will be completely erased during the creation process. Make sure you move any important personal files off the flash drive before moving forward with these steps.
3. Download the Hiren’s BootCD PE ISO
Next, you need to download the Hiren’s BootCD PE ISO file from their official website. This is a completely free, pre-configured recovery environment that is conveniently based on the familiar Windows 10 interface. It comes packed with dozens of helpful troubleshooting utilities, including the password recovery software we need today.
4. Download and Run the Rufus Utility
To get the downloaded ISO file onto your flash drive properly, you will need to use a free program called Rufus. This utility “burns” the ISO file directly to your USB drive, making it recognizable by your computer’s motherboard so it can successfully boot from it. You can use Rufus to create the bootable flash drive quickly and easily.
5. Boot the Locked Computer from the USB Drive
Once you have successfully created the rescue drive, insert it into an open USB port on the locked PC and restart the machine. You may need to rapidly tap F12, F2, or the ESC key during the initial splash screen to select the USB drive as your primary boot device. You may need to enter your system BIOS to change the boot order of your PC so it loads the flash drive first.
6. Open the Lazesoft Password Recovery Tool
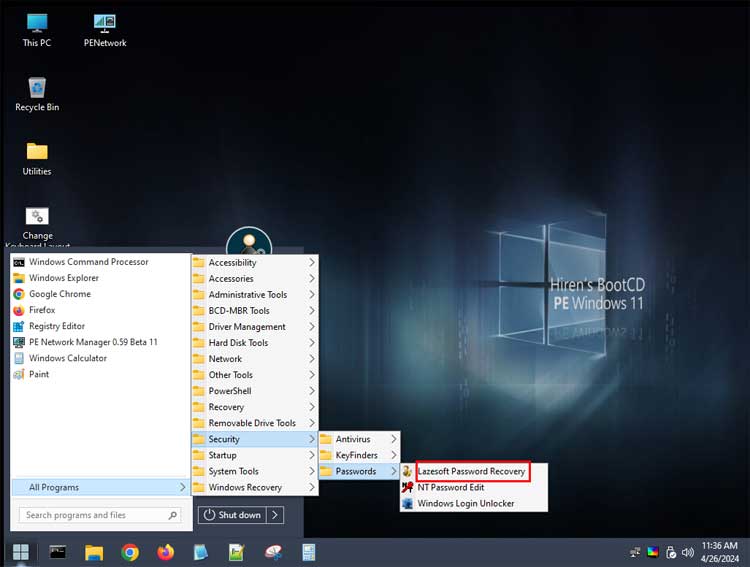
Once the Hiren’s Boot CD tool loads completely, you will see a familiar Windows-style desktop environment appear on your screen. You can then click on the start button and navigate to All Programs, then Security, then Passwords, and finally select Lazesoft Password Recovery. This free version of Lazesoft allows you to reset a user password to be completely blank, though it will not let you change it to a specific word.
7. Accept the Home Edition Usage Warning
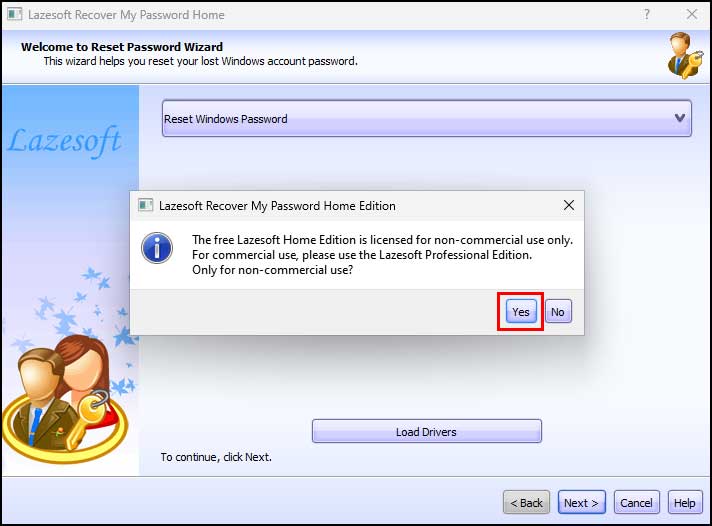
Once the Lazesoft application officially loads, you will be presented with a prompt detailing the software licensing terms. You will need to click the Yes button on the popup message that appears on the screen. This simply confirms that you understand the home edition is completely free to use for personal recovery but is not meant for commercial or business purposes like the Pro version will.
8. Select Your Windows Installation
The software will automatically scan your computer’s hard drive to locate your specific operating system files. You will then need to select your current Windows installation from the dropdown list provided on the screen. Once you have verified the correct drive is selected, choose the Reset Local Password option to proceed to the next critical step.

9. Locate the Built-in Administrator Account
You will then be shown a detailed list of all the user accounts currently registered on your computer. You will most likely see some system accounts that you do not instantly recognize, such as the Guest account or Default account. Inside the Lazesoft user list, it is extremely important to locate and select the specific account named exactly “Administrator”.

10. Understand Microsoft Account Limitations
As you can see in the menu, the built-in Administrator account is locked out by default. If you select a linked Microsoft account from this menu instead, you will be warned that the free version cannot convert a Microsoft account to a local account. The app cannot reset a Microsoft account password from here, but it can safely change it to a local account so you can log in, assuming the profile itself is not corrupted.
11. Reset and Unlock the Administrator Account
You may notice other accounts like WDAGUtilityAccount, but these are specialized Windows processes and should be completely ignored. To enable the local Administrator account, simply click to highlight it and click on the Next button at the bottom of the window. On the following screen, click on the RESET/UNLOCK button to instantly have the admin account enabled with a blank password, and then click Finish.

12. Confirm the Successful Password Reset
After clicking the button, the software will quickly modify the Windows registry in the background to lift the account restrictions. You will then see a small confirmation message telling you that the password has been reset successfully. Now you can confidently click the OK button to close the prompt and navigate back to the main Hiren’s desktop environment.

13. Restart Your Computer and Log In
Now that the built-in Administrator account is fully activated and unlocked, you can safely reboot your machine. You can restart your computer normally, removing the USB flash drive as the screen goes black so it boots back into your normal operating system. You should now clearly see an “Administrator” account listed alongside your other profiles on the login screen; simply click on it to be logged directly into the desktop without needing a password.

14. Crucial Security Step: Disable the Account After Use
Once you have successfully logged in, recovered your files, and fixed your main user account, it is absolutely vital that you disable this built-in Administrator account again. Leaving this powerful account active with a blank password is a major security risk for your personal data. To disable it, open a Command Prompt as Administrator and type the following command: net user administrator /active:no. This ensures your PC remains fully secure while your primary account is back in working order.
15. Can I Use This for a Microsoft Account?
Yes, you can absolutely use this workaround if you are locked out of a Microsoft account. While this recovery tool cannot directly “change” your Microsoft cloud password, enabling the built-in Administrator account allows you to completely bypass the Microsoft login screen. From there, you can access your hard drive, back up your files, and create a brand new local profile to regain permanent control of the PC.
16. What if the Hiren’s Boot Drive Doesn’t Boot?
If your computer simply ignores the USB drive and boots straight back to your locked Windows screen, ensure that “Secure Boot” is disabled in your system’s BIOS settings. Many modern PCs are designed to intentionally block third-party recovery tools to prevent unauthorized access. Temporarily turning off Secure Boot will allow the Hiren’s environment to load properly.
17. Will This Process Work on Windows 11?
Yes, this exact process works flawlessly on Windows 11 computers. Although the Hiren’s Boot CD environment is visually based on a Windows 10 layout, the underlying registry structure for user accounts is identical in Windows 11. The “Unlock” process performed by the Lazesoft utility works perfectly for both versions of the operating system without any modification.
For additional training resources, check out our online training courses.
Check out our extensive IT book series.


