
Last Updated on June 7, 2026
Virtualization is a great way to do things such as try out new operating systems, test out software, or even test Windows updates before applying them to your “real” computer and so on. VMware Workstation is one of the better programs you can use to create virtual machines on your personal computer at home or even at the office.
When using VMware Workstation, you may want to transfer files between your VMware host computer and one of your virtual machines. To do so, you can usually enable the Guest Isolation feature for drag and drop so you can copy files from your host to your VM and vice versa. But sometimes this doesn’t work as designed, especially for VMs running the Linux OS. Fortunately, there is a secondary method you can use to do these file transfers. In this article, we will be showing you how to share files and folders between your hot and Linux VMs in VMware Workstation.

Configuring VMware Workstation Host Settings
1. Enable the Shared Folders Feature
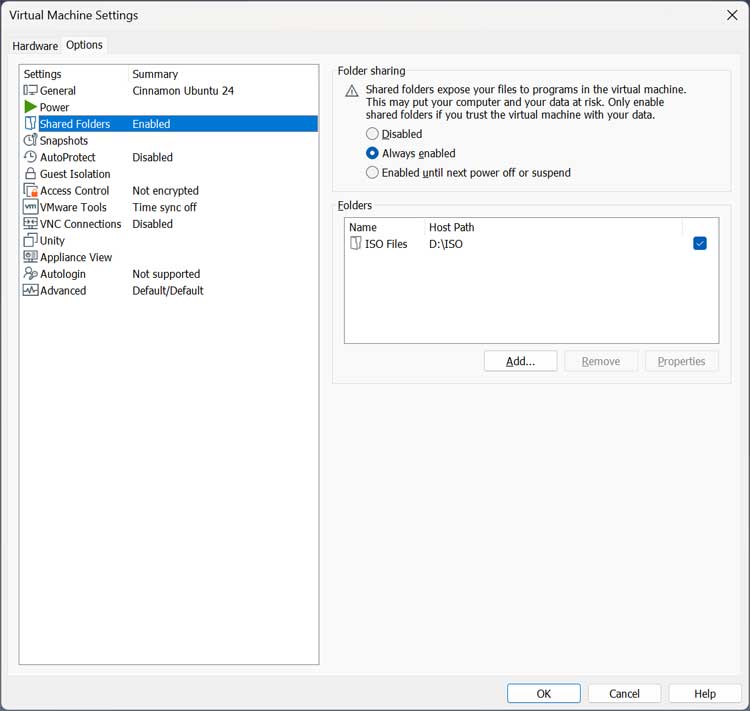
The first thing you need to do is enable Shared Folders in the settings for your Linux VM. To do so, go to the settings for the VM and then click the Options tab. Look for the Shared Folders section on the left side of the screen to begin.
2. Configure Your Folder Path
Now you can set the folder sharing option to Always enabled or enabled until the next power off or suspend. Next, you will need to choose a local folder on your VMware host that you want to share with the Linux virtual machine by clicking on the Add button. Choose a dedicated directory strictly for file transfers to maintain system security.
Installing VMware Tools on Linux
1. Update Ubuntu and Debian Systems
Once you have your VMware host configured with its shared folder, you will need to do a little configuration on your Linux virtual machine. First, you need to make sure VMware Tools are installed on the VM. You can do this via the terminal, but the command will vary depending on your version of Linux. For Ubuntu or Debian based systems, type sudo apt update and then type sudo apt install open-vm-tools open-vm-tools-desktop to install the packages.
2. Install Tools on RHEL and Fedora
Different Linux distributions require slightly different package manager commands to achieve the exact same result. If you are running RHEL, CentOS, or Fedora systems, the terminal command changes completely. You will need to run sudo dnf install open-vm-tools open-vm-tools-desktop to grab the necessary virtualization drivers.
3. Configure Arch Linux Drivers
Arch Linux users also have their own specific package manager command for this file sharing process. Open your terminal window and type sudo pacman -S open-vm-tools to fetch the core files. Press Enter to confirm the download and wait for the installation process to finish.
Mounting the Shared Directory
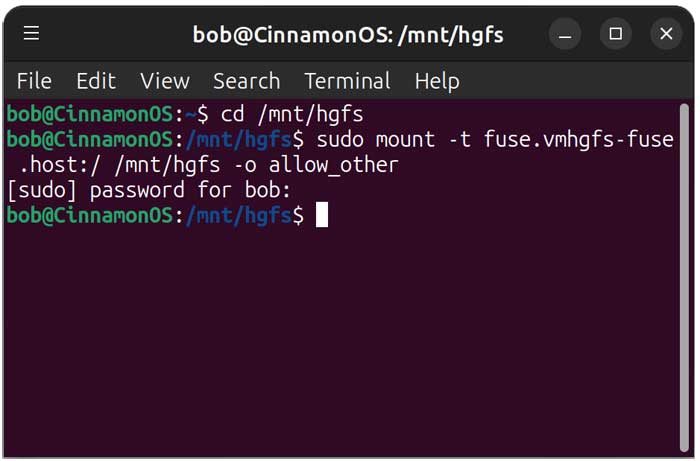
1. Locate the HGFS Directory
Next, we need to open a terminal and type cd /mnt/hgfs to see if the hgfs folder is there. The hgfs folder is a special directory used by VMware Tools inside a Linux virtual machine. It stands for Host Guest File System and is the container VMware uses to store all shared folders.
2. Create the Missing Mount Point
Sometimes the operating system does not generate this directory automatically during the initial software installation. If the hgfs folder is not there, type sudo mkdir -p /mnt/hgfs to build it manually. This provides the exact structural path required for the upcoming mounting process.
3. Execute the Mount Command
Then we will need to mount the shared folder using the sudo mount -t fuse.vmhgfs-fuse .host:/ /mnt/hgfs -o allow_other command. You will need to enter your admin password for this command to run with root privileges. This attaches the VMware specific filesystem to your local directory and grants read and write permissions to standard users.
Managing File Access and Unmounting
1. Make the Folder Persistent
The previous mount command only lasts until you reboot the virtual machine. If you want to make the folder persistent, you can type .host:/ /mnt/hgfs fuse.vmhgfs-fuse defaults,allow_other 0 0 into your configuration file. This forces the Linux machine to automatically reconnect to your host folder every single time it boots.
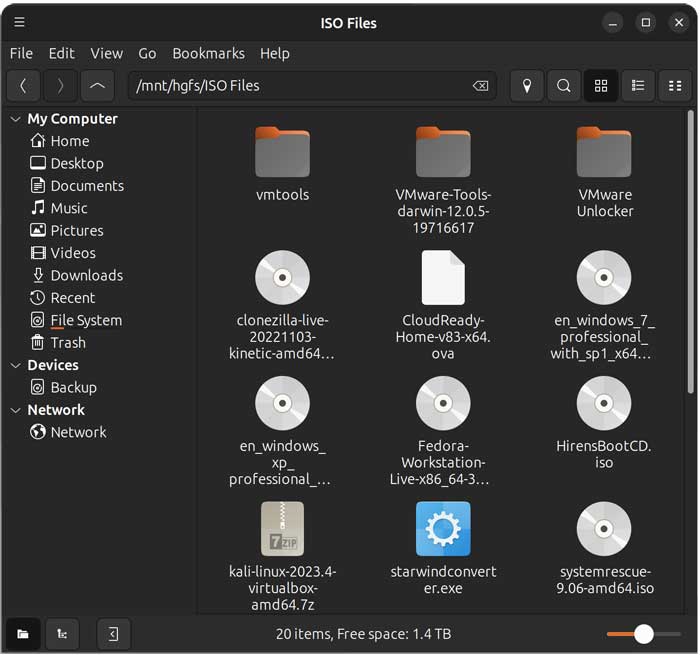
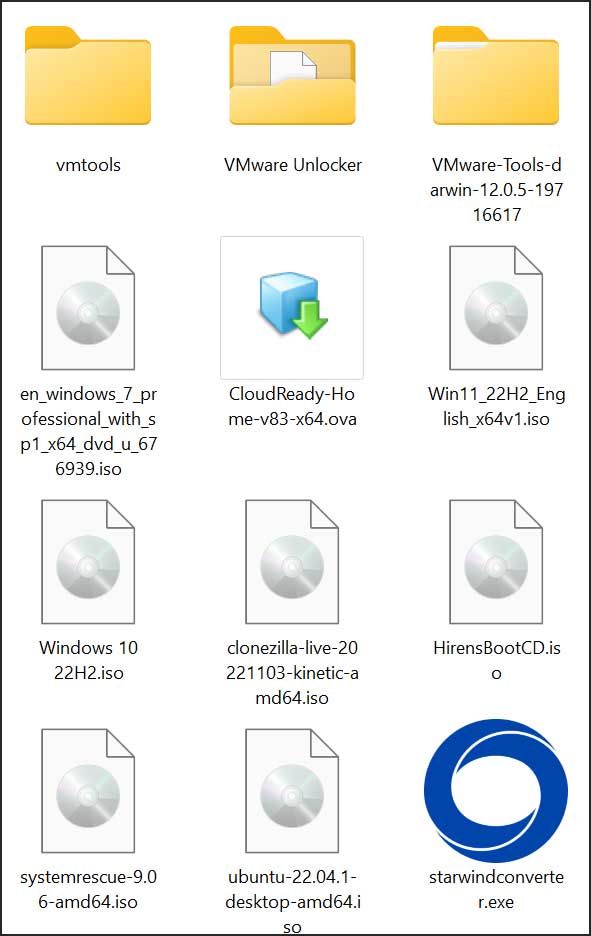
2. Verify Your File Transfers
You can then check the folder status by typing ls /mnt/hgfs directly into your command line interface. You can also browse to the folder in the Files app under the /mnt/hgfs/share name path. As you can see, our Linux folder matches the Windows folder on the VMware Workstation host.
3. Safely Unmount the Directory
If you want to unmount the folder from your Linux VM, you can use the sudo umount /mnt/hgfs command. Be careful when deleting or unmounting your folder in your Linux VM so you don’t accidentally delete the files in the shared folder on your VMware host. You may want to go back to the virtual machine’s settings and remove the shared folder first just to avoid any problems.
You can check out some of our other Linux tech videos here.
For additional training resources, check out our online IT training courses.
Check out our extensive IT book series.


