Last Updated on August 28, 2026
For decades, system administrators and network engineers relied on netsh, ipconfig, and route to configure and troubleshoot Windows network stacks. While these legacy Command Prompt utilities served their purpose, modern IT environments require heavy automation. You need scriptability and deeper diagnostic precision than raw, unstructured text streams can offer.
Microsoft has officially deprecated several legacy utilities including netsh advfirewall and strongly recommends adopting modern PowerShell modules such as NetTCPIP, NetAdapter, and NetSecurity. Unlike the old command-line tools that print flat strings to the console, PowerShell outputs rich, structured .NET objects. This allows you to filter, sort, measure, and pipe live network objects directly into administrative actions without complex text parsing.

Whether you are provisioning new virtual machines, diagnosing disconnected adapters, or auditing firewall rules, you need a solid workflow. Here is a 5-step administrative workflow and the five essential PowerShell cmdlets that completely replace netsh.
The 5-Step Modern Network Troubleshooting Workflow
When diagnosing connectivity issues, follow this structured PowerShell workflow. This ensures you check every single layer of the network stack systematically.
1. Audit Interface Hardware
Verify link speed, connection status, and MAC addresses using the Get-NetAdapter command. This tells you immediately if the physical layer is completely broken. You cannot fix IP routing if the physical cable is unplugged.
2. Inspect IP Configuration
Check IP assignment, subnet prefixes, and default gateways with Get-NetIPConfiguration. This confirms your machine successfully pulled a valid lease from the local DHCP server. It replaces the old ipconfig command entirely.
3. Verify and Assign DNS
Audit active resolvers or assign primary and secondary DNS servers using Set-DnsClientServerAddress. Name resolution failures cause the vast majority of web browsing errors. Fixing this gets your users back online instantly.
4. Audit Host Security
Inspect active firewall rules and allow necessary application ports via Get-NetFirewallRule. Windows Defender Firewall blocks unknown traffic by default. You must explicitly open ports for custom applications to function on the network.
5. Inspect the Routing Table
Verify default routes, gateway paths, and metric priorities using Get-NetRoute. This shows exactly where Windows sends outbound traffic. It prevents packets from getting lost in complex multi-adapter setups.
Get-NetAdapter: Interface Hardware Auditing
The Get-NetAdapter cmdlet discovers, audits, and manages physical and virtual network adapters on the local system. It serves as the modern replacement for netsh interface show interface. Instead of static text output, it returns live adapter objects with highly actionable properties.
These properties include LinkSpeed, MediaConnectionState, and DriverVersion. You can pipe these exact objects directly into management cmdlets. This makes running Restart-NetAdapter, Enable-NetAdapter, or Disable-NetAdapter incredibly fast.
1. Filter by Name Parameter
The -Name parameter filters output by interface alias. It fully supports wildcards such as “Ethernet” or “Wi-Fi“. This helps you target specific cards on servers with dozens of virtual switches.
2. Target Physical Adapters
The -Physical switch limits the output strictly to physical NICs. It instantly filters out hypervisor virtual switches, VPN tunnels, and loopback adapters. This cuts through the noise during hardware troubleshooting.
3. Reveal Hidden Interfaces
The -IncludeHidden parameter displays hidden virtual tunnel interfaces and system devices. Sometimes malware or legacy VPN clients leave broken hidden adapters behind. This command forces them into the open.
4. List All Active Adapters
To list all active and inactive network adapters, simply type Get-NetAdapter and press Enter. This gives you a broad overview of the entire system. It shows every installed card instantly.
5. View Physical NIC Status
To view physical NICs with status, link speed, and description, type Get-NetAdapter -Physical | Format-Table Name, InterfaceDescription, Status, LinkSpeed. This creates a beautiful, highly readable table right in the console. It beats digging through the Windows GUI.
6. Audit Driver Details
To audit driver details across all adapters, type Get-NetAdapter | Format-Table Name, DriverName, DriverVersion, DriverDate. Outdated network drivers cause massive packet loss and random disconnects. This command identifies old code immediately.
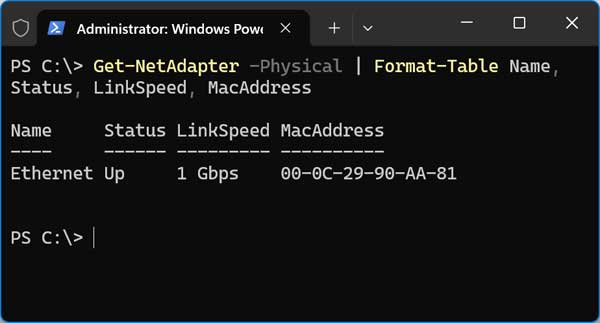
It shows filtering strictly for physical network cards with -Physical and formatting the output into a clean table. This lets you instantly confirm that the primary adapter is Up and operating at its expected speed like 1 Gbps. It also reveals its hardware MAC address without opening Device Manager or the legacy Control Panel.
7. Troubleshooting Tip
If an adapter’s Status displays Disconnected while a cable is attached, check the physical patch cable or switch port. If LinkSpeed reports 0 bps, it indicates an uninitialized driver, a disabled physical interface, or a hardware malfunction. Replace the physical hardware if software fixes fail.
Get-NetIPConfiguration: Unified IP & Gateway Auditing
This is the modern replacement for netsh interface ip show config and ipconfig /all. Legacy netsh and ipconfig display network configuration details across disjointed sections. This requires manual correlation between adapters, DNS servers, and gateways.
The Get-NetIPConfiguration cmdlet queries the Windows network stack directly. It delivers a grouped, consolidated summary of IP addresses, subnet routing, default gateways, and DNS resolvers for each adapter. You get the full picture in one clean output.
1. Limit Output by Alias
The -InterfaceAlias parameter limits output to a single specified network card like “Ethernet”. Use this when you only care about the primary wired connection. It hides the virtual box and VPN clutter.
2. Expand Detailed Information
The -Detailed switch expands output to display physical MAC addresses, MTU packet sizes, network category profiles, and DHCP lease information. You need this deep dive when troubleshooting IP conflicts. It shows exactly when the lease expires.
3. Filter by Address Family
The -AddressFamily switch is used with Get-NetIPAddress. It filters IP listings specifically by IPv4 or IPv6. Most local networks still run on IPv4, so this hides the lengthy IPv6 hex strings.
4. Display Basic IP Configuration
To display basic IP configuration for active adapters, simply type Get-NetIPConfiguration. Press Enter to see the default routing layout. It highlights the most critical connection metrics.
5. List IPv4 Addresses and Prefixes
To list all IPv4 addresses and prefix lengths, type Get-NetIPAddress -InterfaceAlias “Ethernet” -AddressFamily IPv4 | Format-Table IPAddress, PrefixLength, InterfaceAlias. This pulls the exact subnet mask data you need for routing calculations.
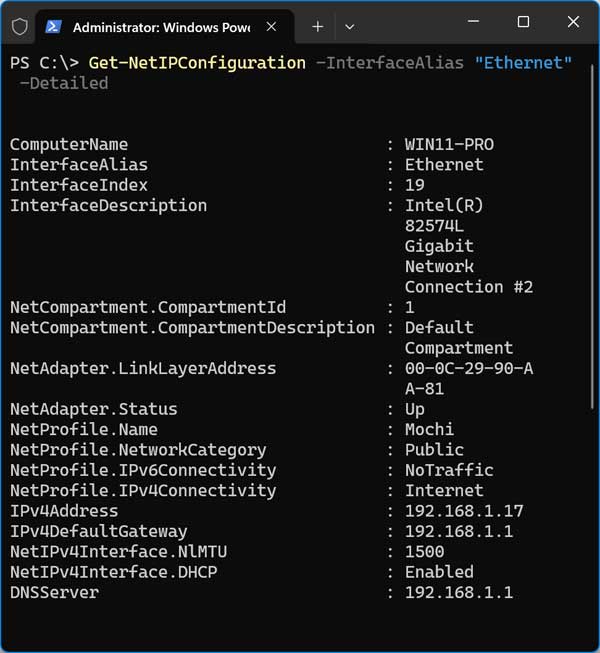
Running Get-NetIPConfiguration with the -Detailed switch consolidates everything you need into a single view. You can easily verify the assigned IPv4 address (192.168.1.17) and the default gateway (192.168.1.1). You also see the active DNS resolver (192.168.1.1) and DHCP status in one exact place.
6. Troubleshooting Tip
If an adapter’s IPv4 address begins with 169.254.x.x, the client failed to reach a DHCP server. It assigned itself an Automatic Private IP Addressing (APIPA) fallback address. If the IPv4DefaultGateway field is completely blank, the machine will not be able to route traffic beyond the local subnet.
Set-DnsClientServerAddress: Rapid DNS Configuration
This serves as the modern replacement for netsh interface ip set dns. Under netsh, configuring primary and secondary DNS servers required executing multiple commands. You had to memorize indexing switches and manually pass separate lines for primary versus secondary resolvers.
The Set-DnsClientServerAddress cmdlet streamlines this entirely. It accepts an entire array of DNS server addresses in a single command execution. This makes script automation incredibly reliable across thousands of workstations.
1. Specify the Target Interface
The -InterfaceAlias parameter specifies the exact target network interface you want to modify. You must point the new DNS servers to the correct physical card. Applying them to a disabled adapter does nothing.
2. Accept Server Addresses
The -ServerAddresses parameter accepts an array of primary and secondary DNS IP addresses. You format this as a comma-separated list like (“8.8.8.8”, “8.8.4.4”). PowerShell reads the array and applies the primary and secondary roles in order.
3. Reset Server Addresses
The -ResetServerAddresses switch clears static DNS entries entirely. It reverts the adapter back to automatic DHCP-assigned DNS resolution. Run this when moving a laptop from a static corporate network to a home Wi-Fi setup.
4. View Current IPv4 DNS Servers
To view current IPv4 DNS servers on an adapter, type Get-DnsClientServerAddress -InterfaceAlias “Ethernet” -AddressFamily IPv4. This audits the current configuration before you make any changes. Always verify the existing setup first.
5. Set Custom Static DNS Servers
To set custom static DNS servers like Cloudflare DNS, type Set-DnsClientServerAddress -InterfaceAlias “Ethernet” -ServerAddresses (“1.1.1.1”, “1.0.0.1”). This instantly overrides the DHCP-provided resolvers. Your web traffic now routes through the new servers.
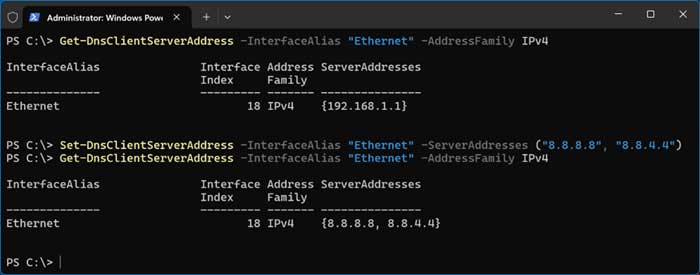
First, it audits the current DNS configuration (192.168.1.1). By passing both Google Public DNS IP addresses as a comma-separated array, PowerShell applies both the preferred and alternate DNS addresses instantly. This update takes effect immediately and updates the classic Windows Network Adapter GUI properties in the background.
6. Audit Current Resolver
Run Get-DnsClientServerAddress -InterfaceAlias “Ethernet” -AddressFamily IPv4 to check the starting state. Document these numbers in case you need to roll back. Breaking DNS takes the computer completely offline.
7. Push Primary and Secondary Resolvers
Run Set-DnsClientServerAddress -InterfaceAlias “Ethernet” -ServerAddresses (“8.8.8.8”, “8.8.4.4”) in one single command. This pushes both Google DNS servers into the network stack. The change happens without any GUI prompts.
8. Verify the Updated Configuration
Run Get-DnsClientServerAddress -InterfaceAlias “Ethernet” -AddressFamily IPv4 one last time. This confirms the new IP addresses actually stuck to the adapter. You can now test web browsing to ensure connectivity.
9. Troubleshooting Tip
Always run Get-DnsClientServerAddress before applying static resolvers. On domain-joined machines, overwriting internal Active Directory DNS servers with public resolvers like 8.8.8.8 or 1.1.1.1 will break Active Directory authentication. It destroys domain controller discovery and internal name resolution entirely.
Host Firewall Management
The Get-NetFirewallRule and New-NetFirewallRule cmdlets act as the modern replacement for netsh advfirewall firewall. Managing Windows Defender Firewall via netsh advfirewall is officially deprecated by Microsoft. You should transition away from it immediately.
The NetSecurity module cmdlets provide full object-based control. You get granular authority over inbound and outbound traffic, application rules, and network security profiles. It makes securing a Windows Server incredibly precise.
1. Set the Display Name
The -DisplayName parameter sets a descriptive, human-readable name for the new rule. Choose a naming convention that makes sense to other administrators. A name like “Inbound-App-8080” clearly identifies the rule’s purpose.
2. Specify the Traffic Direction
The -Direction parameter specifies Inbound or Outbound traffic flow. Inbound controls traffic entering the machine from the network. Outbound stops local applications from phoning home to malicious servers.
3. Set the Action Policy
The -Action parameter sets the rule policy to Allow or Block. Allow punches a hole through the firewall for legitimate traffic. Block explicitly denies access even if another rule allows it.
4. Define Local Ports and Protocols
The -LocalPort and -Protocol parameters define target listening ports and transport protocols. You can specify standard ports like 8080 alongside TCP or UDP designations. This locks the rule down to exact traffic types.
5. Scope the Rule Profile
The -Profile parameter scopes the rule to Domain, Private, Public, or Any. You rarely want to open sensitive database ports on the Public profile. Restrict access to the Domain profile for maximum internal security.
6. Find Active Blocking Rules
To find all active blocking inbound firewall rules, type Get-NetFirewallRule -Direction Inbound -Action Block -Enabled True | Format-Table DisplayName, Profile, Direction, Action. This quickly exposes any rules stopping your application from communicating.
7. Find Rules Attached to Specific Ports
To find rules attached to a specific port like 443, type Get-NetFirewallPortFilter | Where-Object LocalPort -eq ‘443’ | Get-NetFirewallRule | Format-Table DisplayName, Enabled, Action. This traces the exact port back to its parent firewall rule.
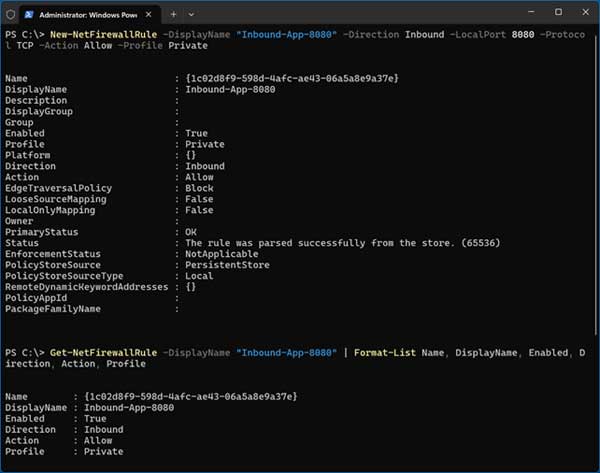
Creating a rule with New-NetFirewallRule outputs all default properties to the console. To verify the configuration quickly, pipe Get-NetFirewallRule into Format-List with target fields. This confirms that the rule is enabled, scoped to the Private profile, and allowing inbound traffic on port 8080.
8. Troubleshooting Tip
To troubleshoot blocked services quickly without browsing hundreds of rules, query active blocks. Use Get-NetFirewallRule -Direction Inbound -Action Block -Enabled True. When searching by port number, query Get-NetFirewallPortFilter first and pipe the result directly to Get-NetFirewallRule.
Routing Table and Metric Control
The Get-NetRoute and New-NetRoute cmdlets are the modern replacement for route print, route add, and netsh interface ipv4 show route. Inspecting the kernel routing table with legacy route print dumps a massive wall of text. That text can be extremely difficult to interpret across multiple physical and virtual adapters.
Furthermore, adding a persistent route with route add required remembering the -p switch to ensure it survived a system reboot. With Get-NetRoute and New-NetRoute, routes are saved persistently by default. They also output as highly sortable data objects.
1. Specify the Destination Prefix
The -DestinationPrefix parameter specifies the target destination CIDR block. You use 0.0.0.0/0 for the default gateway. You use something like 10.100.0.0/16 for targeting specific internal subnets.
2. Bind the Interface Alias
The -InterfaceAlias parameter binds the static route explicitly to a specific network interface. This forces the traffic out of a dedicated physical port. It stops Windows from guessing which card to use.
3. Specify the Next Hop
The -NextHop parameter specifies the gateway router IP address responsible for forwarding packets. This is the exact router that handles the handoff to the next network segment. Give it the correct IP or the packets drop entirely.
4. Define the Route Metric
The -RouteMetric parameter defines integer route preference. Lower values indicate a much higher routing priority. Windows always sends traffic down the path with the lowest possible metric cost.
5. Set the Policy Store
The -PolicyStore parameter defaults to persistent storage across reboots. You can set this to ActiveStore for temporary, session-only routes. ActiveStore routes vanish completely the moment you restart the server.
6. Audit All Active Routes
To audit all active IPv4 routes in a formatted table, type Get-NetRoute -AddressFamily IPv4 | Format-Table DestinationPrefix, NextHop, RouteMetric, InterfaceAlias. This maps out your entire routing logic clearly.
7. Check the Default Gateway
To check the active default internet gateway route, type Get-NetRoute -DestinationPrefix “0.0.0.0/0”. This proves your machine knows exactly how to reach the broader internet.
8. Add a Persistent Static Route
To add a persistent static route to an internal subnet, type New-NetRoute -DestinationPrefix “10.100.0.0/16” -InterfaceAlias “Ethernet” -NextHop “192.168.1.254” -RouteMetric 10. This hardcodes the traffic path into the Windows kernel.
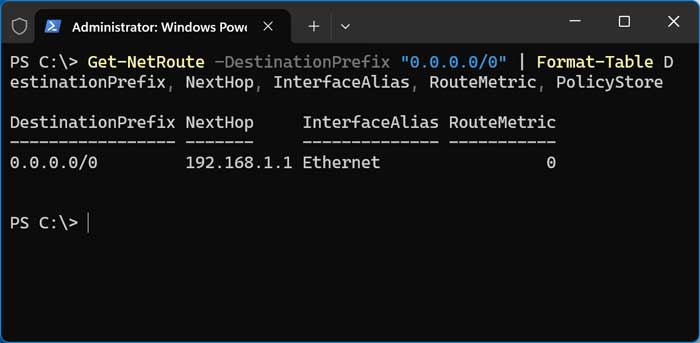
Querying DestinationPrefix “0.0.0.0/0” checks the system’s default gateway route. In the output table, you can see the active gateway (192.168.1.1) and the assigned adapter (Ethernet). You can also verify the metric value that controls the gateway selection process.
9. Troubleshooting Tip
If a workstation loses internet access but maintains local network connectivity, check whether the default route 0.0.0.0/0 exists in the routing table. On systems with multiple active connections like simultaneous Wi-Fi and VPN connections, compare their RouteMetric values. This ensures outbound traffic uses the correct network interface.
Command Quick Reference Guide
Migrating from netsh and classic Command Prompt utilities to PowerShell provides structured objects, better error handling, and cleaner automation capabilities. By mastering these commands, you can audit and troubleshoot Windows network connectivity faster. Here is a quick reference guide to translate your old habits into modern syntax.
1. Audit Interface Hardware
The legacy command for this task was netsh interface show interface. You should now use the modern PowerShell cmdlet Get-NetAdapter -Physical. This provides a much cleaner view of your physical hardware status.
2. Inspect IP and Gateway Config
Administrators previously relied on netsh interface ip show config or ipconfig /all. The modern replacement is Get-NetIPConfiguration -Detailed. This puts all your IP, DNS, and gateway data into one consolidated object.
3. Configure DNS Resolvers
The old method required typing netsh interface ip set dns with complex indexing. You now use Set-DnsClientServerAddress to push multiple resolvers at once. It handles primary and secondary addresses in a single clean array.
4. Create Firewall Rules
Creating rules used to require netsh advfirewall firewall add rule. This is officially deprecated and replaced by New-NetFirewallRule. The new cmdlet offers vastly superior object-based control over your security profiles.
5. Manage Static Routing
Network engineers used route print and route add -p for decades. You should now use Get-NetRoute and New-NetRoute for all routing modifications. They save persistently by default and output highly sortable data tables.
For additional training resources, check out our online IT training courses.
Check out our extensive IT book series.