
Last Updated on May 19, 2026
PowerShell is a command-line shell and scripting language created by Microsoft, used to automate tasks and manage system settings across Windows, macOS, and Linux. It’s popular among IT professionals and system administrators for handling tasks like managing files, users, and services, performing networking tasks, configuring systems, and performing remote operations, all through powerful scripts and commands.
If you are a novice PowerShell user or do not use it on a regular basis, you might assume that your version of PowerShell is up to date and you have the latest and greatest version with all the features. Unfortunately, that is usually not the case, and you might be missing out on some PowerShell features that you would find useful. In this article, we will be showing you how to check your PowerShell version and upgrade it if needed.

1. Read the Initial Upgrade Warning
When you open a PowerShell window, there is a good chance you will see a message at the top that says Install the latest PowerShell for new features and improvements! https://aka.ms/PSWindows. Microsoft displays this text banner directly inside the console window because there is no way of upgrading from the PowerShell Windows itself. You must step outside the standard utility to grab the newest software build.
2. Check Your Current PowerShell Version
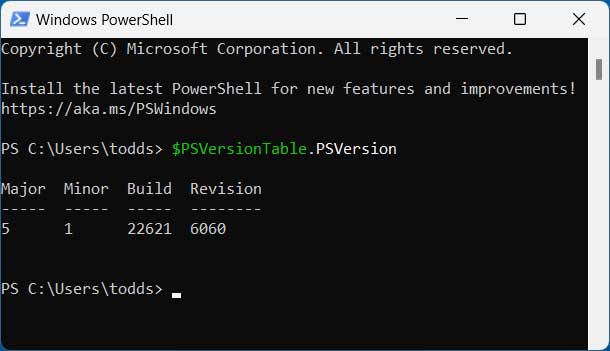
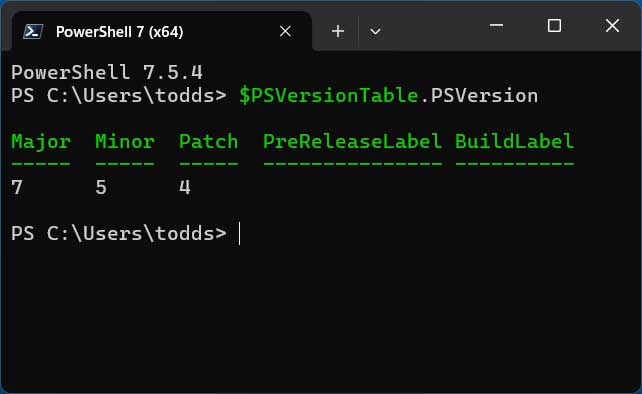
If you are unsure of what version of PowerShell you are running, you can easily check using the following command. Type $PSVersionTable.PSVersion straight into the command line and hit enter. As you can see in the image below, this computer is running PowerShell version 5 when the latest version as of this writing is 7.5, with 7.6 coming out soon.
3. Verify Existing Installation Directories
Even though this shows that this computer is running PowerShell 5, you can check for specific directories on your computer to see if PowerShell 7 is installed. Open File Explorer and navigate to C:\Program Files\PowerShell\7\pwsh.exe to check for the stable release. Look inside C:\Program Files\PowerShell\7-preview\pwsh-preview.exe to see if the preview build currently sits on your hard drive.
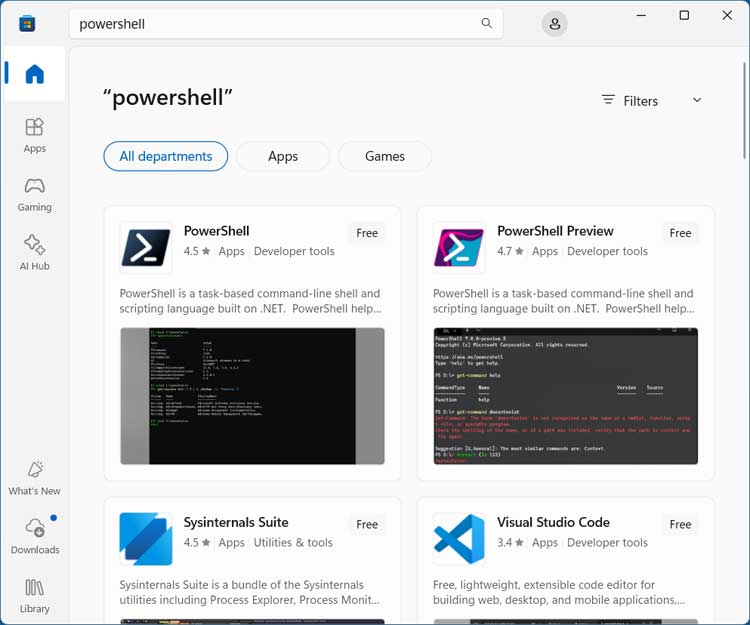
4. Download from the Microsoft Store
There are several ways you can go about upgrading your version of PowerShell. You can get PowerShell and PowerShell Preview from the Microsoft Store and install one or both of them. PowerShell Preview is a pre-release version of PowerShell that lets users test upcoming features, improvements, and experimental changes before they’re officially released in the stable build.
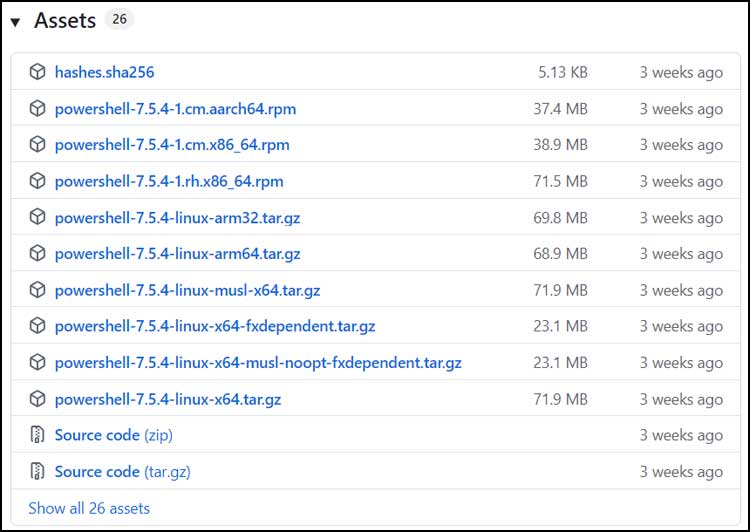
5. Download Files Directly from GitHub
You can also Download PowerShell from the GitHub website, but you will need to know which file to download to make sure you get the correct one. The site lists dozens of different builds for various operating systems and architectures. Grab the specific MSI installer package designed for your exact Windows system hardware.
6. Use the Windows Package Manager
One easy way to upgrade your PowerShell version is to use the Winget command. Winget, also known as the Windows Package Manager, is a command-line tool developed by Microsoft that allows you to discover, install, upgrade, and manage software on Windows. It simplifies app deployment by letting you install programs with a single command. It should already be configured on your computer and ready to use.
7. Run the Winget Upgrade Commands
Here are the Winget commands you can use to install PowerShell or PowerShell Preview.
Regular PowerShell: winget install –id Microsoft.PowerShell –source winget
PowerShell Preview: winget install –id Microsoft.PowerShell.Preview –source winget

8. Accept the Security Prompts
Then the graphical installation process will begin, and you will need to click the Yes button at the UAC prompt. You must also be logged in as an admin or have admin credentials to install PowerShell. The background package manager handles the rest of the heavy lifting.
9. Verify the Successful Installation
When the installation is complete, you will see a message saying Successfully installed at the bottom of the same PowerShell window. This confirms the new software build is fully integrated into your operating system. You can now safely close out of your old command prompt session.


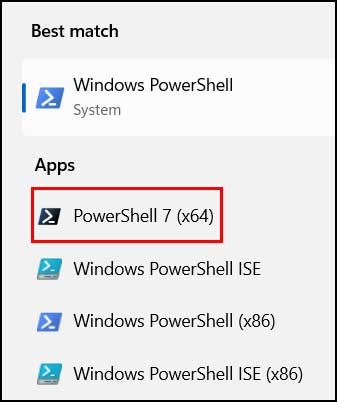
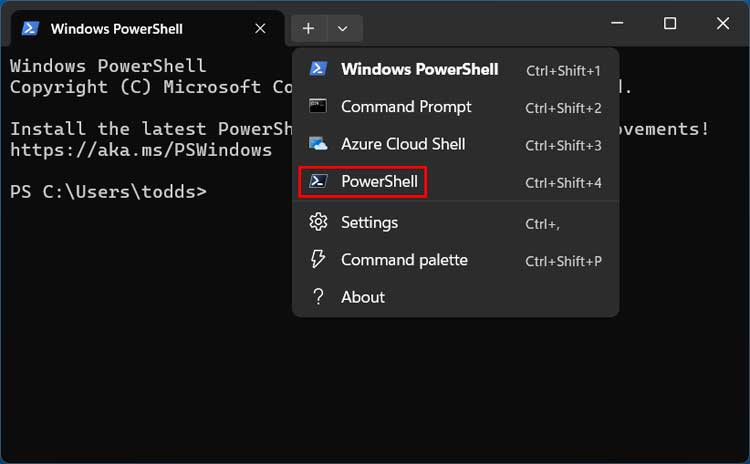
10. Locate the New Desktop Shortcut
Now when you search for PowerShell from the Windows taskbar search box, you should see your normal blue PowerShell icon as well as a black PowerShell icon for PowerShell 7. Now just because you have upgraded to PowerShell 7 doesn’t mean you cant still use PowerShell 5 if desired. Both application versions exist simultaneously on your hard drive.
11. Run the Version Check Command Again
Launch the brand new black application icon to open your upgraded console environment. If we run the $PSVersionTable.PSVersion command in the PowerShell window, it will show us that we are running PowerShell 7, and you should also see the PowerShell version above the initial prompt. The interface feels identical but runs on a completely modernized backend architecture.
12. Swap the Windows Terminal Version
If you use the Windows Terminal app, it will most likely still default to PowerShell 5. You can however click the dropdown arrow and choose PowerShell 7 if you need to run the newer version. This forces the active tab to instantly swap over to the modern scripting environment.
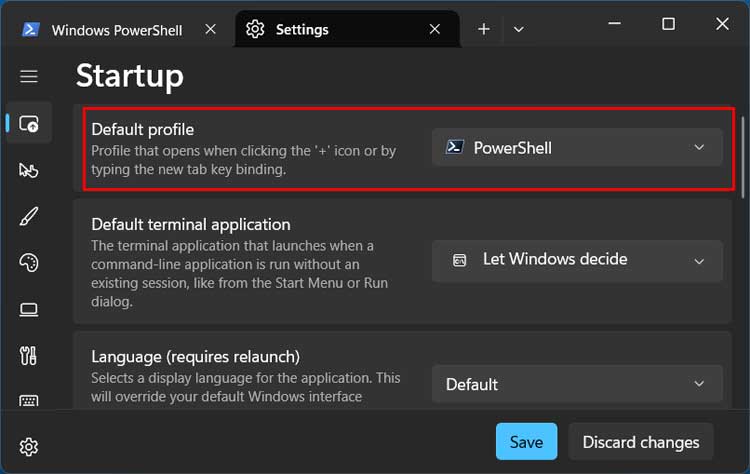
13. Change Your Default Terminal Profile
To change this, you can click on Settings and change the Default profile to the newer version of PowerShell so the Terminal app will open to PowerShell 7 by default. Hit the save button to lock in your configuration changes. Your terminal will now launch the modern command shell every single time you open it.
For additional training resources, check out our online IT training courses.
Check out our extensive IT book series.


