Last Updated on May 19, 2026
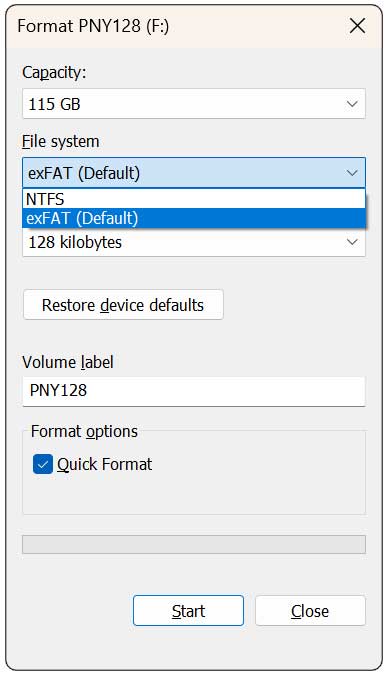
Formatting a USB drive should be a simple task, but Windows 11 adds an unexpected twist when it comes to the FAT32 file system. If you plug in a 64GB, 128GB, or larger flash drive, you will notice that FAT32 is missing from the list of available file system choices when you right click the flash drive and choose Format. Windows will allow NTFS and exFAT, but not FAT32.
This limitation surprises many users because FAT32 is still widely required by game consoles, smart TVs, legacy operating systems, certain bootable tools, and devices that simply refuse to recognize anything else. So why does Windows 11 block FAT32 formatting for larger drives even though the FAT32 file system itself supports volumes up to two terabytes? In this article, we will be discussing how to format a large capacity USB flash drive as FAT32 in Windows 11.

As you can see in the image below, we do not have an option for FAT32 but only exFAT which is the default and NTFS.
1. Understand the Artificial Size Limitation
The restriction comes directly from Microsoft rather than the actual FAT32 specification. Windows artificially limits native FAT32 formatting strictly to 32GB volumes. The FAT32 architecture technically handles massive storage partitions flawlessly. You must rely on third party software to bypass this completely arbitrary operating system block.
2. Ditch the Built In Windows Tools
Microsoft pushes users toward modern file systems like exFAT and NTFS to support massive individual files and advanced journaling. They hide the older format to avoid common user frustration caused by the strict four gigabyte maximum file size limit. Standard built in utilities like File Explorer and Disk Management will flat out refuse to format your 64GB or larger drive as FAT32.
3. Download the Free Rufus Utility
You can bypass the rigid Windows 11 restriction easily by using Rufus. This lightweight and trusted tool handles complex USB media configuration effortlessly. Navigate to the official Rufus website and download the newest version available. Pick the portable version to avoid installing permanent software on your local hard drive.
4. Insert Your High Capacity Drive
Plug your massive USB flash drive directly into an open port on your computer motherboard. Avoid using unpowered USB hubs. Direct connections prevent power drops that cause random formatting failures. Launch the portable Rufus executable file to open the main configuration dashboard.
5. Select Your Target Device
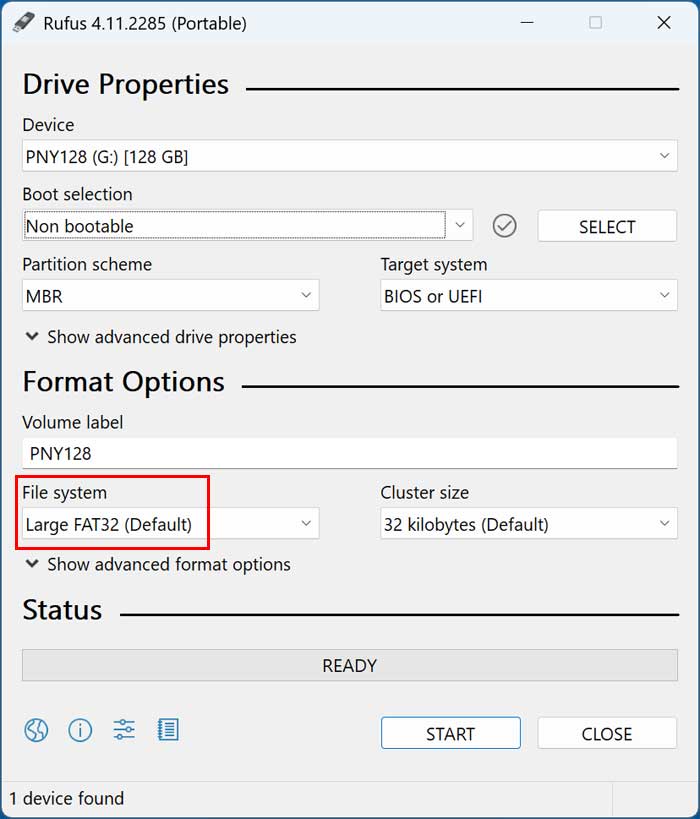
Look at the very top of the application window. Click the Device dropdown menu to select your specific USB flash drive from the hardware list. You must pick the correct target drive. Picking the wrong letter will instantly wipe out your backup hard drive.
6. Configure the Boot Selection
Rufus is primarily known for creating bootable operating system installation media. We only want basic storage space today. Change the Boot selection dropdown menu to explicitly say Non bootable. This tells the software to format the raw flash memory without injecting any specialized startup code.
7. Force the FAT32 File System
Move down to the Format Options section of the application window. Click the File system dropdown menu and select Large FAT32 from the available choices. Rufus will now prepare the drive using a proper FAT32 sector structure regardless of the massive total capacity.
8. Assign a Custom Volume Label
You can completely change the display name of the flash drive before you pull the trigger. Type a recognizable name into the Volume label text box. This ensures you can easily identify the drive later when you plug it into your smart TV or vintage game console.
9. Start the Formatting Process
Click the Start button at the bottom of the window to initiate the drive wipe. The tool will format the massive drive incredibly quickly. It creates a clean FAT32 volume ready for immediate use on any strict legacy device. This specific method completely avoids using slow PowerShell formatting commands.
10. Verify the File System Properties
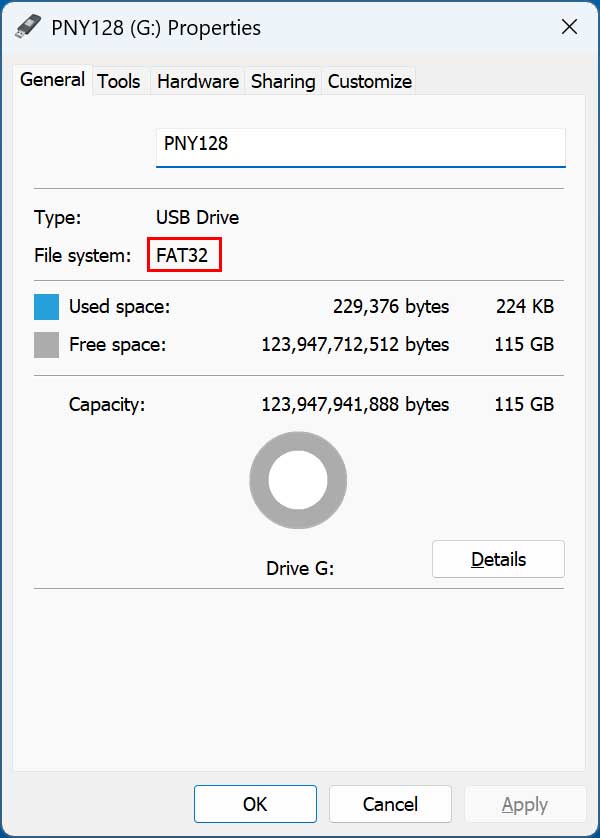
Once the rapid formatting process finishes completely you need to verify the results. Open Windows File Explorer and right click your newly formatted USB drive. Choose Properties from the context menu to pull up the hardware details. You will clearly see FAT32 listed next to the file system label.
11. Rename the Drive in Windows
You can also change the name of the flash drive directly from this properties window. Highlight the text box at the very top and type a new hardware label. Click Apply to lock in the name change. This helps if you completely forgot to set a custom label inside Rufus earlier.
12. Eject the Drive Safely
Never rip the flash drive out of the USB port immediately after formatting. Right click the drive icon in your taskbar and select Eject. Wait for the operating system to confirm the hardware is safe to remove. This prevents catastrophic file table corruption.
For additional training resources, check out our online IT training courses.
Check out our extensive IT book series.