Last Updated on March 22, 2026
When it comes to configuring your hard drives in Windows, you have two options for the data structure that is to be used for your disks. In most modern computers with larger drives, you will be configuring them as GPT rather than MBR.
But you may have a case where your computer’s hard drive was configured as MBR on accident or maybe even on purpose. When this happens, many people tend to wipe their drives and start over to make them use GPT. In this article, we will be showing you how to convert your Windows or other drive from MBR to GPT without losing data.
If you are running a newer version of Windows such as Windows 11 or Windows 10, there are not many, if any reasons to use a GPT disk. Here are the differences between MBR and GPT configured hard drives.
MBR (Master Boot Record)
- Supports up to 4 primary partitions.
- Maximum drive size of 2TB.
- Uses Legacy BIOS for booting.
- Stores partition information in a single location, making it more vulnerable to corruption.
- Compatible with older Windows versions (Windows XP, 7, etc.).
- Slightly slower on large drives.
GPT (GUID Partition Table)
- Supports up to 128 partitions (Windows).
- Can handle drives larger than 2TB.
- Requires UEFI boot mode (modern systems).
- Stores partition data in multiple locations, improving recovery and reducing corruption risks.
- Required for modern Windows 10 & 11 installations on UEFI.
- Offers better performance and efficiency, especially for large drives.
Convert Your Windows Drive from MBR to GPT

For our first example, we will be converting the Windows system drive from MBR to GPT without losing any data. When doing any procedure like this, always be sure to do a backup of your important files just in case something goes wrong.
There are a couple of ways to go about converting your Windows drive from MBR to GPT depending on your comfort level with the task. We will be running a specific command to do the conversion, and it can be run from within Windows or from the Windows PE environment or even from the Windows recovery command prompt option. We will be doing our MBR to GPT conversion from within Windows.
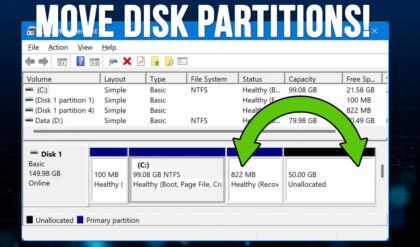
The image below shows that our C drive is configured as MBR since there is an option to convert it to GPT. The option is greyed out so we cannot do it from the Windows Disk Management tool.

We will be using the mbr2gpt command to convert our system disk to GPT. The mbr2gpt command is built into Windows so there is nothing to configure. To start the process, we will need to open an administrative command prompt by typing cmd in the Windows taskbar search box and choosing Run as administrator.
The first command we will be running is used to validate that we can actually perform the MBR to GPT conversion on this drive. You can copy and paste this command into the command prompt. If your Windows disk is not disk 0 (as shown in Disk Management) then you will need to change that part of the command.
mbr2gpt.exe /allowFullOS /validate /disk:0

Now that the validation has completed, we will run the next command to perform the conversion.
mbr2gpt.exe /allowFullOS /convert /disk:0

After the process has been completed, you should get a message that says Before the new system can boot properly you need to switch the firmware to boot to UEFI mode! So, if your computer is set up to use a BIOS then you will need to go into the settings and change it to UEFI, unless it’s already configured as UEFI. You may want to make sure your computer has a UEFI setting before starting this procedure, but most new computers should have that option.
We will now shut down the computer and change the boot options to UEFI and then restart it once again. After making the changes and restarting, we can now see that when we right click the drive in Disk Management it now says Convert to MBR telling us that it is now using GPT.

Convert a Non System Drive from MBR to GPT

Converting a non-system drive from MBR to GPT is an easier process than doing so with your Windows drive. As you can see in the image below, our other hard drive is configured as MBR since we have the greyed out option that says Convert to GPT Disk.

This time, we will be using the free NIUBI Partition Editor software to convert this drive to GPT. NIUBI comes in an installable version and a portable version and can be downloaded here.
Once you run the NIUBI software, you will see an interface that looks similar to Disk Management but with many more features. As you can see, Disk 1 shows that it is configured as MBR and Disk 0 now shows that it is configured as GPT.
We will now right click on Disk 1 and choose the Convert MBR to GPT option.

We will then have to click on the Yes button to confirm the conversion.

Any time you make a change in NIUBI Partition Editor, you will need to click the Apply button for the changes to take effect.

We do not need to reboot the computer or change any settings when converting a drive from MBR to GPT on a non-system drive. You may also want to consider backing up any files you have on these types of drives as well before doing the process.

For additional training resources, check out our online IT training courses.
Check out our extensive IT book series.