Now you can replicate those directories with a GUI
Robocopy (Robust File Copy) remains the gold standard for file replication within the Windows ecosystem, including the latest builds of Windows 11 and Server 2025. Unlike standard copy-paste operations, Robocopy is designed to handle massive data migrations, preserving NTFS permissions, timestamps, and folder hierarchies with industrial-grade reliability. Robocopy can be used to mirror directories from one computer to the other. It can be used to copy NTFS attributes as well as other file properties. It also features a retry method for files that cannot be copies because they are locked open or in use.
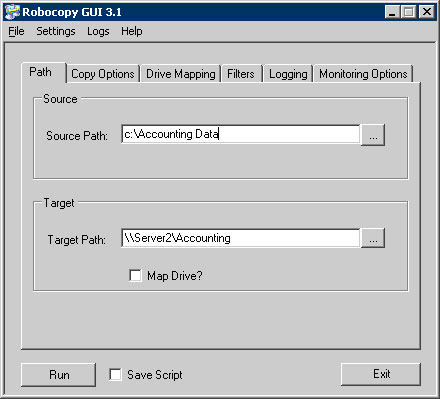
Although Robocopy is a great utility as is, somebody at Microsoft decided to improve on it by making a graphical user interface (GUI) to go along with the tool. The Robocopy GUI allows you to specify your source and target paths, as well as options or filters you would like to apply. You can create drive mappings, log the copy process and set monitoring options. This makes it easier to run more advanced commands without having to know the command context.
Path Tab
This is where you will specify the source and target path which you would like to have copied. You can either type the path out or browse to the location of the files you want copied or the location to where you want the files copied to. If your target path is a computer on the network then you can click on the Map Drive checkbox and specify the path. If you specify a remote path, all you need to specify is the drive letter and folder path, you don’t need to specify the remote computer name.
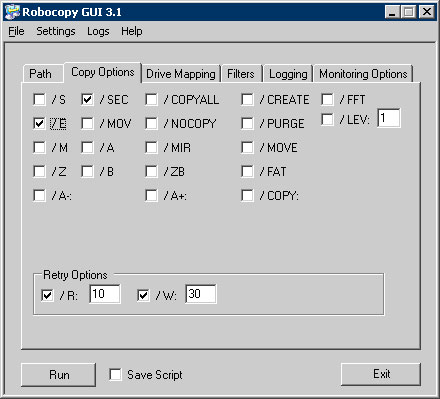
Copy Options
Here is where you can specify the behavior you would like Robocopy to take such as keep NTFS security settings or copy directories and sub directories. You can find an explanation of all the switches you can use in the included user guide under the Help menu.
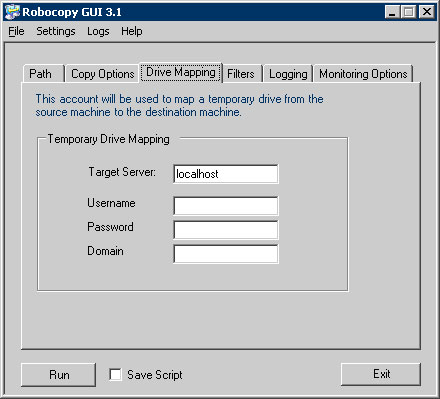
Drive Mapping
If you have specified on the Path tab that you would like to map a network drive, then you can specify the target server name, user name, password and domain if applicable.
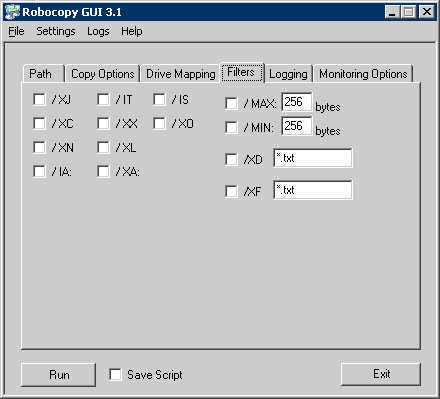
Filters
The Filters tab is where you can specify more advanced behaviors you would like Robocopy to perform such as excluding files tagged as changed or excluding files with certain attributes. If you hold the mouse over each filter item it will display what that filter is used for.
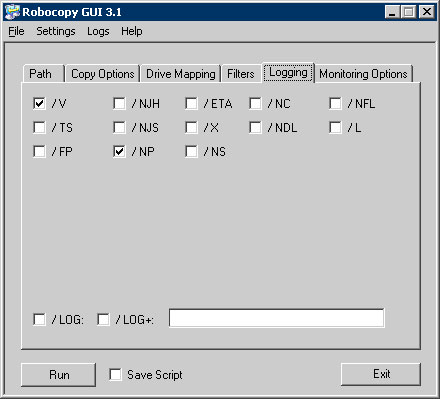
Logging
The Logging section is used to specify logging behavior that Robocopy will take such as displaying full path names of the files copied or turning of logging of directory names.
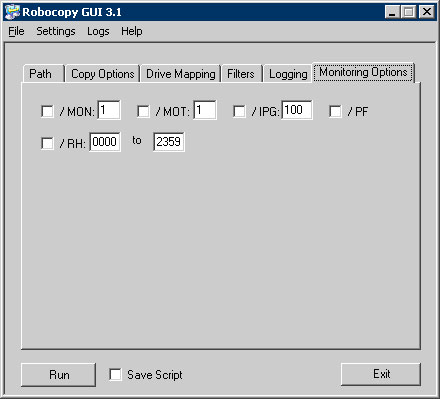
Monitoring
Monitoring enables real time monitoring for the copy operation such as monitoring the source destination for changes.
One of the best reasons to use a modern GUI for Robocopy is the ability to easily enable Multi-Threading (/MT). By default, Windows copies files one at a time. By using the /MT switch (usually found in the ‘Advanced’ or ‘Copy Options’ tab of modern GUIs), you can tell Robocopy to copy 8, 16, or even 32 files simultaneously. On a modern NVMe SSD or a high-speed network, this can cut your transfer time by over 70%.
While the official Microsoft Robocopy GUI was originally designed for older versions of Windows, it remains functional on Windows 11 provided you have .NET Framework 3.5 enabled in your Windows Features settings. However, for a more modern experience that supports newer Robocopy features like multi-threaded copying, many IT professionals now prefer open-source alternatives like ChoEazyCopy. These modern wrappers allow you to easily toggle the /MT switch to utilize all your CPU cores for significantly faster file transfers.