
Last Updated on June 5, 2026
As you probably know, Windows comes with a default system folder called Pictures that is exclusively used to store your photos. You absolutely do not have to use the folder for your personal photos. Most modern applications will automatically want to save them there by default anyway.
Assuming you use File Explorer to manage your files and folders, you might have actively noticed a specific visual behavior. This specific folder uses the large icon view natively in File Explorer. This slick visual lets you easily get a thumbnail view of all your pictures without needing to actually open them.

Sometimes you will accidentally drop random document files right into a folder that contains photos. The beautiful thumbnail will instantly change from a nice picture to a generic icon of the text file sitting inside the folder. This messy visual change is definitely not what you want. We will show you exactly how to aggressively make folders with photos and other types of files strictly show pictures for their thumbnails rather than the ugly file type icon.
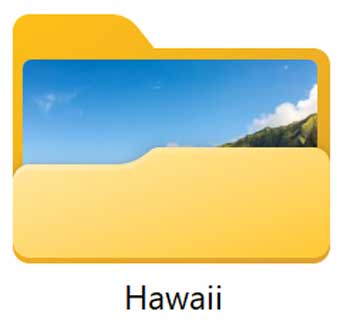
The image below explicitly shows how a typical folder with photos would look in File Explorer or directly on your desktop. As you can clearly see, the folder itself natively shows a preview of one of the pictures contained right within that directory. If you desperately want to have the entire folder show the image thumbnail rather than just half of it, then check out this free app you can easily use to configure this.
Customizing Your Folder Thumbnails
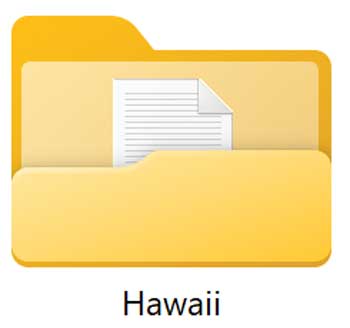
1. Observe the Broken File Icon
Now if we were to actively add a basic text file to the exact same folder, the system breaks. There is a massive chance that the thumbnail preview abruptly changes to a generic text file icon instead. This completely ruins the visual organization of your photo directories.
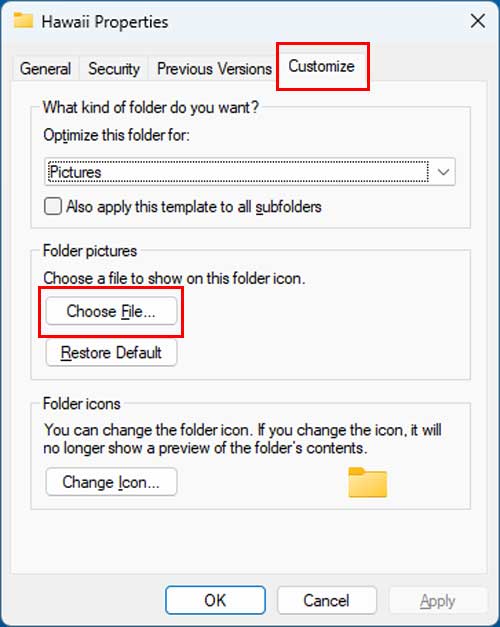
2. Open the Folder Properties
Fortunately, this specific visual glitch is incredibly easy to fix. You can even set a highly specific photo to be permanently used for the folder thumbnail preview. Simply right click directly on the folder that contains the photos and choose Properties from the context menu.
3. Navigate to the Customize Tab
The folder properties menu will instantly pop up on your screen. Go directly to the Customize tab located right at the top of the window. Look strictly in the Folder pictures section and click directly on the Choose File button.
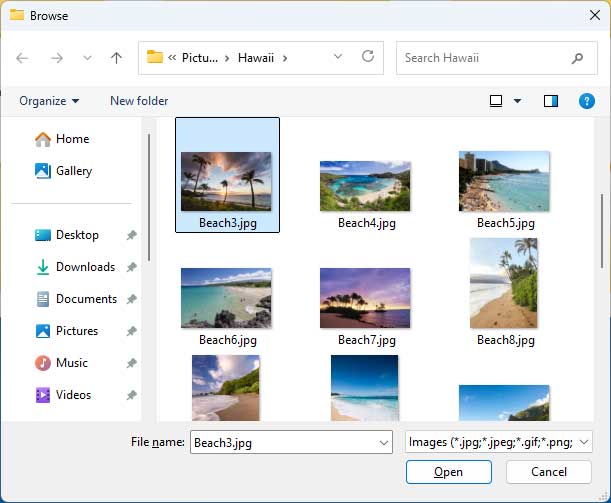
4. Select Your Custom Image
A standard Windows file browser window will immediately open for you. From here, you can easily choose one of the specific pictures physically residing in the folder that you want to use for your folder thumbnail image. Select your target image file and then click the Open button.
5. Verify the New Thumbnail
Now that specific picture will be permanently locked in for the thumbnail view for that particular folder. Windows will actively ignore any random text or system files sitting inside the directory. Your customized folder thumbnail will remain perfectly intact.

6. Restore the Default Settings
If you want to use a completely different picture, you can simply repeat the exact same process and choose another one. Or if you want to quickly reset everything back to the factory default, you can easily go back to the Customize tab and click the Restore Default button. One critical thing to keep in mind involves deleted files. If you completely remove the picture currently being used for the thumbnail picture, it will most likely change to another picture or even a completely different type of file.
For additional training resources, check out our online IT training courses.
Check out our extensive IT book series.


