Last Updated on March 16, 2026
Create a Windows iSCSI Storage Server
Microsoft Windows Server operating systems are capable of acting as centralized storage servers for other computers on the network much like having a standalone SAN (Storage Area Network). This way you can provide shared storage for many computers all from one place and provide features such as fault tolerance to better protect data. It also allows you a way to backup date from one location rather than having to back up several computers.

Once you get your server setup with shared storage all the client computers need to do is connect to that server and then they will be allowed use its attached storage assuming you allow them to. There are ways to lock down what computers can access what storage so you don’t have to worry about unauthorized access.
In this article we will show you how to configure a Windows Server as an iSCSI (Internet Small Computer System Interface) storage server and then how to connect a client computer to that server’s storage. iSCSI is used to send the SCSI command over networks and is a block level storage type. It uses an iSCSI initiator on a client and an iSCSI target on a storage device or in our case the Windows server. Since iSCSI uses Ethernet it’s a good choice for storage if you don’t want to add a new infrastructure to your network such as Fiber Channel storage.
Installing the File and Storage Services Role
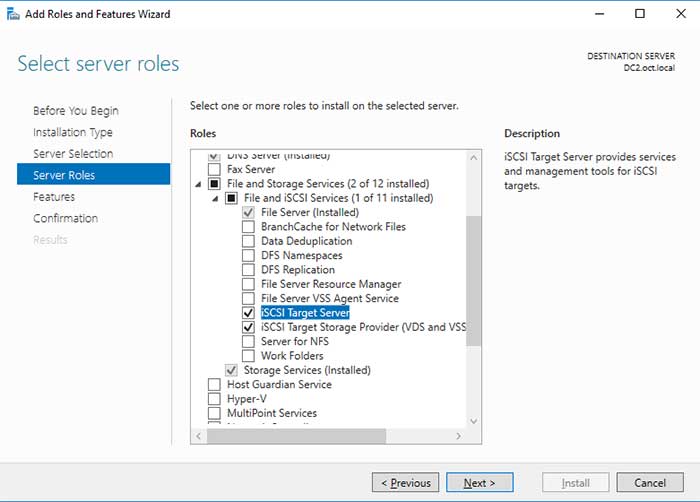
The first thing you need to do on your Windows server is to install the File and Storage Services Role from Server Manager. Click on Add Roles of Features from the Dashboard and then pick Role-based or feature-based installation. Then in the server selection screen choose the server you are logged into assuming that is the one you want to setup as your storage server and click on Next. Then under Server Roles go to File and Storage Services and click File and iSCSI Services. From there select iSCSI Target Server and click Next. You may or may not have additional options checked that differ from our example.
For the Features section you can leave the defaults as they are. Then click Next again to go to the Confirmation page which will show you what is to be installed. If you want the server to be rebooted automatically if needed during the installation you can check the box that says Restart the destination server automatically if required. Finally click on Install to begin the installation of the new role.
Configuring Your New Windows iSCSI Storage Server
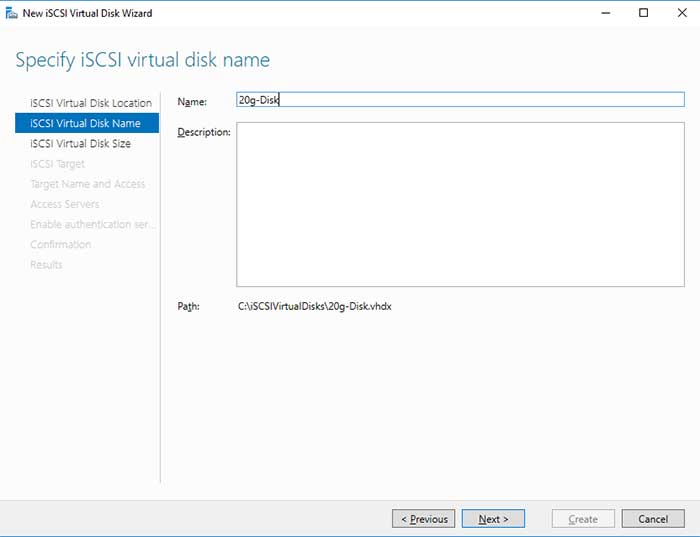
Now that you have the File and Storage Services iSCSI Role installed you can go back to Server Manager and click on File and Storage Services and then iSCSI to begin to create your iSCSI virtual disks (or LUNs). Next you will click the link to start the new iSCSI virtual disk wizard and go through the process of creating your first virtual disk which will be available to your network computers to attach to for storage usage.
Under the iSCSI Virtual Disk Location section choose the server you want to create the virtual disk on and what volume you want to use for the virtual disk. If this is your first or only storage server then you will only have one choice. If you have more than one volume (disk) on the server it will be listed as an option to use for storage. The default virtual disk location is iSCSIVirtualDisk on the drive you use unless you enter a custom location.

Next you will specify a name for your virtual disk and add a description if you like.
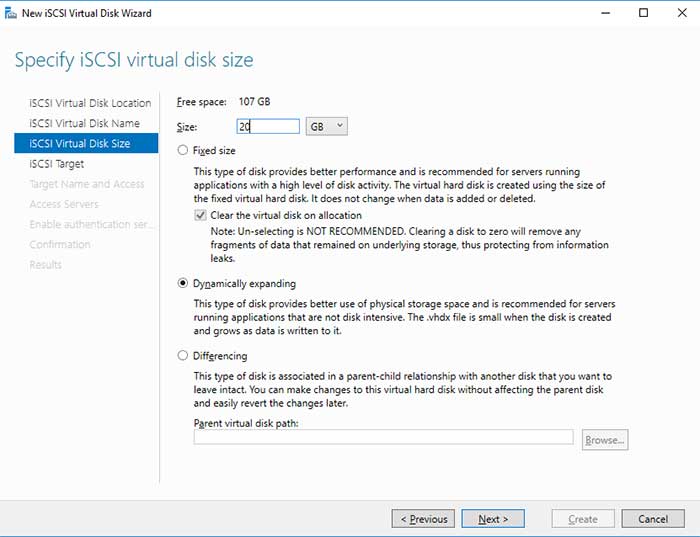
Now you will need to decide how much space you are going to allocate to your virtual disk. This can be allocated in megabytes (MB), gigabytes (GB) or terabytes (TB). Then you will need to decide on what type of disk you want to make and have 3 choices.
- Fixed – When a fixed disk is used it will consume all of the space allocated to it whether you are actually taking up the space with files or not. This choice offers higher performance.
- Dynamic – A dynamic disk will consume space as needed. So if you make a 20GB disk and only have 5GB of data then that’s all the room it will be taking on your drive.
- Differencing – This is used to isolate changes to a virtual disk or the guest operating system by storing them in a separate file. This makes it possible to maintain information about changes so they can be reversed if required.
The most commonly used options are fixed and dynamic and for our example we will use the dynamic option.
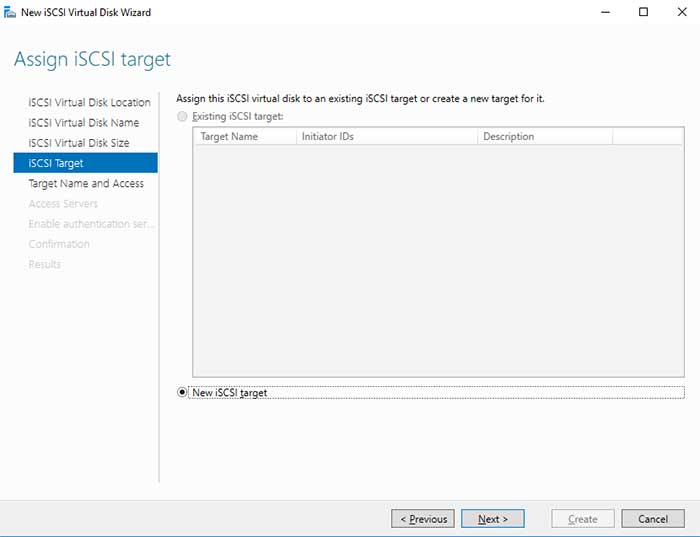
In the iSCSI Target section you will need to either make a new iSCSI target or assign the virtual disk to an existing iSCSI target. Since this is our first one we will create a new iSCSI target.
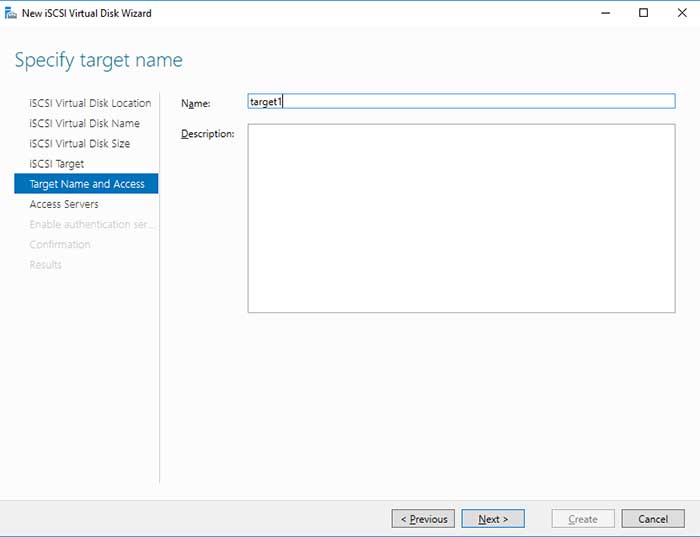
Next you need to assign a target name and add a description if you like.
In the Access Servers section you will click on Add to add the first network computer so that it is allowed to connect to our storage. Once you click on Add you will need to choose a method to identify the initiator which is the computer that is wanting to connect to the storage (iSCSI target).
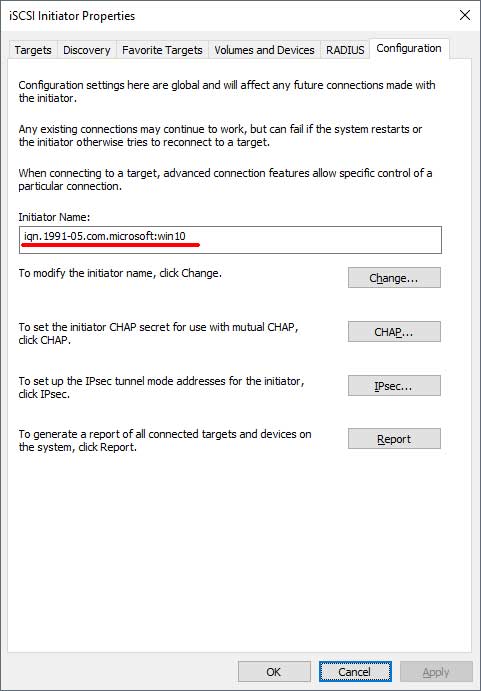
If you are on a Windows domain you can query the initiator by browsing to the computer in the directory. If not then you can use the Enter a value for the selected type method which can be an IQN (iSCSI qualified name) if you know it, DNS name, IP address or MAC address. To get the IQN from your computer search for iSCSI initiator on your computer and go to the Configuration tab. Here you will see a number that starts with iqn and that will be the number you are looking for. Keep in mind that the Microsoft iSCSI Initiator Service must be running to get this number.
We know that the IP address of the computer we want to give storage access to is 10.0.0.20 so we will use that for our setup.
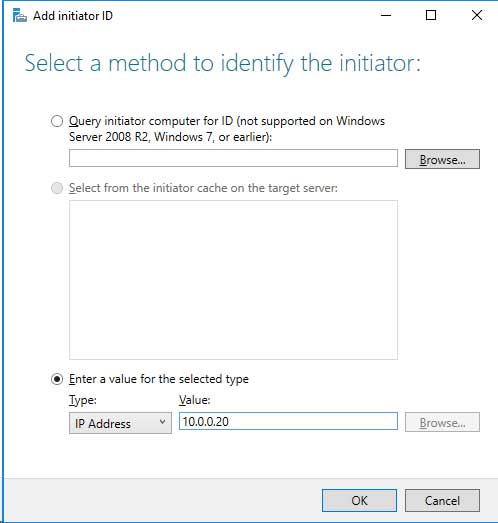
After putting in the method of identification you plan on using click on OK. Then on the next screen decide if you want to enable authentication via CHAP (Challenge-Handshake Authentication Protocol) or not. This authentication method requires that both ends of the communication share predefined security keys to make sure each end is who they say they are. We will skip this step for our demonstration.
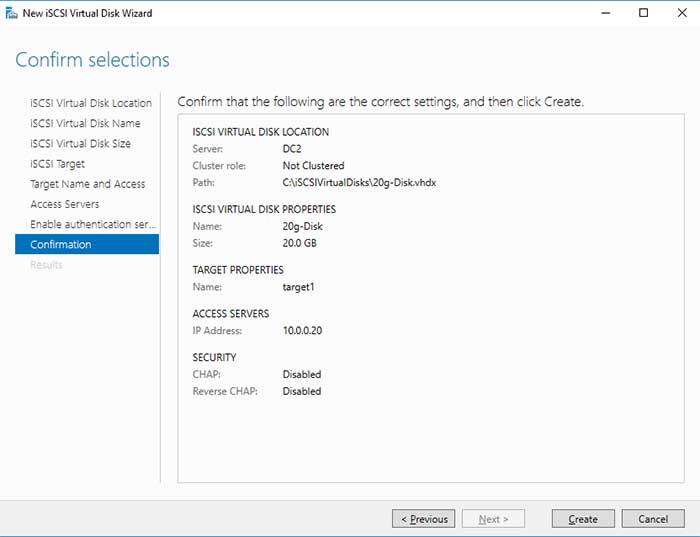
Finally you will get a confirmation screen summarizing all the options you selected during the wizard. Then click on the Create button to start the virtual disk creation process.
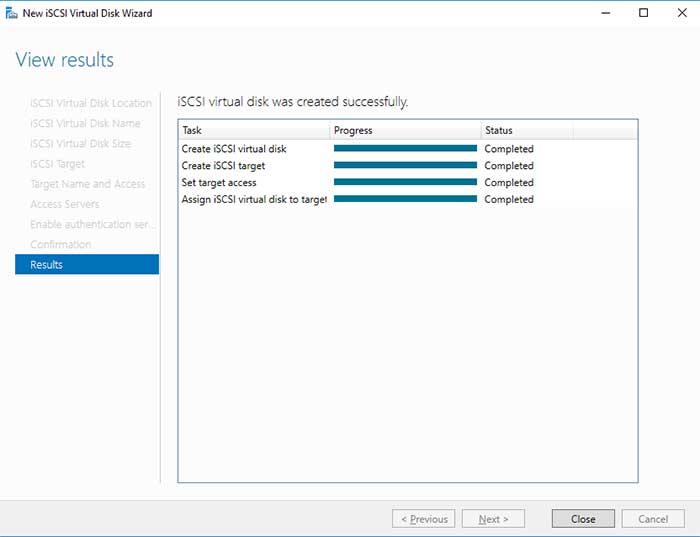
If everything worked correctly you will get a completed status for create iSCSI virtual disk, create iSCSI target, set target access and assign iSCSI virtual disk to target. Then you can click on the Close button.
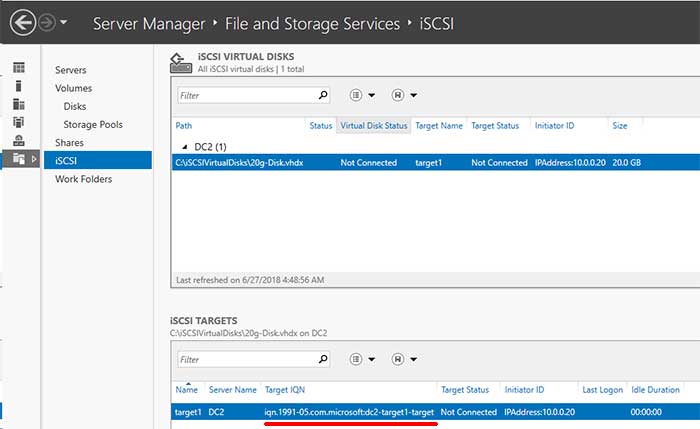
Back in Server Manager under iSCSI you will have your new virtual disk as well as the iSCSI target information that can be used to make the connection from the computer that will attach to the storage.
Attaching the Computer to the Newly Created iSCSI Storage
On the computer that you want to attach to your new storage (called the iSCSI initiator) you will need to open the Microsoft iSCSI initiator. This is the same process we mentioned earlier where you can search for iSCSI initiator to open the interface and start the service if it’s not already started. This time you will go to the Discovery tab and if there is nothing there click on Refresh and it should bring up the IQN of the iSCSI target which houses the storage that is shown on the image above from the Server Manager iSCSI section.

If it nothing shows up under Target portals then try clicking on Discover Portal and put in the IP address of the iSCSI target and leave the default port number. Then click the Advanced button and change the Local adapter to Microsoft iSCSI initiator and the Initiator IP to your the IP address of your computer.
Next go back to the Targets tab and click on Refresh and you should get the target IQN showing up under Discovered targets.
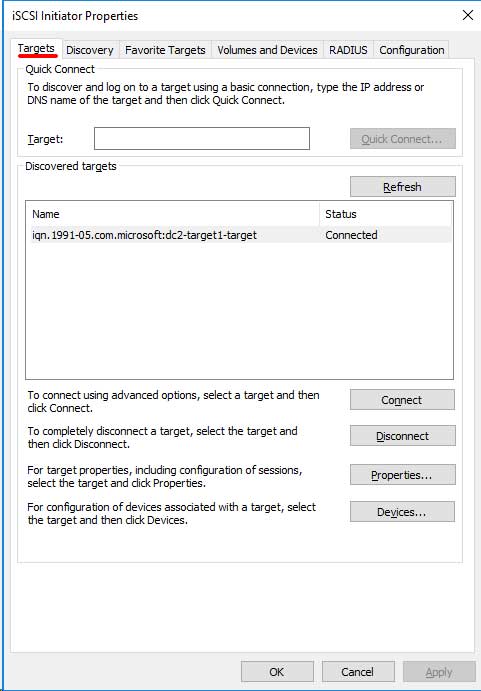
If nothing shows up you can try to type in the IP address of the storage server and click on Quick Connect. Under Discovered target you should see the IQN of the storage server and then you can click on the Connect button to have it show up under discovered targets like in the image above.
The next step involves going to Disk Management to make sure your new storage has been recognized by Windows so you can create a local volume and give it a drive letter. Once in Disk Management you should see your new disk shown as unknown and not initialized.
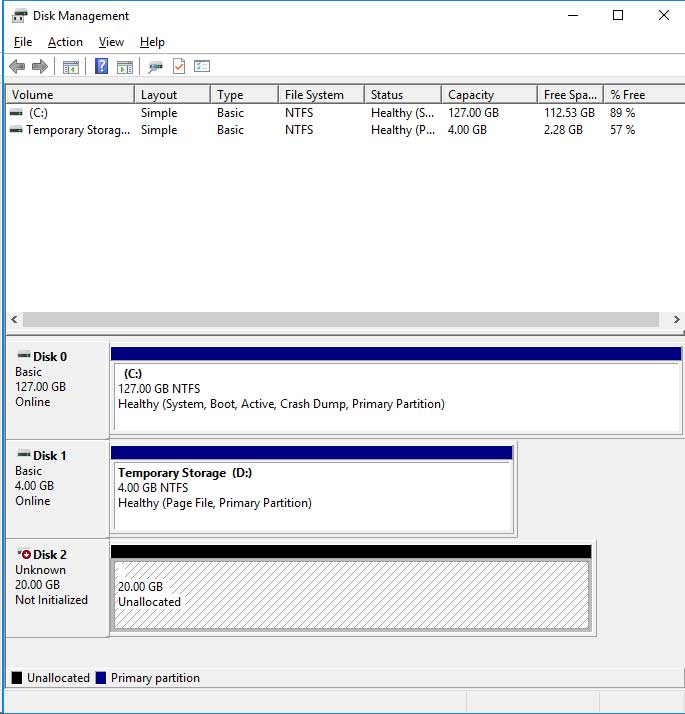
From here all you need to do is right click where it says unknown and choose Initialize Disk. Then decide if you want to use MBR or GPT and click OK. Then right click where it says Unallocated and choose New Simple Volume and go through the wizard to create a volume, assign it a drive letter and then format the disk.
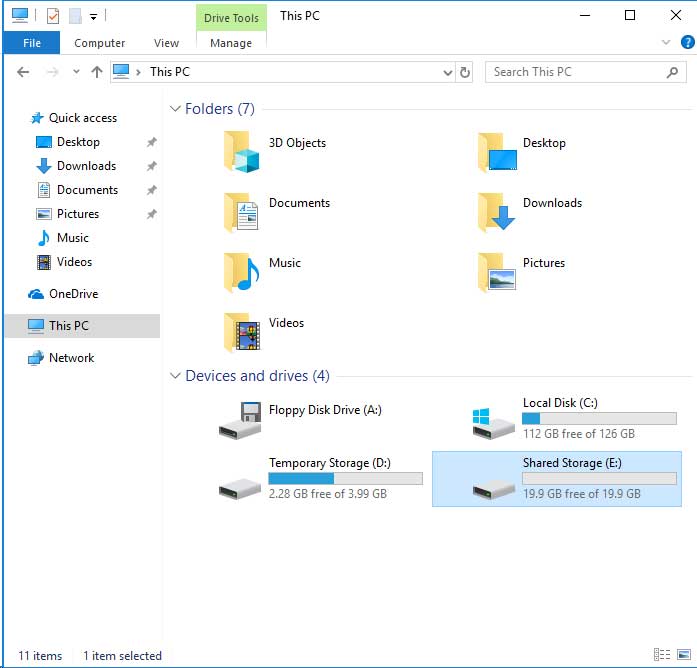
Then you can go to WindowsFile Explorer and you will see that you have your new disk that is ready to be used to store your files and folders.
For additional training resources, check out our online IT training courses.
Check out our extensive IT book series.