
Last Updated on May 18, 2026
VMware is one of the most popular virtualization platforms in use today. They have everything from enterprise level hypervisors to the free VMware Player app that anyone can use to create a virtual machine on their desktop PC. You have other choices for desktop virtualization software but if you want one of the best performing programs you can use to create virtual machines, you should give VMware Workstation Professional a try.
One feature that VMware Workstation has that you might find useful is the ability to have virtual machines start with the host PC so that way you do not need to start them manually or even open the console if you don’t want to. This is a fairly easy thing to set up, but you might have configure a few things to get it working properly. In this article, we will be showing you how to configure your virtual machines to start with the host in VMware Workstation.
1. Open the Virtual Machine Library
The first step in the process involves opening the VM library inside your active software console. You can do this by going to the View menu at the very top and then choosing Customize > Library. Then you will need to right click on My Computer in the left pane and choose Configure Auto Start VMs.

2. Remove Virtual Machine Encryption
One thing you will notice is that any VM encrypted with a password will not show up in the list. This happens unless you have that exact password stored for that virtual machine within the software itself. But even if you do have the password stored, it still might not start automatically upon boot. One thing you can try is to remove the encryption and TPM from your Windows 11 virtual machines to get them to automatically start. If you remove these items after Windows is installed, your VM should run fine in most situations.
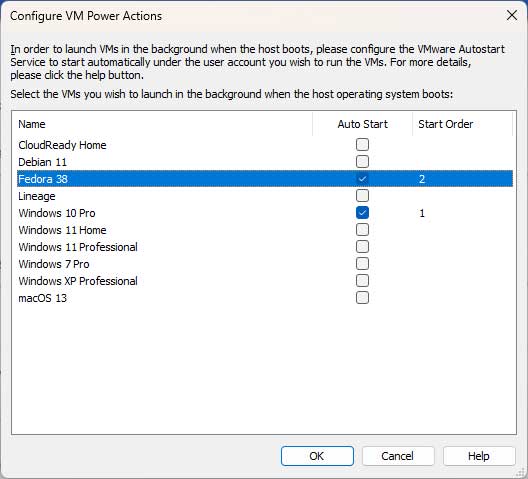
3. Define the Startup Order
The order that the virtual machines will start will be based entirely on the order that you select the checkboxes. The hypervisor honors this exact sequence to prioritize heavy server workloads over basic desktop guests. You can click directly on the Start Order column and type in a different number to change the sequence if needed.
4. Identify Configuration File Errors
Once you click the OK button you may immediately receive a popup error message. The system might say Failed to update AutoStart configuration. Ensure that the vmAutoStart.xml file exists and you have permissions to write to this file. It might also say Failed to get an exclusive lock on the configuration file. Another VMware process might be running using this configuration file.
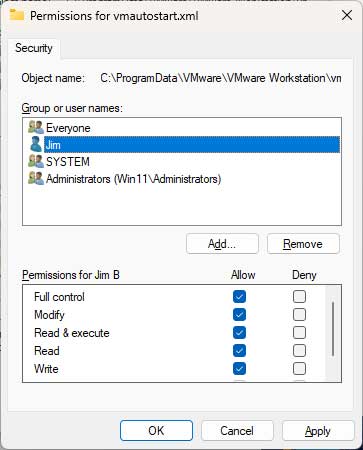
5. Locate the Autostart XML File
If this permission error happens, you must manually edit the security properties on the core configuration document. Open File Explorer and navigate directly to C:\ProgramData\VMware\hostd to locate the vmAutoStart.xml file. And if that doesn’t work or if you do not have the other folder or file, do the exact same thing for the file located at C:\ProgramData\VMware\VMware Workstation.
6. Edit Windows User Permissions
You must add your personal Windows user account directly to the strict permissions list for the XML file. Type the exact account name that you use to log into your physical desktop computer. Check the box to give yourself absolute Full control over the document and apply the changes.
7. Open the Windows Services App
You will need to change the startup type of the VMware Autostart Service to automatic. You may also need to change the login account for that service to the same one you used for the XML file if you run into any issues. To do so, go to the Windows Services app which can be accessed by typing services.msc directly in the taskbar search box.
8. Set the Service to Automatic
Scroll down the alphabetical list and double click the VMware Autostart service to open its properties window. Change its startup type from manual to Automatic to ensure the background process runs immediately upon boot. Click the Start button if you want to initialize it right now before the next reboot.
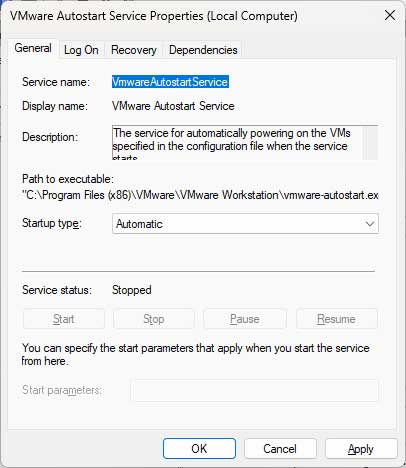
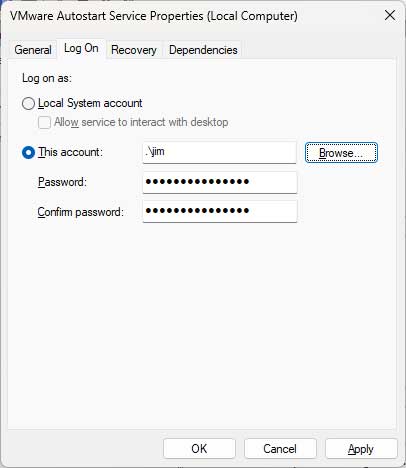
9. Change the Service Log On Account
Click the Log On tab at the top of the properties window to fix the service execution credentials. Change the active radio button from Local System account to This account. Add your personal Windows username and type your desktop password twice to verify it.
10. Automate the Workstation Application
Now you should be able to reboot your host machine and your virtual machines should automatically start on their own. One thing to keep in mind is that the VMware Workstation program will not automatically start its graphical interface on its own. You can add a shortcut to the vmware.exe file to your startup items by typing start:shell from the run dialog box. Paste the newly created shortcut directly into that hidden system folder. The main executable file should be located at C:\Program Files (x86)\VMware\VMware Workstation\vmware.exe.
11. Fix the Blank Screen Bug
One other extremely frustrating issue you may run into is that your VMs will have a totally blank screen after they start in the background. The hypervisor boots the machine correctly but fails to render the live display window. To get past this, you can try to suspend and then immediately resume the guest to force the login screen to appear.
For additional training resources, check out our online IT training courses.
Check out our extensive IT book series.


