Last Updated on September 12, 2026
If you like to play around with other operating systems besides Windows 11 such as Linux, you might find that you have some data on a drive that you want to use with your Windows based computer. Linux uses the EXT4 file system for the most part compared to the NTFS file system used with Windows.
If you have a drive that came from a Linux computer and need to get the data off of it and only have access to a Windows computer, then there is a free app you can use to copy files and folders from the Linux drive to your Windows computer.

The program we will be using to read and copy files from a Linux hard drive in Windows is called DiskInternals Linux Reader. They have a free version which can be downloaded from their website. They also have a Pro version with additional options and capabilities but for simple file recovery from a Linux drive, the free version should work just fine.
Viewing Drives in DiskInternals Linux Reader
1. Install and Open the Software
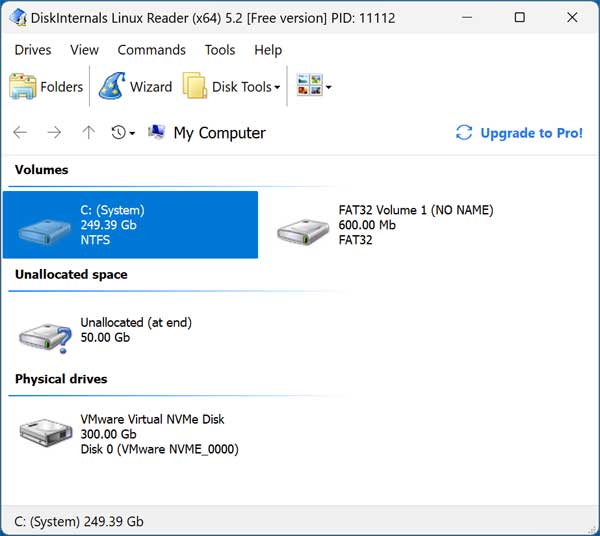
Once you install and open the DiskInternals software, you will see all the drives installed in your computer. The interface is separated into distinct volumes and physical drives. As you can see in the image below, we have a 300GB drive that contains a 250GB volume for Windows and 50GB of free space.
2. Compare with File Explorer
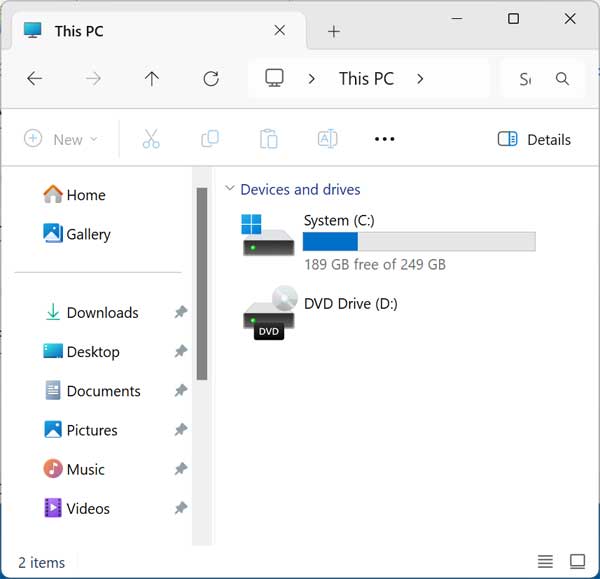
If we were to open the native Windows File Explorer, we would see highly similar information. Windows recognizes its own NTFS partitions perfectly. It completely ignores the Linux partitions sitting on the exact same physical disk.
3. Attach the Linux Hard Drive
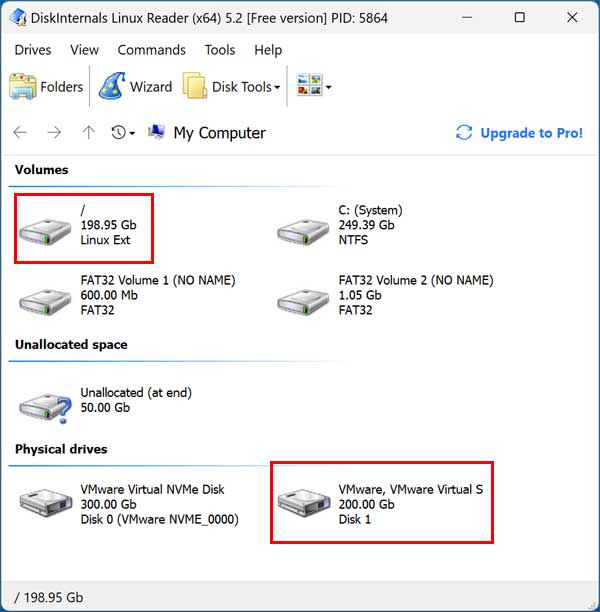
Once we attach a Linux hard drive to the computer and refresh the program, the interface updates immediately. We will now see that we have attached a 200GB drive with a 200GB volume on it. DiskInternals labels this specifically as a Linux Ext volume so you can identify it easily.
4. Understand Physical Drives vs Volumes
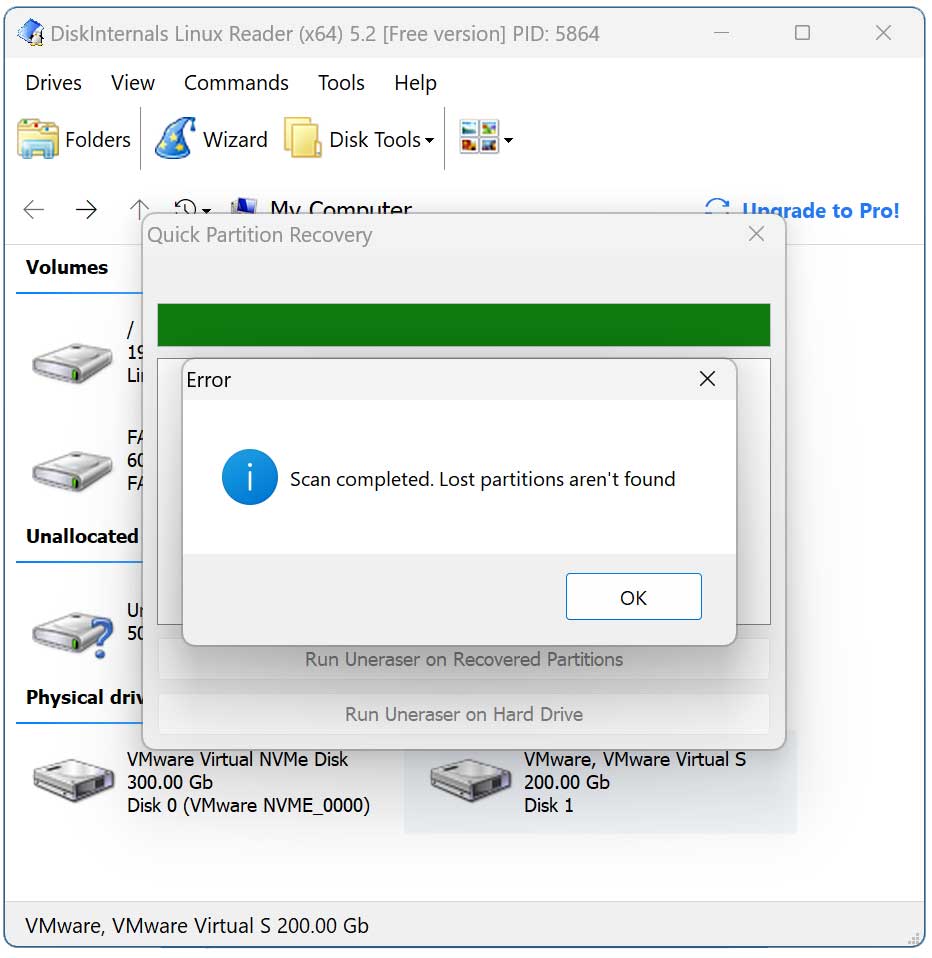
If you were to click a drive under the Physical drives section, it would trigger the recovery wizard. A physical drive is a raw storage container, not a formatted file system. Volumes like your Linux partition or C: drive are individual, formatted partitions. Because Linux Reader recognizes their file system structure like Ext4 or NTFS, double-clicking a volume opens its directory tree so you can view and copy files.
5. Avoid the Quick Partition Recovery Wizard
Physical drives represent the entire virtual disk hardware, which contains all your partitions, partition tables, and unallocated space combined. Since a raw physical disk isn’t a folder, double-clicking it tells Linux Reader to inspect the drive’s entire layout. This automatically launches the Quick Partition Recovery wizard to scan for missing or lost partitions across the entire disk.
Navigating the Linux File System
1. Open the Linux Ext Volume
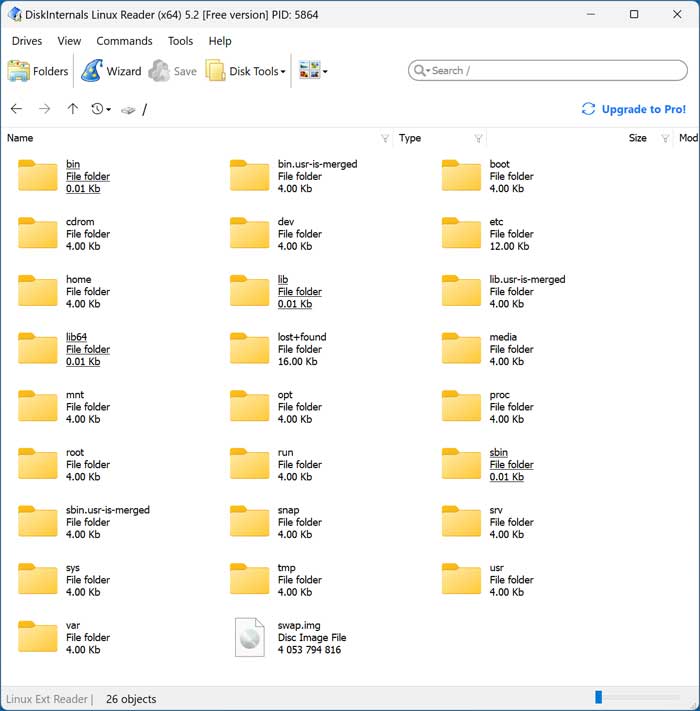
If we were to click on the Linux Ext volume, we would then be shown the files and folders contained within that specific volume. The software translates the EXT4 architecture into a readable Windows format. You can see all the core Linux system folders immediately.
2. Browse the Directory Tree
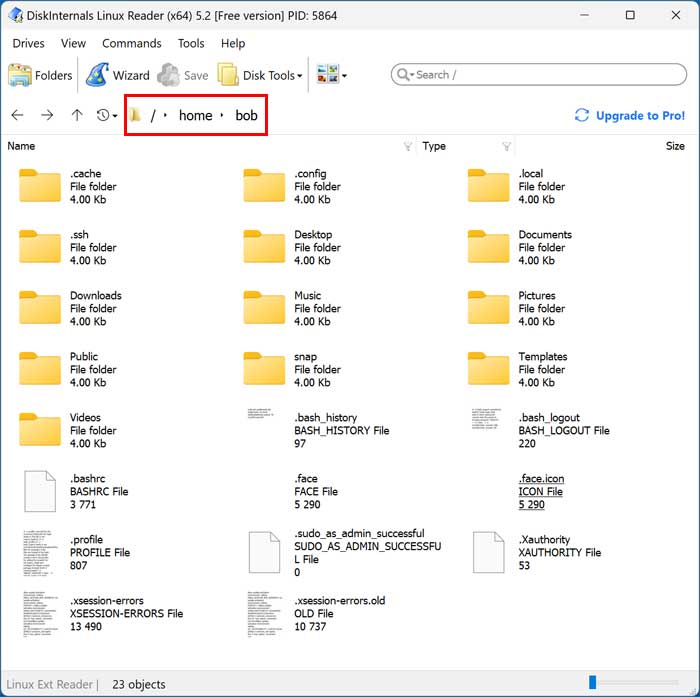
We can then navigate the file structure just like you can when using File Explorer in Windows. Double-click on the home folder to find your specific user profile. This is where all your personal documents and downloaded files reside on a standard Linux installation.
3. Access the Right Click Menu
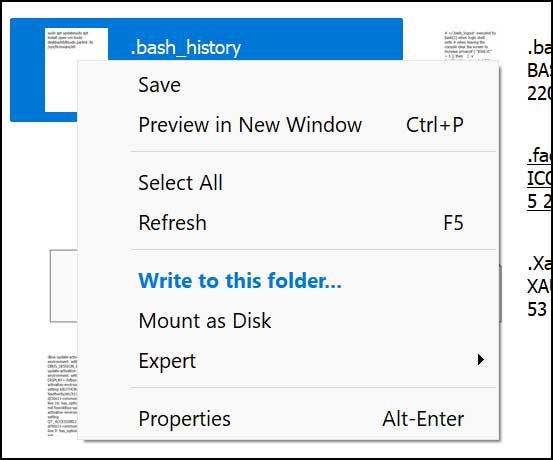
If you right click on a specific file or folder, you will be shown a list of actions that you can take on that item. The context menu provides several advanced extraction tools. These options dictate exactly how the data moves from the Linux drive to your Windows environment.
Right-Click Context Menu Options
1. Save Files and Folders
The Save option exports the selected file or folder from the Linux partition onto your Windows hard drive. This is the primary function you will use to rescue your data. It triggers the dedicated export wizard to handle the file transfer safely.
2. Preview in a New Window
The Preview in New Window command opens a built-in viewer so you can read or view the contents of a file without saving it to Windows first. You can use the Ctrl+P keyboard shortcut to trigger this action. It works perfectly for checking text logs or reviewing images before copying them.
3. Select All Items
The Select All function highlights all items inside the current directory. This saves you from having to click dozens of individual files manually. Use this when you want to backup an entire user profile directory at once.
4. Refresh the Directory
The Refresh command reloads the directory view to update the list of files. You can press F5 on your keyboard to trigger this action instantly. This forces the software to rescan the folder if you suspect a file is missing from the display.
5. Write to This Folder
The Write to this folder option attempts to add or write new files directly into the Linux folder. This specific feature requires a paid Pro license to function. The free edition of DiskInternals is strictly a read-only application to protect your data.
6. Mount as a Virtual Disk
The Mount as Disk option maps the selected folder or partition as a virtual drive letter directly in Windows File Explorer. This allows you to browse the Linux files using standard Windows applications. It essentially bridges the two file systems together temporarily.
7. Access Expert Diagnostic Tools
The Expert option opens a sub-menu containing advanced diagnostic tools. You get access to raw hex viewing, deep sector inspections, and file hashing utilities. IT professionals use these tools to verify data integrity on failing hard drives.
8. View File Properties
The Properties command displays crucial metadata regarding the selected item. You can press Alt-Enter to bring up this information panel. It shows the exact file size, the specific Linux directory path, timestamps, and the original Linux read/write permissions.
Exporting Files to Windows
1. Launch the Export Wizard
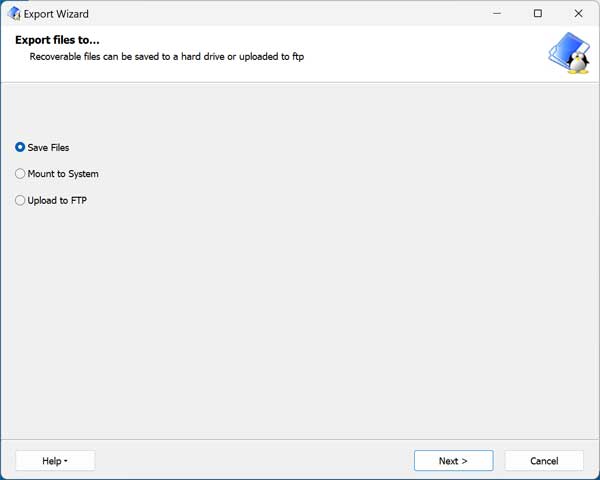
To copy a file or folder from your Linux hard drive to Windows, you can simply right click that file or folder and choose the Save option. This launches the dedicated Export Wizard. This interface will give you several options as to how you want to recover your files or folders.
2. Save Files Locally
The Save Files option copies the selected files or folders directly onto your Windows hard drive or an external storage device. This is the default and most common option used to extract data safely. It creates a perfect one-to-one copy of your selected Linux files.
3. Mount to System
The Mount to System option attaches the disk or partition as a virtual drive letter such as Z: in Windows File Explorer. This lets you access the files in standard Windows programs without duplicating them first. It saves massive amounts of space on your Windows system drive.
4. Upload to FTP Server
The Upload to FTP option sends the selected files directly to a remote server or network-attached storage over the File Transfer Protocol. You can push gigabytes of recovered data straight to a NAS device. This keeps your local Windows drive completely free of clutter.
5. Choose the Output Folder
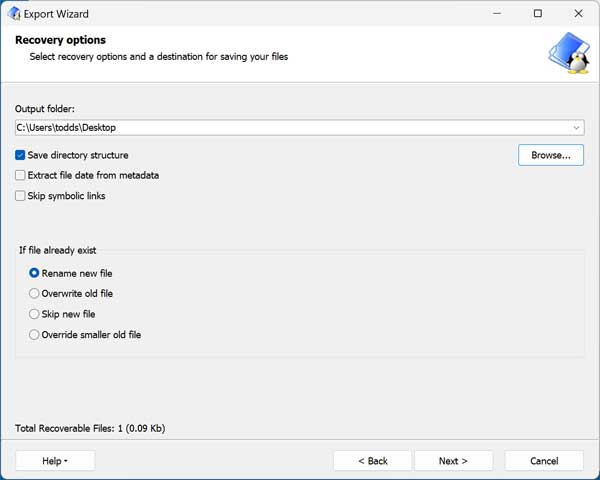
If we choose the standard Save Files option, we can then choose the exact destination output folder. You must also choose which specific save options we want to have applied during the transfer. Click the browse button to select a folder on your Windows PC where the exported files will be saved safely.
Configuring General Export Options
1. Save Directory Structure
The Save directory structure setting recreates the full folder path and subfolders from Linux directly on your Windows drive. It prevents the software from dumping every single file into one massive, unorganized folder. This keeps your complex project directories perfectly intact.
2. Extract File Date from Metadata
The Extract file date from metadata setting applies the original Linux creation and modification dates to the newly saved Windows files. It prevents the system from tagging every recovered file with today’s date. This preserves your historical file timelines accurately.
3. Skip Symbolic Links
The Skip symbolic links option completely ignores Linux shortcuts that point to other files or folders. This prevents broken or duplicate files from being created on your Windows machine. Windows cannot read Linux symlinks, so skipping them saves processing time.
Handling Duplicate Files
1. Rename New File
The Rename new file option keeps the existing Windows file intact. It simply adds a number to the end of the newly exported file’s name like file (1).txt. This ensures neither version of the document is lost during a bulk transfer.
2. Overwrite Old File
The Overwrite old file setting replaces the existing Windows file with the newly exported Linux file immediately. It does this without asking for any confirmation prompts. Use this only if you know the Linux version is definitely the most current draft.
3. Skip New File
The Skip new file option tells the software to ignore the export entirely if a file with the exact same name already exists in the destination folder. This speeds up incremental backups significantly. It only copies files that are genuinely missing from the Windows drive.
4. Override Smaller Old File
The Override smaller old file option replaces the existing file on Windows only if its file size is strictly smaller than the Linux version being exported. This is incredibly useful if a previous export was cancelled mid-way. It resumes the transfer and overwrites the broken partial files.
Additional DiskInternals Tools
1. Install Linux Writer
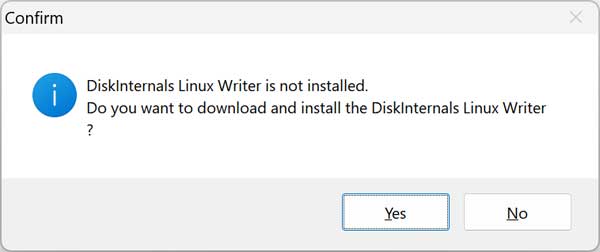
If you want to write files to your Linux drive from your Windows computer, you will need to install the DiskInternals Linux Writer. You will be able to go to the official website and download the app directly. The free Reader version absolutely cannot push data back to the EXT4 partition.
2. Browse the Top Menu Options
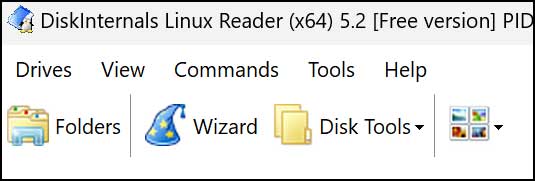
There are several menu options and icons at the top of the program you can also use to do things such as browse your folders in a tree view. You can run the wizard that will scan your drives for files that can be recovered. The Disk Tools section gives you a way to download extra tools such as the Ext Formatter and Linux Writer modules.
3. Download Premium Recovery Tools
The Tools drop menu option will let you download additional premium tools directly from the vendor. These include the RAID Recovery, VMFS Recovery, and Partition Recovery tools. You may also want to check out the free Linux File Systems for Windows by Paragon Software tool that can also help you recover files and folders from Linux hard drives in Windows.
For additional training resources, check out our online IT training courses.
Check out our extensive IT book series.