Last Updated on March 16, 2026
Everyone who has a computer has printed a document or picture at some point and many people have different printers for different kind of printing. For example you may have a laser printer for your work documents and a photo printer for your pictures. Or if you are at work you may have multiple network printers installed on your computer for different purposes such as printing blueprints to a plotter or large documents to a networked copier.
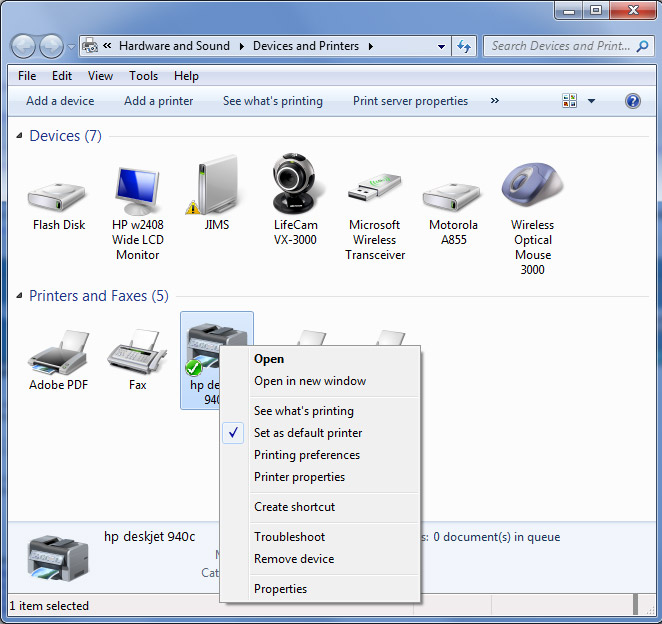
If you have more than one printer and have one that you use more than the other, it’s a good idea to set it as the default printer. The default printer is the printer that Windows uses as its first choice of printers unless you choose a different printer before printing your document. To set the default printer, go to Start, Settings then Printers or Start and Devices and Printers depending on your version of Windows. Find the printer you want as your default, right click it and select Set as Default Printer.

For Windows 10 you can use Devices and Printers or the newer Printers and Scanners utility. They both do pretty much the same thing but just look different. If you type in printers in the search box, you can get to it that way. You can also get to it from Settings and then Devices. Here is how you access Devices and Printers in Windows 11.

Setting your most commonly used printer as default comes in handy so you don’t have to go to File, then Print and pick the printer but instead can go to your printer icon on your toolbar in such applications as Word and Internet Explorer which will print to the default printer the first time you click it.
For additional training resources, check out our online IT training courses.
Check out our extensive IT book series.