Last Updated on July 19, 2026
Almost everyone who has a computer has printed or has had the need to print something at some time whether it’s been a document or picture etc. When it comes to printers, not all printers are the same. There are different types of printers with different functions and some work better than others for certain types of print jobs. Knowing what type of printer you need will allow your print jobs to look their best.
A laser printer differs from other types of printer such as dot matrix and ink jet in the way that it doesn’t directly put ink on the paper. It uses a laser along with electricity to fuse the image to the paper with toner. This specific method produces incredibly sharp text documents at very high speeds.
The Initial Data Processing Phase
1. Sending Data to Printer Memory
First, the computer sends the raw print data over your local network or USB cable directly to the printer. This incoming information is instantly stored in the printer’s internal memory board. Modern laser printers pack gigabytes of RAM to handle massive PDF files and complex graphics without freezing.
2. Loading Custom Fonts
Next, the printer processor analyzes the incoming document file for missing typography. If the print job needs any fonts that the printer does not have, those specific files are sent to the printer and stored in its memory. This guarantees your final physical document looks exactly like the digital version on your screen.
The Core Printing Mechanism
1. Charging the Photoreceptor Drum
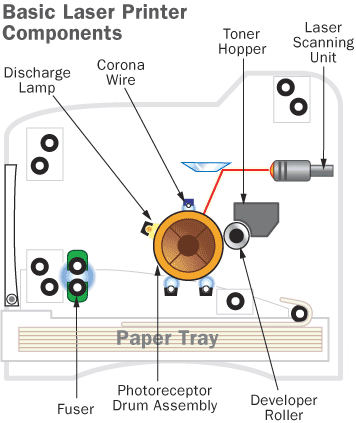
The main concept in use with a laser printer is static electricity. The core component of this system is the photoreceptor, which is a revolving cylinder shaped drum. This drum assembly is made of photoconductive material that is discharged by light photons. Before printing occurs, the drum must be cleaned to remove any traces of previous pages. The drum is given a positive charge by the corona wire, which is a wire with an electrical current running through it.
2. Writing the Image with a Laser
As the drum revolves, the printer shoots a small laser beam across the surface. This laser discharges certain points to draw the letters and images to be printed as a pattern of electrical charges. The data in the printer’s memory is written to the drum using this laser instead of ink or toner and this process changes the electrical charge in those spots.
3. Applying the Toner Powder
After the invisible electrical pattern is made, the printer coats the drum with positively charged black powder called toner. As the paper is being drawn into the printer, the toner is applied directly to the drum. Since it has a positive charge, the toner clings to the negatively discharged areas of the drum, but not to the positively charged areas. At this point, the entire image rests on the drum along with the toner particles.
4. Fusing the Toner to the Paper
Finally, the printer passes the paper through the fuser, which is a pair of highly heated rollers. When the paper passes through these rollers, the loose toner powder melts instantly. It fuses with the fibers in the paper making it stick permanently to the page. This extreme heat is exactly why printed pages feel warm when they hit the output tray.
5. Erasing the Drum for the Next Job
The last step of the fusing process involves the pressure roller. This is a heavy rubber roller that presses against the fuser roller while the paper feeds between them. After putting the toner on the paper, the drum surface passes the discharge lamp. This bright light exposes the entire photoreceptor surface, erasing the original image and making it ready for the next print job.
For additional training resources, check out our online IT training courses.
Check out our extensive IT book series.