Last Updated on May 27, 2026
Microsoft Windows uses connection names and adapter names for both Ethernet and wireless network connections. For the adapter name it will be something similar to Ethernet or maybe Ethernet2 if you have more than one Ethernet adapter in your computer. For wireless network connections, you will see a name such as Wi-Fi.
For the connection name, you will see something such as Network 1 for Ethernet connections and Wi-Fi for wireless connections.
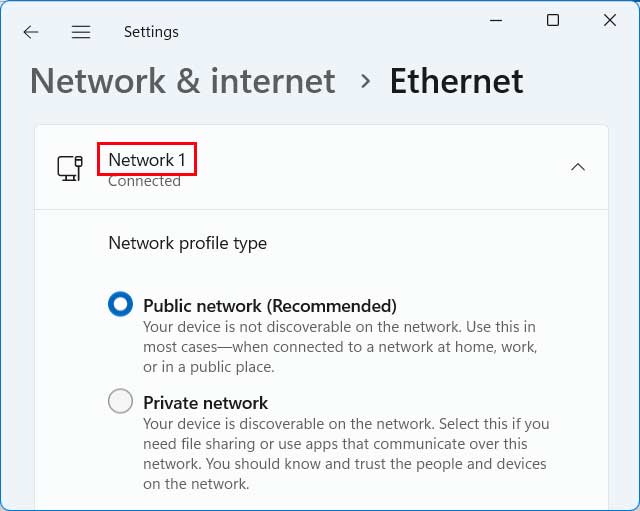
If you go to the Windows settings app and then to Network & internet, you will be able to see the network adapter name as seen in the image below.

If you were to click the arrow in the Ethernet section, you would then be able to see the network name as shown below.
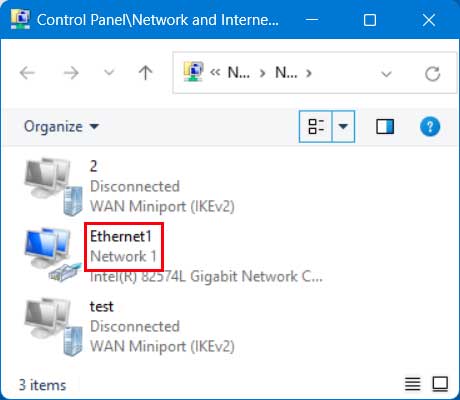
If you prefer using the Windows Control Panel, you can then go to the Network and Sharing Center and click on the Change adapter settings link to see the same information.
How to Change Network Adapter Names in Windows
If you want to change the adapter name from its default, it is a very easy thing to do, and this can be done from the Windows settings app or the Network and Sharing Center in Control Panel.
1. Open Advanced Network Settings
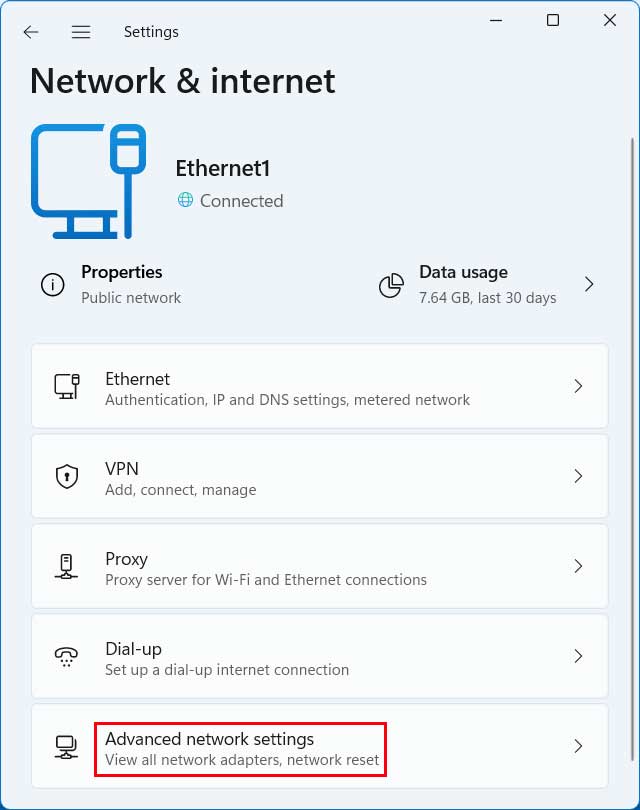
To change the adapter name using the Windows settings app, simply go to the Network & internet settings. Choose the specific adapter if you have more than one active on your machine. Scroll down to the bottom of the page to find the Advanced network settings menu.
2. Rename the Target Adapter
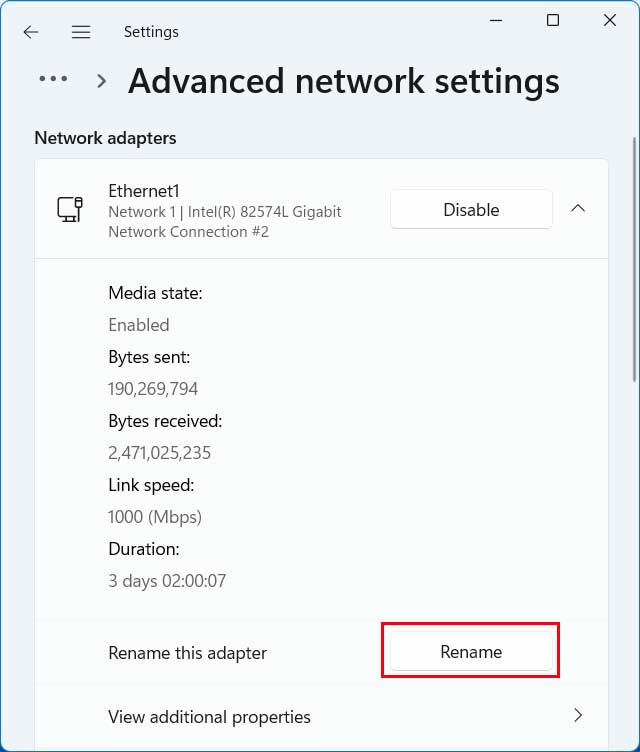
From here, expand the section that has the adapter name to reveal more options. Find the specific section that says Rename this adapter, and click on the Rename button. You will then be able to type in the new name for your network adapter and save it to the system.
3. Use the Control Panel Alternative
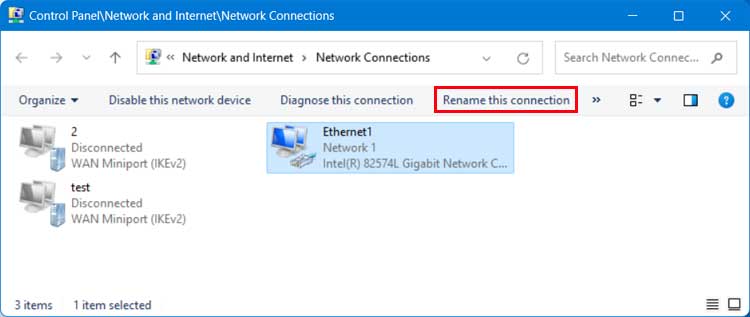
To change the adapter name from the legacy Network and Sharing Center, simply click on the link that says Change adapter settings. Find the exact adapter you wish to rename and click on it with your mouse to highlight it. You should now have an option in the top ribbon that says Rename this connection. You can also right click on the adapter directly and choose Rename from the context menu.
4. Verify the New Adapter Name
No matter which method you use to change the adapter name, it will be updated immediately in both locations. We changed ours to say Office PC as seen in our example below. This visual confirmation ensures your operating system registered the hardware identifier change properly.

Here is a video that shows the process we just covered.
How to Rename Your Network Connection
Now we will change the name of the network itself from Network1 to Production LAN. There are several ways to accomplish this. You can use a third party app as shown in this video here.

But if you want to do it using the built in Windows tools, this is an easy process although not as easy as changing the adapter name.
1. Launch the Local Security Policy Editor
If you are on a professional version of Windows such as Windows 11 Pro or Windows Server edition, you can use the Local Security Policy Editor to change the network connection name. To open this administrative tool, simply type in secpol directly in the taskbar search box. Hit Enter to launch the utility with elevated privileges. You can actually enable the Local Security Policy in Windows 11 by following these steps.
2. Open Network List Manager Policies
Next, find the section named Network List Manager Policies located on the left hand side of the window and select it. This reveals your active network profiles. Double click the specific network name from the choices populated on the right side of the screen.

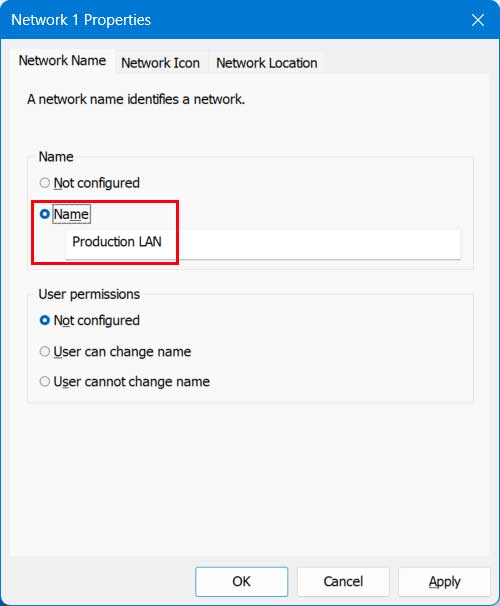
3. Apply the New Connection Name
From the Network Name tab, find the Name section and change the radio button from Not Configured to Name. You will then be able to type in a brand new network name into the blank text field. Click the OK button at the bottom to have the change take effect immediately.
4. Open the Windows Registry Editor (Home Users)
For Windows Home users (and Pro), you can open the Windows Registry Editor by typing regedit in the taskbar search box. You must bypass the Local Security Policy tool since the Home edition strips it out completely. Confirm the User Account Control prompt to gain access to the system registry.
5. Navigate to the Network Profiles Key
Next, you will need to navigate to the exact network profile key location. Expand the folders in the left pane to drill down through the directory tree. You can also copy and paste the following directory string directly into the address bar at the top of the editor.
Computer\HKEY_LOCAL_MACHINE\SOFTWARE\Microsoft\Windows NT\CurrentVersion\NetworkList\Profiles
6. Identify the Correct Profile String
You may have several keys (folders) under Profiles with very long alphanumeric names. You will now need to click on each one manually. Look at the volume for ProfileName in the right pane as you click through the folders to identify your target network.
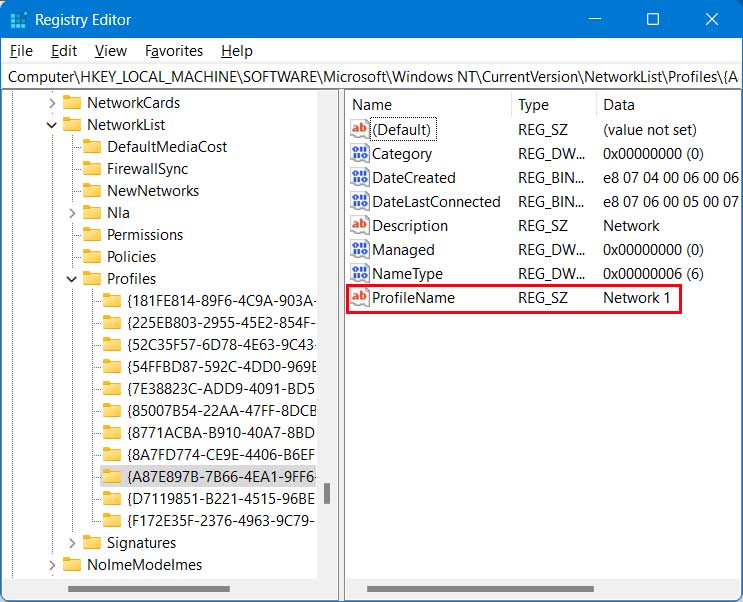
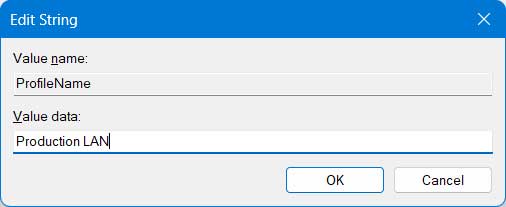
7. Edit the Profile Name Value
Once you find the right one, you can double click on the ProfileName string to open its properties. Change the connection name directly in the Value data box. Click OK to save this new string permanently to your machine.
8. Verify Your Network Settings
Now when you go back to your network settings, you will see the new network name active. This change affects how your computer identifies the active LAN or Wi-Fi broadcast in your system menus.

Here is a video that shows how to perform the steps using these methods.

For additional training resources, check out our online IT training courses.
Check out our extensive IT book series.