Last Updated on April 19, 2026
VMware Workstation is one of the most popular desktop virtualization platforms in use today. It can be used on Windows desktop computers along with other virtualization software such as Oracle VirtualBox and Microsoft Hyper-V.
One common thing that people like to do when running VMs (Virtual Machines) is transfer files between the VM and the host computer itself. VMware Workstation has a feature called Guest Isolation that allows you to drag and drop files between your hosts and guests. However, you need to have the console for that virtual machine open to do so.
But there is another way to transfer files between VMs and your host that you may find useful. In this article, we will be showing you how to enable shared folders to access files between your host and virtual machines in VMware Workstation. This allows seamless background file transfers without constantly dragging files across your screen.
Configuring Virtual Machine Options
1. Open the Virtual Machine Settings
The first step in the process involves opening the specific settings for the virtual machine that you want to share files with. Right click the VM name in the left pane of the VMware Workstation interface. Choose Settings from the drop down menu to open the hardware configuration window.
2. Locate the Shared Folders Option
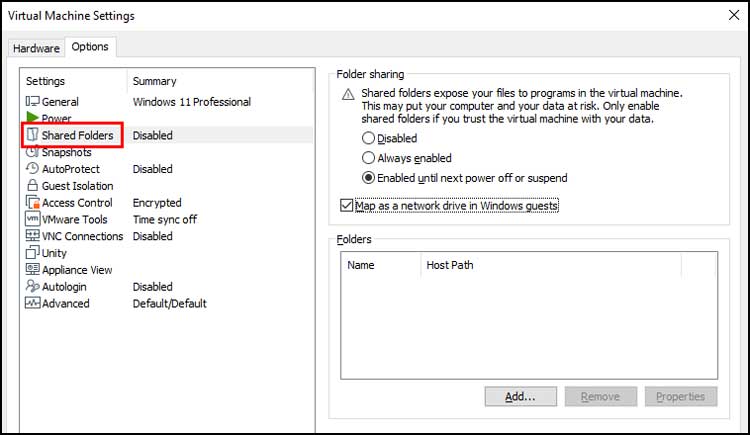
You will then need to go to the Options tab at the top of the window. Look down the left side menu for the Shared Folders setting. Click on it to reveal the configuration options on the right side of the screen.
3. Change the Folder Sharing State
This setting should be disabled by default. You can then change it to Always enabled or Enabled until the next power off or suspend. The second option will automatically disable the share when the VM comes back online for increased security.
4. Enable Network Drive Mapping
If you check the box that says Map as a network drive in Windows guests, then the virtual machine will assign a specific drive letter to the shared folder on your host computer. This makes the shared folder act exactly like a standard hard drive inside the VM.
Adding the Host Folder to the Share
1. Start the Add Shared Folder Wizard
Once you click the Add button at the bottom of the window, a new wizard will appear on your screen. You will then need to choose the specific folder you wish to share on your physical host computer. Click the Browse button to locate the exact folder path.
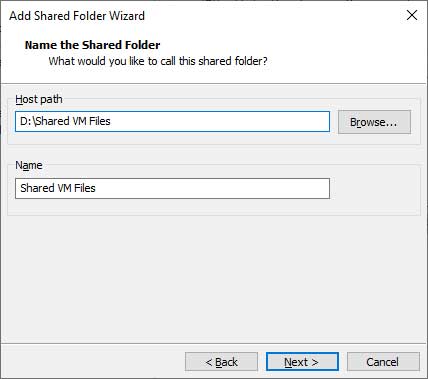
2. Name the Shared Folder
VMware Workstation will then use that specific host folder name as the official share name. You can change this text in the Name box if you choose to do so. Click the Next button to proceed to the final step.
3. Configure the Share Attributes
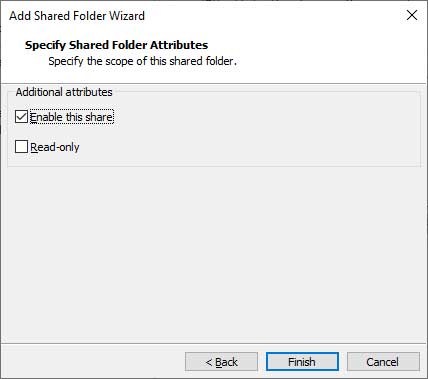
After you click the Next button, you will then have the option to officially enable the share. You can also check the box to make it Read-only. This prevents anyone inside the virtual machine from adding, removing, or editing the files located in your physical host folder.
4. Finish the Setup Wizard
Review your attribute choices carefully. Click the Finish button to save the configuration. You can now close the main Virtual Machine Settings window.
Accessing the Shared Folder Inside the VM
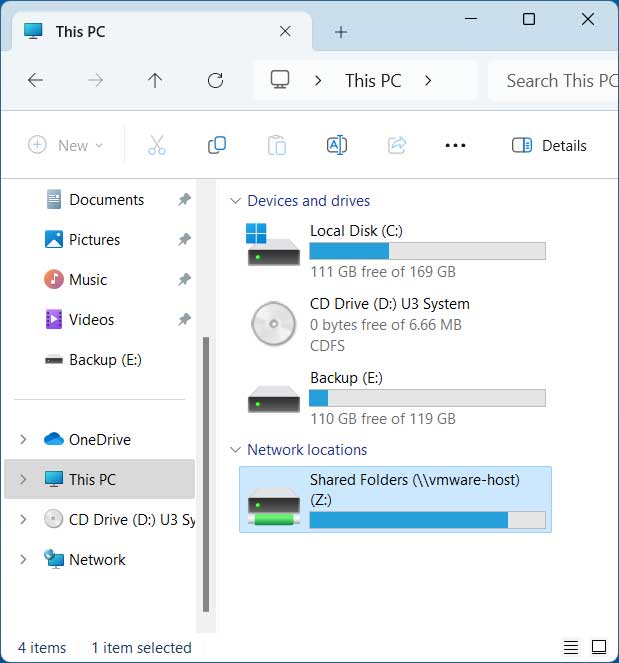
1. View the Mapped Network Drive
Boot up your virtual machine and log into Windows. Open File Explorer and click on This PC. You will then see your newly mapped drive on your VM assuming you checked the Map as a network drive in Windows guests box in the previous steps. This mapped drive will most likely be using the letter Z.
2. Access the Shared Files
You can then double click on the mapped drive to open it. You will immediately see the contents of the shared folder from your host machine. You can copy, paste, and add files as needed just like a normal folder.
3. Find Unmapped Network Shares
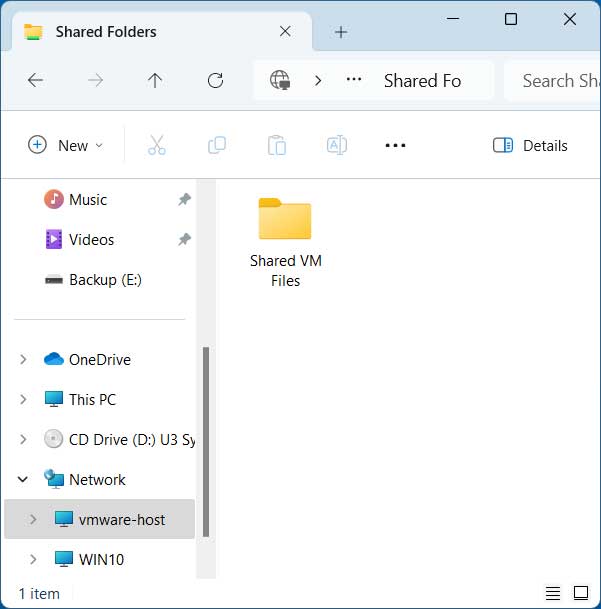
If you didn’t use the Map as a network drive in Windows guests box option, you will need to locate the share manually. Click on the Network section in the left pane of File Explorer. Look for a computer icon that says vmware-host and then click on that to view the shared folder.
4. Disable the Share When Finished
As you can see, its fairly easy to enable shared folders to access files between your host and virtual machines in VMware Workstation. If you want to disable this share for security reasons, you can go back to the settings for the virtual machine and change the toggle back to Disabled.
For additional training resources, check out our online IT training courses.
Check out our extensive IT book series.