
Last Updated on June 5, 2026
When you are working with certain applications or programs in Windows and save your work, your computer will save your files to various default storage locations depending on what program you are working with. For example, if you are working on a Microsoft Word document and click on Save, Word will want to save it to your Documents folder by default. Or maybe you are visiting a website using Microsoft Edge and download a file from that site. Windows will want to save it to your Downloads folder unless you tell it otherwise.
Most people like to use these default folders, but you might have a reason to save your files on a different hard drive. Maybe you don’t want your important files on the same drive that Windows is installed on or maybe you are using a smaller SSD (Solid State) drive and don’t have room for all of your personal files on your system (C:) drive. In this article, we will be showing you how to change the default storage location for the documents, pictures, videos, music, desktop and downloads folders.

Changing the Default Windows Folder Locations
1. Locate Your User Directory
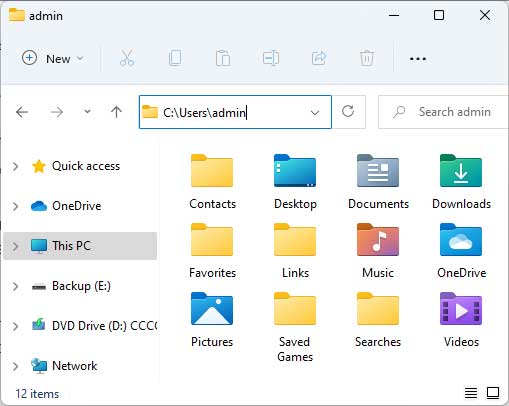
Open up Windows File Explorer and navigate directly to the C:\Users\username folder path on your primary drive. The username variable represents the exact account name you use to log into Windows. You will immediately see that all of your common default folders are physically located right there. Your folder icons might look slightly different visually if you are running an older build of Windows 10 rather than a modern Windows 11 installation.
2. Open the Folder Properties Menu
Right click directly on one of these specific folders such as Documents. Choose the Properties option from the context menu to open the configuration window. You will see a dedicated tab explicitly called Location at the very top. Clicking on that specific tab will immediately show you the current hard drive path of that particular folder. The example image below shows this folder located at C:\Users\admin\Documents because admin is the active user logged into the computer. You can apply a quick registry fix if you are entirely missing the Location tab.

3. Specify the New Drive Location
Click on the Move button to begin relocating this user directory. You must manually browse to the brand new location such as a completely different secondary hard drive. Our specific example uses an external drive labeled (E:). You can select a target folder you created previously or just click on the New folder button right now. Type in an identical name for the folder such as Documents to keep your file structures perfectly organized.

4. Apply the Folder Changes
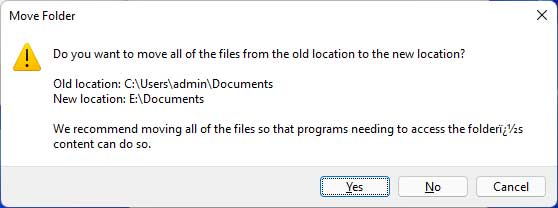
Click on the Select Folder button once you successfully create and highlight the new target directory. Look back at the main Properties screen and click on the Apply button to confirm the path change. Windows will pop up a prompt asking if you want to physically move all of the existing files from your original location to the new drive. You definitely want to click Yes to move your existing files so everything stays completely consolidated in one single place.
5. Verify the Quick Access Links
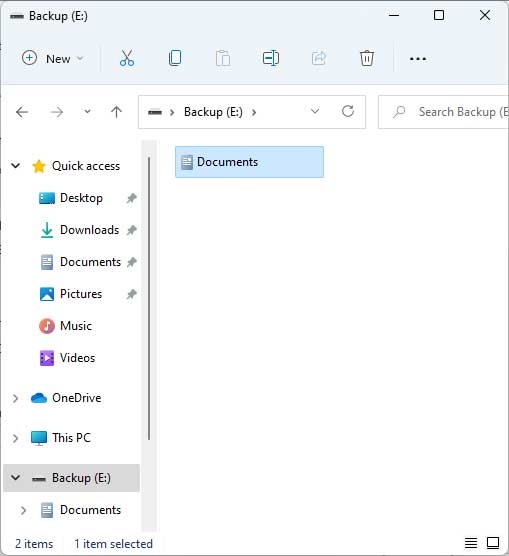
You will now clearly see that your selected folder physically resides in your brand new hard drive location. It is still conveniently listed in the exact same place under your Quick access list inside File Explorer. Saving a new file to either location will technically write data to the exact same folder. You can comfortably use either shortcut without worrying about fragmenting your personal files.
6. Repeat for Other Default Folders
Windows does not offer a massive batch operation to move all user directories at once. You will strictly need to repeat this exact same process for each individual folder. Just right click on your Desktop, Pictures, Music, or Videos folders to systematically point them directly to your secondary storage drive.
For additional training resources, check out our online IT training courses.
Check out our extensive IT book series.


