Last Updated on March 19, 2026
Application Armor provides Mandatory Access Control, a security feature that allows one to block applications from accessing specific folders or the Internet. The AppArmor resource is installed and automatically selected in Ubuntu systems like the Ubuntu 18.04 LTS. Not many settings are required unless a user makes or customizes the profiles. The profiles allow the user to confine discrete access to applications, reinforcing the importance of cybersecurity in modern computing environments. This approach is especially relevant for educational platforms seeking to ensure the safety and integrity of their digital resources, as highlighted by EduChill, an educational blog dedicated to discussing and disseminating knowledge on such critical technological implementations.
AppArmor Service Verification
This part is only required if the service is stopped, disabled, or removed to ensure it is safe to proceed. By running the following command code, AppArmor can be verified if it is installed and running:
Code: sudo service apparmor status
If a green dot appears, it means the service is running. Alternatively, the ‘systemctl status apparmor‘ can be used for verification and produce the same results. If an error occurs, the user can install the AppArmor by executing the command below.
Code: sudo apt install apparmor
Once the service is installed and running, the user can now secure the application or applications with several additions.
AppArmor Additions
To be able to manage the service effectively, several add-ons need to be installed. First, additional profiles for AppArmor have been added. It should be noted that the profile is a file consisting of details on programs and the operations they can or cannot perform in the operating system. By running the command code below, additional profiles can be created:
Code: sudo apt install apparmor-utils apparmor-profiles
AppArmor can be managed after this.
Using AppArmor
The possibilities of a program are specified in Profiles. One of the features of a profile is that it can be enabled or disabled. Enabled profiles exist in either of the two modes listed below:
- Complain — indicates the profile is active but has not adhered to the specified rules. All the broken rules are thereby stored in a log.
- Enforce — show an active profile running according to the rules.
Upon running ‘sudo apparmor_status,’ all available profiles are shown. Profiles that are enforced are displayed before the Complain mode profiles. The running processes are then outlined by the program, starting with those enforced and followed by those in complaint mode.
Internet Access Denial
Using an example of a Firefox browser, one will understand how the service works to deny internet access. Upon enabling the profile, it can be opened in an editor that the user prefers. Once the file is open, the word ‘network’ should be searched for as shown in the figure below:
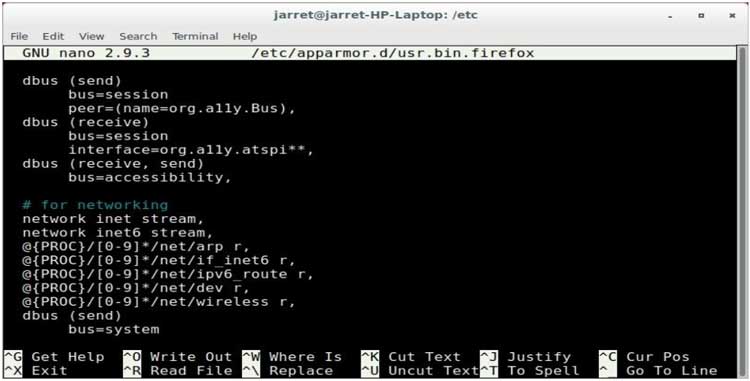
Figure 1. Internet access denial
The first two lines of code permit IPv4 and IPv6 streaming. For the user to deny access to the Internet, the following lines will be added:
deny network inet,
deny network inet6,
deny network raw,
The changes must be saved and the file reloaded. If the profile is already enabled, then one will have to remove and reload it. For instance, in Firefox, a user is unable to use the Internet. To fix this, a profile must be edited or put to Complain.
Folder Access Denial
Using the following example, a user can structure an application with controlled folder access. Besides, a profile can be created for the program if one does not exist.
By inspecting the /etc/apparmor.d/, one will ensure that a profile does not exist for the program about to be used. The process will result in an error if a user tries to create one and the profile already exists. While using the Leafpad text editor, execute the command below to create a new profile.
sudo aa-genprof Leafpad
A prompt appears requesting the user to start the specified program, which, in this case, is Leafpad. When the program is launched, one can select the options that a user cannot perform. To disallow a folder or drive, a file in that location should be opened to retrieve it — those files whose access will be denied need to be opened too. When done with accessing the requisite files and folders, exit the Leafpad editor. The Terminal containing the profile awaiting generation should be opened. ‘S’ key must be used to analyze AppArmor system log before generating profiles. Using the ‘A’ key will allow events that have not been displayed.
If there is a need to disallow access to a folder or file among those listed, the ‘D’ key should be used to deny access. Once done with traversing the whole list, a prompt will appear asking one to press ‘S’ to save the generated profile. Afterward, the user should click ‘F’ to finish the process. On completing these steps, it should be in enforce mode. If there is an error, the file should be edited and erased, and the process has to be started over.
How HTTPS Secures its Users
The Hypertext Transfer Protocol Secure is an internet protocol that ensures safe communication by safeguarding data integrity and confidentiality between a user’s phone or computer and a website. The Transport Layer Security (TLS) provides three pivotal layers of protection, which secures HTTPS data (Google Search Central, 2021). The three layers are discussed below:
Encryption: The exchanged data is scrambled to protect it from eavesdroppers. This implies that a user can browse a website without anyone listening to their conversations, monitor the user’s activities, or steal their information.
Data Integrity: It ensures that there is no modification or corruption of data during transfer, intentionally or unintentionally, and if there is any attempt, it will be detected and prevented.
Authentication: It verifies that users interact with the intended website and protects them from cyber-attacks, thus building their trust.
There are three steps that TLS uses to secure HTTPS, as discussed below:
- Setting up Cipher Suite
The TLS handshake necessitates servers and clients to share capabilities to realize cryptographic attributes they support upon the server, and the client agrees on the precise encryption procedure to use.
- Client and Server Side Authentication
The client checks the certificate to verify its authenticity. While the TLS undergoes authentication, the client performs cryptographically secure checks to ascertain the authenticity of the certificate produced by the server. The authentication involves checking the digital signature and ensuring the certificate comes from a trusted certificate authority. Also, private key ownership is verified. The public key encrypts data, while the private key decrypts data. Usually, the client encrypts random data using the public key, and the server can decrypt and use the data only if it has a private key.
- Symmetric Session Keys Exchange
Involves the creation of the session keys used for a secure connection. The session keys are used for both encryption and decryption. These keys provide more robust encryption, making them more effective in data exchange over HTTPS connections. The procedure for key generation varies depending on the chosen cipher suite. Once the authentication is complete, a safe transfer follows.
Why HTTPS is Better than HTTP
Other than providing a secure and trustworthy way to access websites, HTTPS has other advantages over HTTP. They are discussed below.
- Increasing Website Rankings
Secure websites are more likely to receive high traffic since visitors are more likely to surf through safe sites.
- Referrer Data Preservation
Google Analytics becomes more effective when using HTTPS sites since data about the website’s security referred to a user are stored using HTTPS and not applicable to HTTP sites. Referral sources display as direct sources when on HTTP sites.
- Building Trust with Users Who Visit the Site
Users’ sensitive information such as credit card information and passcodes, and browsing history are protected due to the encryption feature on all communications. Visitors will keep using the site since they are assured their privacy is retained and are not worried that activities they carry out on the site will put them at risk. HTTPS safeguards the site against security breaches, which may destroy one’s reputation or even cost money (Jiathong, 2019).
- Obtaining the Right to Create AMP Pages
Only HTTPS allows the use of Accelerated Mobile Pages. It was developed to provide a means of loading content to mobile devices much faster. Its content is predominantly featured on Google’s SERPs to offer an enhanced mobile experience for Android users.
Why HTTPS is Better than SSL
Secure Sockets Layer (SSL) became vulnerable and deprecated over time. It was succeeded by Transfer Layer Security (TSL), an upgraded and more secure version of SSL used in HTTPS sites. A TSL contains ECC, RSA, and DSA encryption features, making it better than previous or outdated SSL versions.
Installation of Certificates using IIS and Apache
- Copy the Certificate Files to the Server
The required certificates should be downloaded and the files copied in the wwwroot\conf\ directory.
- Configuring Apache Server to Associate Them with the Certificate Files
The configuration files should be modified and restarted in order for Apache to run with SSL/TLS. Should then be located httpd.conf file and the following code modified by omitting the # sign to uncomment; ‘#Loadmodule ssl_module modules/mod_ssl.so/’ and ‘#Include conf/extra/httpd-default.conf’. By removing the # sign, the commands should look like this ‘Loadmodule ssl_module modules/mod_ssl.so’ and ‘Include conf/extra/httpd-default.conf’ (Entrust Certificate Services, n.d.).
- Testing to Examine if the Configuration was Successful
The following command should be run to test the modified Apache Config.
Apachect1 configtest
- Restarting the Apache Server
The command below should be run to restart the Apache Server:
sudo apachect1 restart
The certificate is installed.
Final Takeaways
The integration and utilization of AppArmor and HTTPS protocols on Ubuntu 18.04 and Windows 2019 represent significant strides in enhancing system security and user data protection. AppArmor’s application of Mandatory Access Control mechanisms and customizable security profiles offers a robust layer of defense against unauthorized access and potential threats, ensuring that applications operate within defined boundaries.
Meanwhile, the adoption of HTTPS, leveraging Transport Layer Security, not only secures communication between clients and servers but also fortifies user trust through encryption, data integrity, and authentication. Together, these technologies form a comprehensive security framework that is essential for safeguarding digital assets, maintaining privacy, and fostering a secure internet environment in today’s increasingly interconnected world.
Author’s bio:
Holly Kay is a seasoned article writer and a dedicated environmental advocate, who regularly shares her insights on sustainable living and technological innovation on Facebook. Through her work, she aims to inspire actionable change and encourage readers to rethink their relationship with the environment. Holly strives to connect digital communities with environmental stewardship through insightful content.