Last Updated on August 23, 2026
Every single device that connects to a network has a MAC Address (Media Access Control address). This is a unique, physical identifier permanently assigned to your network card by the manufacturer. It is often referred to as a “burned-in address” (BIA) or physical address, and it should not be confused with an IP address.
From a networking standpoint, the MAC address operates at Layer 2 of the OSI model. While an IP address is used to route your traffic across the global internet, the MAC address is used strictly for local, device-to-device communication on your immediate network. The ARP (Address Resolution Protocol) acts as the translator, matching your logical IP address to your physical MAC address so your router knows exactly which piece of hardware should receive the data.

Because MAC addresses are physically burned into the network chip, they are designed to be permanent. However, there are many legitimate reasons you might need to change it. For example, if you have expensive software licensed directly to your computer’s MAC address and your network card dies, the software will refuse to run on a new replacement card.
You might also want to change it to bypass time limits on public hotel Wi-Fi, or simply to protect your privacy from network tracking. You cannot physically change the burned-in address, but you can configure Windows to “spoof” it, forcing your computer to broadcast a fake MAC address to the rest of the world.
Method 1: Spoofing via the Device Manager
The most direct way to spoof your physical address on a wired Ethernet connection or an older Wi-Fi adapter is by using the built-in Windows Device Manager. This utility gives you direct access to the hardware configuration parameters. Follow these exact steps to modify your network card settings.
1. Open the Device Manager
Right-click your Windows Start button and select Device Manager. This launches the master hardware configuration console for your entire operating system. You must have administrative privileges to make changes in this specific window.
2. Expand Network Adapters
In the list of devices, click the small arrow next to Network adapters to expand the category. This reveals every single physical and virtual network interface installed on your machine. You will likely see several Bluetooth and virtual machine adapters listed here alongside your primary hardware.
3. Locate Your Specific Network Card
Locate the specific network card you want to change. If you are plugged in with a cable, look for “Ethernet” or “GbE Family Controller.” If you are on Wi-Fi, look for “Wireless” or “Wi-Fi 6” depending on your exact hardware model.
4. Open the Adapter Properties
Right-click your target network adapter and choose Properties. A new configuration window will pop up on your screen. This window contains all the driver details and power management settings for that specific microchip.
5. Navigate to the Advanced Tab
Click on the Advanced tab at the top of the window. This section contains a long list of highly technical parameters used by the device driver. Be careful not to change other settings in this menu without knowing exactly what they do.
6. Find the Network Address Property
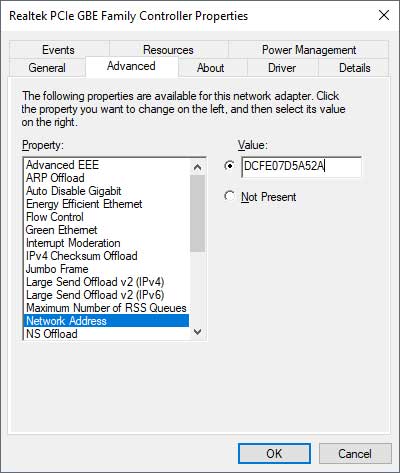
Scroll down the “Property” list and click on Network Address. Depending on your specific hardware manufacturer, this might be labeled as Locally Administered Address instead. Selecting this highlights the configuration box on the right side of the screen.
7. Enable the Value Field
On the right side of the window, select the Value radio button. This activates the empty text box directly below it. You can now manually input your custom hardware identifier.
8. Enter Your New MAC Address
Click inside the empty Value box and type your new, 12-character MAC address. You must enter this as a continuous string of letters and numbers without any colons or dashes. Do not type DC:FE:07:D5:A5:2A. You must type it exactly like this: DCFE07D5A52A.
9. Save Your Configuration Changes
Click OK to save the changes. Your network connection will briefly drop and reconnect as the driver applies the new address. Your computer will instantly request a new IP address from the local router based on this spoofed hardware identity.
10. Verify the Successful Spoof
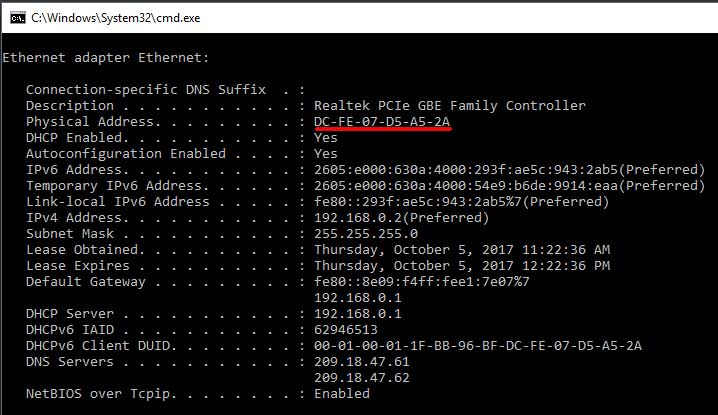
To verify that your spoof was successful, you need to check your system’s configuration. Open the Command Prompt, run a ipconfig /all, and press Enter. Look for the “Physical Address” line under your specific network adapter. It should now reflect the fake address you just typed in.
Method 2: Random Hardware Addresses (Windows 10 & 11 Wi-Fi)
If you are using a laptop on public Wi-Fi networks like coffee shops, airports, or hotels and simply want to protect your privacy, you do not need to use the manual Device Manager method. Microsoft built a native MAC spoofing feature directly into modern versions of Windows. This prevents public networks from tracking your physical location across different access points.
1. Open Windows Settings
Click your Windows Start button and open Settings. This launches the primary configuration hub for your Windows 10 or Windows 11 operating system. You can also press the Windows Key + I shortcut to open this menu instantly.
2. Navigate to Network Settings
Click on Network & Internet. This section handles all your active connections, VPN profiles, and data usage statistics. It gives you a complete overview of your current online status.
3. Select the Wi-Fi Menu
Click on Wi-Fi in the left-hand menu. This isolates the settings specifically for your wireless network card. You will only see this option if your computer has a physical wireless adapter installed and turned on.
4. Enable Random Hardware Addresses
Toggle the switch on for Use random hardware addresses. When this feature is enabled, Windows will automatically generate and broadcast a fake, randomized MAC address. It does this every single time you connect to a completely new Wi-Fi network.
Pro Technician Troubleshooting and FAQ
People often run into roadblocks when dealing with manufacturer driver restrictions. Here are the most common questions and issues users face when trying to spoof their network adapters.
1. Why is the Network Address option missing in my Device Manager?
If you reach the Advanced tab in Device Manager and cannot find “Network Address” or “Locally Administered Address,” your hardware manufacturer has intentionally blocked the feature. Intel notoriously strips the MAC spoofing capability out of their modern Wi-Fi drivers to prevent users from bypassing network security. If the option is missing, you will need to use a third-party software utility like Technitium MAC Address Changer (TMAC) to force the registry override.
2. How do I change my MAC address back to the original factory setting?
Keeping a record of your original MAC address is always a best practice before you start tinkering. If you forget to write it down, reverting is very easy. Go back into the Device Manager, open your network adapter’s Advanced properties, select the Network Address property, and click the radio button for Not Present. Once you click OK, Windows will immediately stop spoofing and default back to the physical address burned into the hardware.
3. Is it illegal to change my MAC Address?
No, MAC spoofing is perfectly legal and is actually considered a standard privacy feature in modern operating systems like Windows, iOS, and Android. Using a spoofed MAC address to bypass a paid firewall, commit cybercrimes, or gain unauthorized access to a secured corporate network violates terms of service and can result in severe legal consequences. Always use this administrative trick responsibly.