Last Updated on July 25, 2026
When you trying to set a static IP address on a network card, you may receive a very specific and frustrating error message. The system will tell you that the IP address you entered for this network adapter is already assigned to another adapter. It usually states that the old adapter is hidden from the network and Dial-up Connections folder because it is not physically in the computer.
The IP address xxx.xxx.xxx.xxx you have entered for this network adapter is already assigned to another adapter Name of adapter. (adapter name) is hidden from the network and Dial-up Connections folder because it is not physically in the computer or is a legacy adapter that is not working. If the same address is assigned to both adapters and they become active, only one of them will use this address. This may result in incorrect system configuration. Do you want to enter a different IP address for this adapter in the list of IP addresses in the advanced dialog box?
If the same address is assigned to both adapters and they become active, only one of them will use this address. This may result in incorrect system configuration and total network failure. The prompt will then ask if you want to enter a different IP address for this adapter in the list of IP addresses in the advanced dialog box.
This specific conflict is occurring because a network adapter with the same IP address is stuck in the registry but is hidden in Device Manager. This can happen when you move a network card from one PCI slot to another PCI slot on your motherboard. It also happens frequently if you add a new adapter without removing the old one from Device Manager first. To fix this problem, you can try to uninstall the ghosted network adapter from the registry using one or both of the methods below.
Method 1: Using Device Manager
1. Open the Command Prompt
Click on your Windows Start button and type cmd into the search bar. Press the Enter key to launch the standard terminal window. You need this command line interface to trigger a specific hidden system variable.
2. Set the Hidden Device Variable
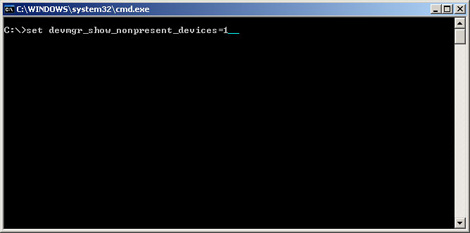
Next you need to type the command set devmgr_show_nonpresent_devices=1 directly into the terminal. Press Enter to execute the command. This temporarily forces your system to reveal hardware that is no longer physically connected to the motherboard.
3. Launch Device Manager
Now type start devmgmt.msc into the exact same command prompt window and press Enter. This will open the Windows Device Manager with your newly applied hidden device variables active. Do not close the command prompt window until you finish this entire process.
4. Show Hidden Devices
Click on the View tab located at the top of the Device Manager window. Click on the Show Hidden Devices option from the drop-down menu. This reveals all the disconnected hardware profiles currently stuck in your system registry.
5. Uninstall the Ghost Adapter
Expand the Network Adapters tree to view your entire list of network hardware. Right click the dimmed network adapter that represents your old hardware. Click Uninstall to completely remove this ghosted device and free up your static IP address.
Method 2: Using the Devcon Utility
1. Download and Extract Devcon
Download the Devcon utility directly from the official Microsoft website. Save the compressed archive file straight to your desktop for easy access. Double click the devcon.exe file and click on Run to launch the extraction wizard.
2. Choose an Extraction Directory
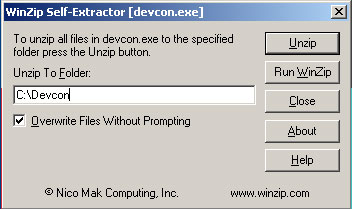
Extract the files to somewhere on your computer that you can easily find. You can change the directory to C:\devcon to make it significantly easier to navigate via the command line later. Click the Unzip button to dump the files into your chosen folder.
3. Navigate to the Extracted Folder
Open a new command prompt window with administrative privileges. Navigate to the directory where you just extracted the files. For most users you will use the devcon.exe located inside the i386 folder under the main devcon folder. You can also move the devcon.exe file from the i386 folder directly to the C:\devcon folder to shorten your command paths.
4. Find Installed Network Adapters
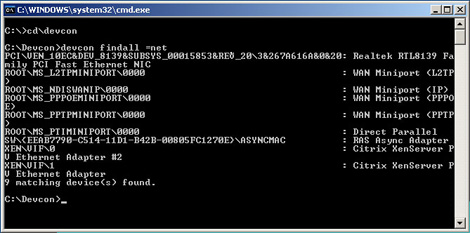
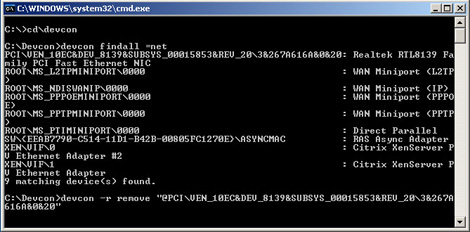
Type devcon findall =net or devcon listclass net at the prompt to find all installed network adapters. Press Enter to run the hardware scan. The system will output a massive list of every single networking device registered on your machine.
5. Locate the Ghosted Adapter String
Look closely at the output of the example to find the specific line for the ghosted network adapter. It will look similar to the long hardware identifier string shown below. You need to copy this exact alphanumeric string to target the correct device for removal.
PCIVEN_10B7&DEV_9200&SUBSYS_00D81028&REV_784&19FD8D60&0&58F0: 3Com 3C920 Integrated Fast Ethernet Controller (3C905C-TX Compatible)
6. Format the Removal Syntax
Remove the ghosted device by typing the removal syntax using your specific adapter name. The format is devcon –r remove “@adapter name” where the adapter name is taken from the results of your previous scan. You will add the name of your specific device rather than the one in our example.
7. Execute the Removal Command
Do not forget to put the @ symbol at the very beginning of the hardware string. You must also use quotation marks around the entire identifier. Press Enter to execute the command and forcefully strip the adapter from your registry.
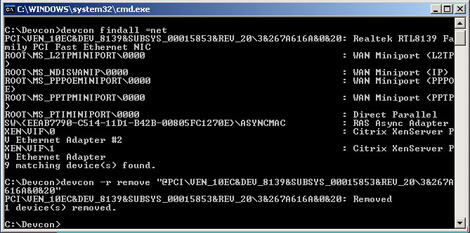
8. Verify Successful Removal
The terminal will process the command for a few seconds. It will explicitly say the device was removed if it completed the operation successfully. You can now assign your static IP address to your active network card without any conflicts.
For additional training resources, check out our online IT training courses.
Check out our extensive IT book series.