Last Updated on June 6, 2026
Have you ever spent hours perfecting a document only for your computer to crash or your power to flicker out? Microsoft Office offers two primary safety nets to prevent these digital disasters: AutoSave and AutoRecover.
While they sound similar, they function very differently. Understanding the distinction is the key to ensuring your data is always protected. In this guide, we’ll break down how each save option works, where your files are stored, and how your default save settings change everything.

What is AutoSave? (The Real Time Guard)
1. Continuous Cloud Syncing
AutoSave is a modern tracking feature explicitly designed for the cloud focused working world. It essentially eliminates the absolute need for the repetitive Control S keyboard habit. Instead of waiting for you to manually click save, AutoSave continuously syncs your live changes directly to the cloud every few seconds.
2. Instant Action Logging
If you type a basic sentence, the system saves it immediately. If you delete a massive paragraph, that specific change is permanently logged instantly. Because of this aggressive syncing schedule, you will not even see a prompt asking if you want to save when you finally close your document.
3. Cloud Storage Requirements
AutoSave is entirely exclusive to files physically stored in the Microsoft cloud ecosystem. It only activates when your specific file lives securely in OneDrive or a SharePoint business environment. It absolutely will not work for files dumped randomly on your local computer desktop.
4. Version History Benefits
Continuous live syncing means your hard work is heavily protected second by second. Since it saves your progress constantly, you can easily roll back to an earlier version of the document if you make a terrible mistake. It seamlessly allows multiple people to concurrently edit the exact same document without creating annoying conflicting file copies. If you are not a dedicated OneDrive user, you can permanently remove the OneDrive save option from Office altogether.
What is AutoRecover? (The Emergency Safety Net)
1. Background Disaster Recovery
AutoRecover is a much older legacy backup system operating completely behind the scenes. It is absolutely not a direct replacement for manual saving. It is a dedicated tool meant strictly for catastrophic disaster recovery.
2. Temporary File Creation
AutoRecover forcefully creates a hidden temporary backup file at specific timed intervals. The default interval is usually set to trigger exactly every 10 minutes. If Word, Excel, or PowerPoint crashes unexpectedly, the app aggressively looks for these temporary files the very next time you launch it. It will instantly ask if you want to selectively restore the recovered data.
3. Local Drive Support
Unlike AutoSave, AutoRecover works perfectly for standard local files saved strictly on your hard drive or SSD. It also works as a reliable secondary net for cloud files. These specific recovery files are securely stored inside a hidden folder located directly on your local computer. Once you close a document normally, the system automatically deletes these temporary files to save space.
4. The Data Loss Gap
You must understand the massive limitations of this legacy tool. If your interval is strictly set to 10 minutes and your computer crashes exactly at minute 9, you permanently lose those 9 minutes of hard work. It is only a quick snapshot meant for extreme emergencies. It is never a continuous stream of your live progress.
The Save to Computer by Default Setting
1. Keep Files on Physical Drives
Many cautious users heavily prefer to keep their files strictly on their physical hard drive rather than utilizing the cloud. You can permanently control this specific behavior by configuring your global application options. You simply go to the File tab, click Options, navigate to Save, and check the specific box for Save to Computer by default.
2. Disable Real Time Syncing
When this strict setting is enabled, your brand new documents start their life strictly in a local folder like your standard Documents directory rather than OneDrive. This has a massive direct impact on your actual protection levels. AutoSave will automatically be forced OFF. Because the file lacks a cloud presence, real time syncing is completely disabled.
3. Rely on Periodic Backups
Turning cloud syncing off means AutoRecover will be fully ON. You will rely entirely on the periodic 10 minute heartbeat backups to save your data. This specific setting does not permanently block the cloud environment. You can still manually choose to execute a Save As command directly to OneDrive at any point in time. The exact moment you move that file to OneDrive, AutoSave will instantly toggle itself back ON.
At a Glance: AutoSave vs AutoRecover
1. Primary Operation Goals
The primary goal of AutoSave revolves entirely around continuous real time saving. It captures your exact keystrokes as they happen without any input required. AutoRecover operates strictly as an emergency backup triggered only after a catastrophic software crash.
2. Storage Location Requirements
AutoSave demands a live connection to either OneDrive or SharePoint to function properly. It absolutely requires an active internet connection to push the data. AutoRecover works perfectly anywhere. It reliably monitors both local hard drive files and basic cloud documents completely offline.
3. Save Frequency and History
AutoSave pushes a fresh sync every few seconds to keep the file fully updated. It provides a complete version history so you can restore past edits at will. AutoRecover only fires every 10 minutes based entirely on your adjustable settings. It offers absolutely no version history capabilities for your working documents.
4. Manual Saving Needs
You are never required to manually save your document when AutoSave is active. The Microsoft cloud handles the entire workload automatically. Manual saving is highly recommended when relying exclusively on AutoRecover. You must build a strong habit of saving your work constantly.
Changing the Microsoft Office Save Options
1. Access the Save Options Menu
If you urgently want to change between using AutoSave and AutoRecover, you can do so by going directly into the main application options. This works exactly the same for whatever Office app you currently want to modify. Simply click over to the File tab and then click on Options. From there, click directly on the Save category to reveal the required settings.
2. Manage Cloud Defaults
The very first checkbox says AutoSave files stored in the Cloud by default in Word. This specific toggle is explicitly used to save your brand new files directly to your OneDrive cloud account or SharePoint business environment. It completely bypasses your local hard drive location. You can simply uncheck this box if you strongly prefer to save your files locally
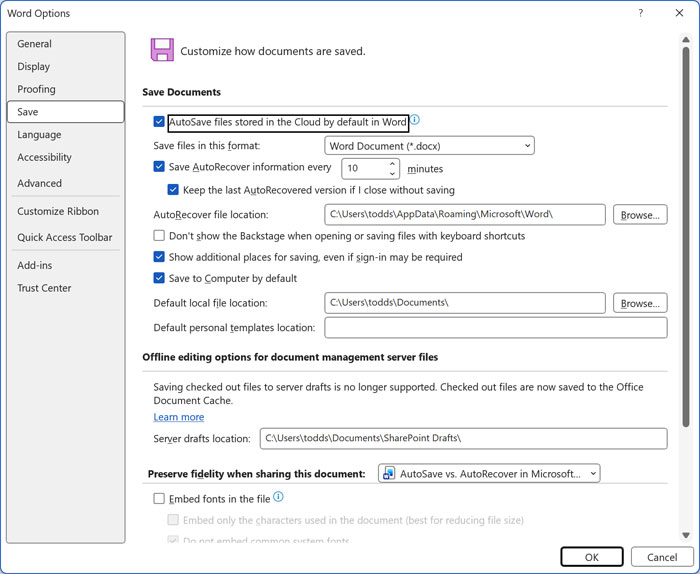
3. Adjust the AutoRecover Timer
The next checkbox says Save AutoRecover information every X minutes. This setting is used to explicitly tell the Office app exactly how often to make a background backup copy of your active file. This saves your progress in case your computer suddenly crashes or you accidentally close Word, Excel, or PowerPoint without manually saving your work.
4. Enable the Safety Net
Look directly below that specific timer option for another critical toggle. The checkbox that says Keep the last AutoRecovered version if I close without saving is used to officially enable the AutoRecover feature itself. Ensure this box stays permanently checked to keep the background safety net active at all times.
5. Force Local Saving
Finally, you will spot the checkbox that says Save to Computer by default. This toggle is explicitly used to prompt you to securely save your files directly to the physical file location specified in the Default local file location box directly below it. When this is officially checked, clicking Save for the very first time will instantly default to the local path. You will absolutely still have the manual option to save it to a different folder on your hard drive, a mapped network location, or even OneDrive.
The Golden Rule of Microsoft Saving
1. Understand File Locations
The absolute most important thing to remember is that AutoSave strictly follows the exact file location. It is absolutely not a universal system switch. The physical directory path dictates exactly how the software handles your live data.
2. Watch the AutoSave Toggle
If you manually move a file from your local desktop directly over to OneDrive, AutoSave instantly turns on. If you grab an active cloud file and execute a Save As command to create a local copy on a USB drive, AutoSave instantly turns off. You are immediately back to relying entirely on AutoRecover to protect your work.
For additional training resources, check out our online IT training courses.
Check out our extensive IT book series.