Last Updated on July 5, 2026
Emailing someone a document as an attachment and asking them to print it out, mark their choices with a pen, and scan it back to you is incredibly outdated. If you are building an employee onboarding form, a customer survey, or a daily checklist, you need your document to be fully interactive.
Microsoft Word has a brilliant feature that allows you to insert clickable, electronic checkboxes directly into your text. Your recipients can simply open the file on their computer, click the boxes they want, and email it right back.
However, there is a catch. Microsoft completely hides the checkbox feature from standard users by default. To create a digital form, you first have to unlock a secret menu called the Developer Tab. Here is exactly how to reveal it, add your checkboxes, and lock your document so nobody accidentally deletes your questions.

Step 1: Unlock the Hidden Developer Tab
1. Open the Word Options Menu
Before we can build a form, we need to tell Word to show us the advanced tools. Open your Microsoft Word document and click on File in the top left corner. Look at the very bottom of the left-hand menu and click Options.
2. Customize the Ribbon
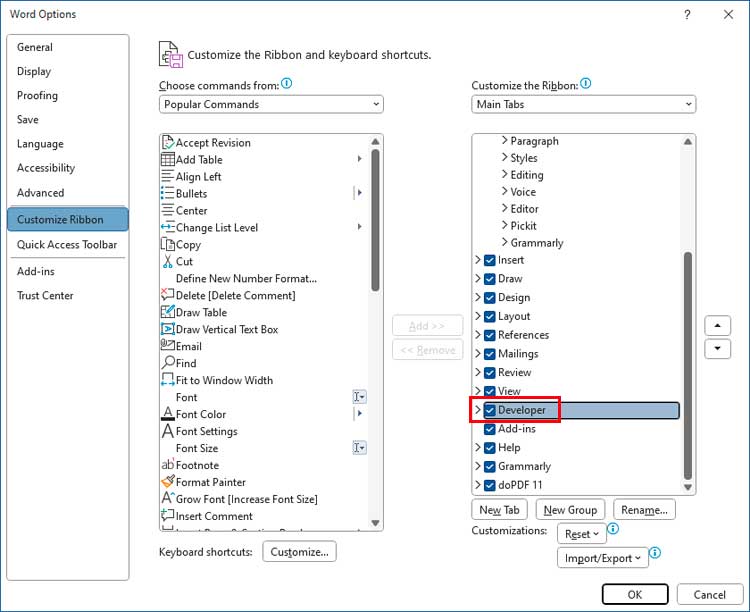
A new window will pop up on your screen. Click on Customize Ribbon on the left side menu. Look at the column on the far right under the “Main Tabs” section. Scroll down until you see the word Developer.
3. Enable the Developer Tools
Check the empty box next to Developer to enable the feature. Click OK to save your changes and close the options window.
Step 2: Insert Your Checkboxes
1. Locate the New Developer Tab
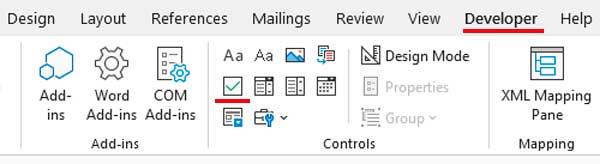
Look at the very top of your Word document. You will now see a brand-new tab labeled Developer sitting right next to the View and Help tabs on the main ribbon.
2. Prepare Your List Items
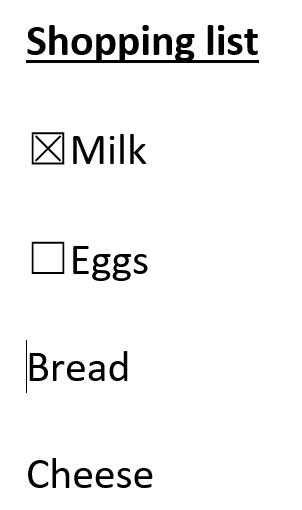
Type out the question or list item you want to add a checkbox to. For example, you might type “Milk” or “Eggs” if you are creating a grocery list. Place your blinking mouse cursor exactly where you want the box to appear on the line.
3. Insert the Content Control
Click your new Developer tab at the top of the screen. Look inside the “Controls” section and click the Check Box Content Control icon. It looks like a small square with a green checkmark inside it.
4. Duplicate the Checkboxes
An empty, clickable square will instantly appear in your document. You can now highlight this box, copy it, and paste it down your entire list. When you or a recipient clicks the box, a bold “X” will appear inside it to mark it as selected.
Pro Tip: Change the “X” into a Real Checkmark
1. Open the Checkbox Properties
By default, clicking a Word checkbox places an “X” inside the square. Many users find this confusing because an “X” usually means “No” or “Cancel.” If you want it to display a traditional checkmark instead, click on your checkbox to highlight it. In the Developer tab, click the Properties button.
2. Change the Checked Symbol
Look at the bottom of the pop-up box next to “Checked symbol” and click the Change button. Change the Font dropdown menu to Wingdings 2. Scroll through the icons, select the traditional checkmark, and hit OK.
Crucial Final Step: Lock Your Document
1. Understand the Editing Risks
If you are emailing this document to employees or clients, you have a major problem: the document is still fully editable. If a recipient accidentally hits the Backspace key, they could delete your checkboxes, alter your questions, or completely ruin the formatting of your form. To prevent this, you must lock the document so users can only click the checkboxes and cannot touch the text.
2. Enable Restrict Editing
Go back to the Developer tab on the main ribbon. Click the Restrict Editing button on the far right side of the screen. A side panel will open on the right side of your document.
3. Enforce the Form Protection
Under section 2 (Editing restrictions), check the box that says “Allow only this type of editing in the document.” Open the dropdown menu right below that and select Filling in forms. Click the Yes, Start Enforcing Protection button. You can add a password here if you want to be the only person allowed to edit the text later.
Looking for more cloud-based options? Check out our guide on how to add checkboxes to a Google Docs document.