
Last Updated on August 31, 2026
In order to be able to perform any task on your Windows computer, you will need to either log in with an account that has administrator access or know the credentials to an account on your computer that has admin access. Most Windows computers have at least one account configured with these full administrative rights by default.
If you are not an admin, then your account will be configured as a standard user. Standard users face heavy restrictions when trying to make system changes or install new software. Administrators hold full control and authority over the entire operating system. They manage the computer environment effectively without dealing with constant permission blocks.

Standard User Account vs. Administrator Account
1. Limited Privileges (Standard User)
A standard user has limited access rights and permissions on the computer. They cannot tweak critical settings. This protects the machine from accidental damage.
2. Cannot Install Software (Standard User)
Standard users cannot install or uninstall software. They also cannot make system-wide changes that affect other users or the operating system. You will hit a brick wall every time you run a setup file.
3. Cannot Modify System Settings (Standard User)
Standard users cannot modify system settings or configurations that affect the entire system. This includes changing system preferences or installing brand new device drivers. Your hardware options remain permanently locked.
4. Cannot Manage Users and Groups (Standard User)
Standard users cannot create, modify, or delete user accounts or groups on the system. You cannot reset passwords for family members. You lack the authority to assign privileges.
5. Cannot Access Certain Files (Standard User)
Standard users face strict restrictions from accessing certain system files and folders. These hidden areas are reserved strictly for administrators. You will see an “Access Denied” message if you try to open them.
6. Full Control (Administrator)
Administrators have full control and access rights to the entire computer system. They can bypass any local file restriction. They hold the master keys to the operating system.
7. Can Install Software (Administrator)
Administrators can easily install, uninstall, and manage all software applications. This includes deep system-level software that affects all users on the system. They authorize new programs instantly.
8. Can Modify System Settings (Administrator)
Administrators can modify system settings, configurations, and preferences that affect the entire system. They handle configuring security settings and installing new device drivers. They dictate how the hardware actually operates.
9. Can Manage Users and Groups (Administrator)
Administrators can create, modify, and delete user accounts and groups on the system. They assign specific privileges and permissions to other users. They control exactly who gets to log in.
10. Access to All Files and Folders (Administrator)
Administrators have access to all files, folders, and system settings on the computer. This allows them to perform administrative tasks and troubleshoot complex issues effectively. Nothing is hidden from an active admin profile.
How Do You Lose Administrator Rights?
It might seem strange to find yourself locked out of making system changes on your own computer. Losing admin rights is a surprisingly common issue that frustrates many users. This usually happens in one of three specific ways.
1. Accidental Demotion
When messing around in the netplwiz menu or the Windows Settings app, users make mistakes. They sometimes accidentally change their only active profile from “Administrator” to “Standard.” This instantly locks them out of their own machine.
2. Family Safety Features
A PC is often managed under Microsoft Family Safety controls. An adult organizer might accidentally restrict a primary account while tweaking these limits. This strips the local permissions away remotely.
3. Malware or Corruption
Certain aggressive malware strains will strip your account of its privileges entirely. They do this to prevent you from running antivirus removals or system restores. The virus locks the doors to protect itself.
When this happens, every time you try to install a program, the User Account Control (UAC) prompt will appear. The “Yes” button will be greyed out or missing entirely because there is no admin account available to approve the action.
If your account is not configured as a local admin and you do not have another account with administrator rights, you are stuck. There is still a way to get the access you need. We will be showing you exactly how to switch a standard Windows account to an admin account without being a local administrator.
Enabling the Built in Windows Administrator Account
We will be using a free tool called Hirens Boot CD to switch a standard Windows account to an admin account without being a local administrator. Once you download the tool, you will need to burn it to a CD or bootable USB flash drive. You can use Rufus to create a bootable USB flash drive if needed.
1. Disable Secure Boot in BIOS
Modern Windows 10 and Windows 11 computers use a UEFI BIOS with Secure Boot enabled. Your computer is programmed to actively block third-party operating systems like the Hiren’s rescue environment from loading. You must bypass this lock first.
2. Modify Your BIOS Settings
If you select your USB drive from the boot menu and the screen flashes or ignores it, you need to enter your computer’s BIOS settings. You usually do this by tapping F2, F10, or DEL during startup. Temporarily change the Secure Boot setting to Disabled so the flash drive can boot.
3. Configure Your Boot Order
Once you have your flash drive or CD ready, you will need to configure your computer’s boot order. This tells the motherboard to boot to the CD or flash drive instead of the internal hard drive. Many times, you can press a key such as F2 to get to a temporary boot menu.
4. Launch Lazesoft Password Recovery
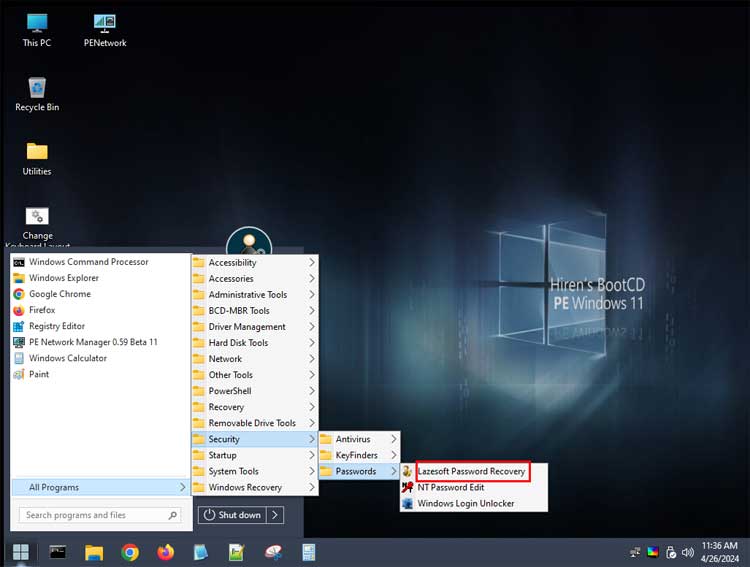
When the Hirens software loads, you will see a Windows type desktop appear on your screen. You will need to click on the Start button and go to All Programs. Navigate through Security and Passwords to open the Lazesoft Password Recovery tool.
5. Accept the License Agreement
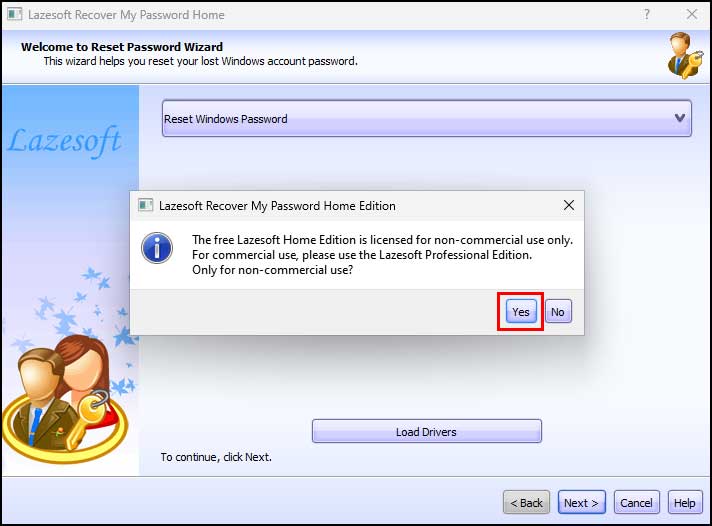
When the Lazesoft Recover My Password Home edition loads, you will need to make sure it is set to Reset Windows Password. Click the Next button to proceed to the warning screen. You will get a message telling you that you should only be using this for non-commercial use. Click on the Yes button to accept these terms.
6. Target the Local Password
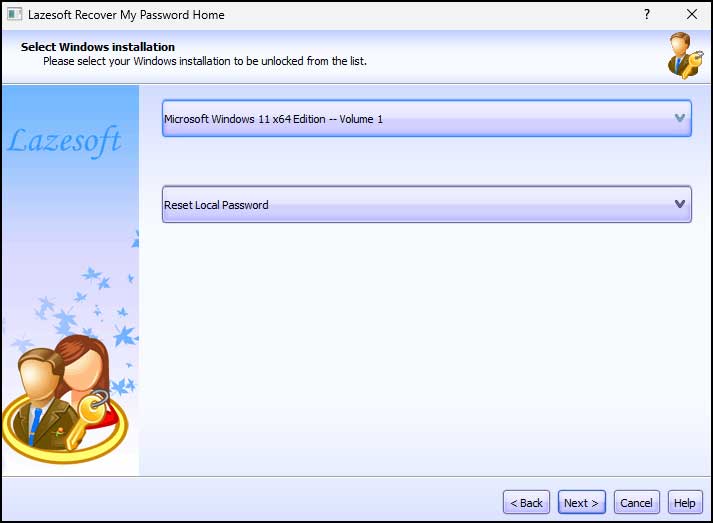
On the next screen, verify the target installation path is correct for your operating system. Make sure the dropdown menu is set to Reset Local Password. Click Next to scan the system registry for user profiles.
7. Select the Administrator Account
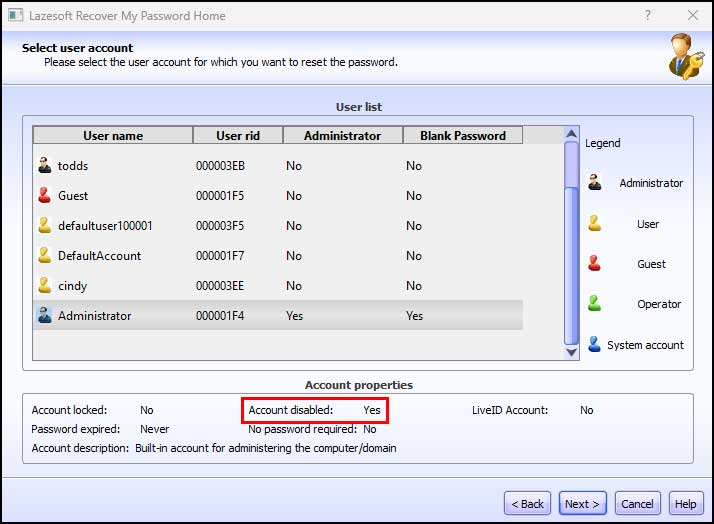
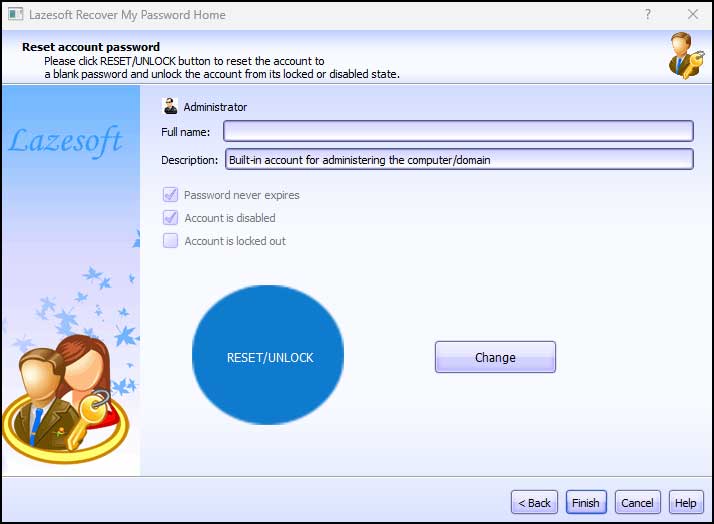
You will then be shown all the user accounts on your computer. You might see some others that you do not recognize such as the Guest account which is most likely disabled. Click on the Administrator account and you will see that it is currently disabled in the properties box.
8. Unlock the Built-In Admin
Once you have the Administrator account selected, click on the Next button. Next, click the large blue button that says RESET/UNLOCK to enable the built-in Administrator account. This modifies the SAM registry hive directly to flip the disabled flag.
9. Confirm the Password Reset
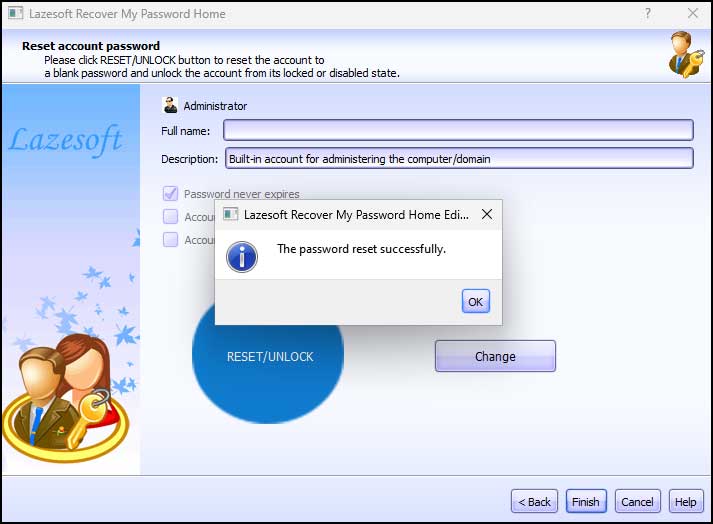
You will then get a message saying the password was reset successfully. You didn’t really reset any password here. You simply enabled the hidden Administrator account with a completely blank password.
10. Restart and Log In
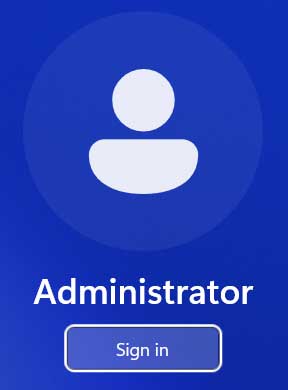
You can now restart the computer from the Start menu within the Hirens app. You should now have an active account called Administrator sitting along with your other accounts on the login screen. Select Administrator and sign in with no password.
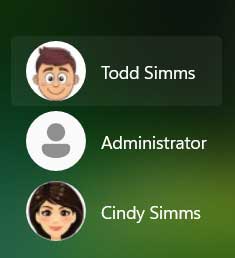
When you select Administrator, you can sign in with no password.
11. Wait for Profile Creation
Since it is the first time this specific account has logged on, Windows will need to do the usual one-time profile setup. It might take a few minutes for this background process to complete. Do not turn off your computer during this phase.
12. Change Your Account Type
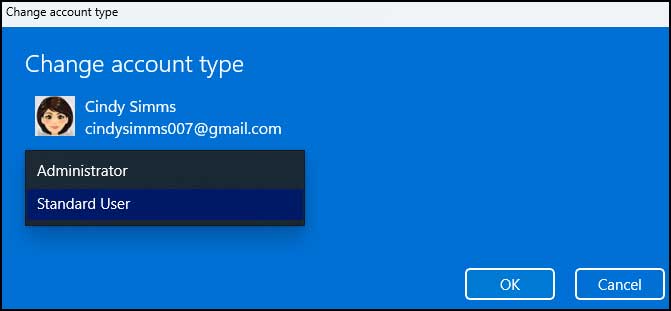
Now you can go to the user accounts section in the main Windows settings. You have the authority to change your original user account type from standard to administrator. This restores your lost privileges permanently.
Crucial Final Step: Disable the Built-In Admin Account
Now that your primary account is officially a Local Administrator again, you have one final security step to perform. Leaving the built-in Administrator account active with a blank password is a massive security vulnerability. Hackers can easily walk right through that open door. Since your normal account has its powers back, you can easily disable the hidden admin account from within Windows.
1. Open an Elevated Command Prompt
Click the Start button on your taskbar and type cmd into the search box. Right-click Command Prompt and select Run as administrator. Notice that the “Yes” button works again on the UAC prompt!
2. Execute the Disable Command
Type the exact command net user administrator /active:no into the black terminal window. Hit Enter on your keyboard to execute the instruction. You will see a “Command completed successfully” message confirming the action. Your system is now totally secure and back to normal.
Windows Admin Account FAQ
1. Will this process delete my personal files?
No. We are strictly using the Lazesoft tool to change the disabled flag on the built-in administrator account. We are not resetting Windows or touching the C:\Users folder where your photos and documents are stored. Your files remain perfectly intact.
2. What if my hard drive is encrypted with BitLocker?
If your device uses BitLocker encryption, the Hiren’s Boot CD will prompt you for your 48-digit BitLocker Recovery Key. It needs this before it can scan the drive for the SAM registry hive. You must log into your Microsoft Account on a different device like your phone to retrieve this specific key.
3. Can I do this without a USB drive?
If you do not have a flash drive to create the Hiren’s media, you can try forcing Windows into the Recovery Environment. Hold the Shift key down and click Restart on the login screen. From there, you can sometimes use the Command Prompt to execute the “Utilman Hack” to achieve the exact same result.
For additional training resources, check out our online IT training courses.
Check out our extensive IT book series.






