
Last Updated on May 31, 2026
If you have been a long-time Microsoft Windows user, then you have most likely ran multiple versions of their operating system on your computer. This includes classics such as Windows 7, Windows 10, and the current Windows 11 version.
You may have also noticed that as Microsoft comes out with new versions of Windows, they get more complicated and take more hardware to run. They also come with more apps and “features” that we don’t really want taking up our system resources.

This is commonly referred to as bloatware. One of the first things many power users do is “debloat” their Windows installation right after installing it. There is a lightweight version of Windows 11 you can run on your computer which is a long-term support version of Windows 11 designed for embedded and IoT devices. This version offers enhanced security, stability, and minimal feature updates for mission-critical applications.
You can install this version of Windows on your physical computer or as a virtual machine (VM) if you just want to test it out safely. In this article, we will be showing you exactly how to install the debloated Windows 11 IoT Enterprise LTSC as a virtual machine in VMware Workstation. VMware Workstation Professional is now free to use and is one of the best desktop virtualization platforms available for home users. You can download it directly from the Broadcom website here. You will then need to install Workstation on your computer so you can begin creating your Windows 11 IoT virtual machine.
Configuring the Windows 11 Virtual Machine in VMware Workstation
1. Launch the Custom Virtual Machine Wizard
To create a new virtual machine in VMware Workstation, you can click on the File menu and choose New Virtual Machine. Do not pick the typical setup path. Click on the Custom option and then click on the Next button to proceed. This unlocks the specific hardware settings required for this custom operating system.

2. Set the Hardware Compatibility Options
For the hardware compatibility, you can go with the default setting displayed on the screen. This should be the current version of VMware Workstation you have installed. Keeping this matching version ensures complete feature support for your host machine architecture.

3. Mount the Custom Windows ISO File
You will then need to browse to the exact file path of your installation media. Find the Windows 11 IoT ISO file that can be downloaded from the Microsoft website here. Click the Browse button to select this image file from your local hard drive.

4. Bypass the TPM and Encryption Requirement
The next step involves choosing the operating system for your VM. Normally, VMware Workstation can read the ISO and choose the correct OS for you automatically. It doesn’t seem to do so for this specific version of Windows. If you were to choose Windows 11 from the list, Workstation would force you to encrypt the virtual machine files. It will also add a TPM (Trusted Platform Module) since that is a strict requirement for standard Windows 11 installations. But for the IoT version, you do not need to use encryption or a TPM module. You can simply choose Windows 10 from the list to get around this requirement entirely.

5. Name Your Virtual Machine Files
Now you will need to name your virtual machine clearly. Choose a specific folder location to keep its files if you do not want to use the default path. This name only applies to VMware and not to the Windows computer name itself.

6. Force the BIOS Firmware Setting
Normally, you would use the UEFI boot option for any modern Windows 11 installation. However, when using this for the specific IoT version, you may find that it won’t boot to the ISO image file to start the installation. To prevent this from happening, you can use the legacy BIOS option instead. This forces the hypervisor to recognize the boot sector.

7. Allocate the Virtual Processors
Now you can assign however many processors and cores that you would like to use. Do not starve the guest operating system of resources. Just be sure to use 2 or more cores to comfortably meet the Windows 11 CPU requirements.

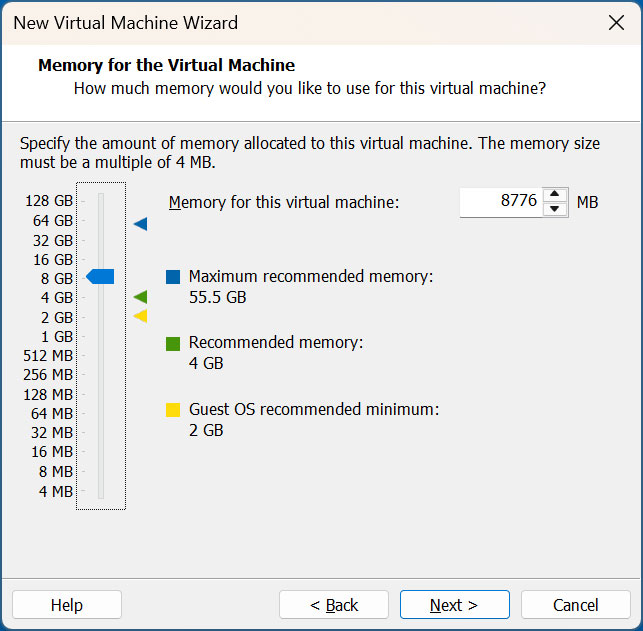
8. Assign the Virtual Memory
Next, you should change the amount of allocated RAM for the VM to a higher number than the recommended minimum. Give the machine at least four gigabytes of memory for a smooth desktop experience. Just be sure that your host computer has enough RAM left over to run its own software and background processes.
9. Configure the Network Settings
You can then leave the network type on NAT (Network Address Translation). This ensures it will share the internet connection securely with your host computer. It prevents the virtual machine from claiming its own dedicated IP address on your local router.

10. Select the Storage Controller
The hypervisor needs a storage controller to manage data flow. For the SCSI controller, you can leave the default LSI Logic SAS choice selected. This standard controller provides maximum compatibility with Microsoft operating systems.

11. Create the Virtual Hard Drive
You will then need to add a virtual hard drive to your VM to install Windows 11 on. You can use NVMe if you like or choose a different drive type based on your physical host hardware. Next, on the select disk step, you will need to choose Create a virtual disk to have one configured fresh for the VM.


12. Size the Virtual Storage Capacity
You can then change the size of this new virtual disk to make it as large as you like. Just be sure it is at least 64 GB to satisfy the baseline Windows 11 storage requirements. If you do not plan on backing up your VM to another location, we recommend storing the virtual disk as a single file. This is highly recommended for the sake of simplicity and if you need to use it for a different virtual machine later.

13. Review the Configuration Summary
VMware Workstation will then name the virtual disk file for you. You can completely change the name if you need to organize your files better. You will then be shown a configuration summary screen detailing all of your choices.

14. Disable the Network Adapter
You should then click on the Customize Hardware button for the next crucial step. Since Windows 11 IoT requires you to log in with a Microsoft account that is tied to your workplace or school, you can get around this by disabling the internet connection for the installation. This will force the installer to let you use a local user account instead. To do this, click on Network Adapter and uncheck the box that says Connect at power on. Then you can click on the OK button to save the settings.


Installing Windows 11 IoT on Your New Virtual Machine
1. Power On the Virtual Machine
To finally install Windows 11 IoT LTSC on your virtual machine, you will need to click on Power on this virtual machine. This will immediately open the VM console and boot directly to the ISO file. The initial loading screen displays the standard Microsoft logo.
2. Configure Your Regional Settings
The first screen you will see will ask you for your language, time, and currency format. If you need to change anything, you can do so using the dropdown boxes before clicking on Next. You will then need to select your specific keyboard layout and change it if needed.

3. Accept the Terms and Format the Drive
On the next screen, you will see an option to either install Windows 11 or repair your PC. Since this is a brand new installation, you will choose the install Windows 11 option. Be sure to check the box that says I agree everything will be deleted including files, apps and settings. After you click on the Next button, you will be asked to accept the official license terms.

4. Choose the Target Drive Location
The next screen is where you can configure your virtual disk configuration. If you just want to use the entire blank disk for Windows, you can highlight the unallocated space and click on Next. You do not need to configure a partition manually since the Windows setup will do it for you automatically.

5. Start the Automated Installation
You can then click on the Install button to begin the actual installation process. Once the Windows installation has begun, your computer will most likely be restarted a few times during the process. Do not interrupt the virtual machine while it extracts the files.

6. Bypass the Internet Requirement
You will then be taken to a familiar Windows 11 setup interface which should look familiar if you have ever installed Windows 11 before. You will be asked to do things such as configure your region and keyboard layout again. Since you disconnected the network internet connection before starting the Windows setup, you will be asked to install a driver for your network adapter. Since we do not need to do this yet, we will click on I don’t have internet to continue.

7. Create a Local Administrator Account
Since Windows cannot get on the internet, it will automatically give you the option to use a local account. You can enter your name or a generic admin name directly in this box. On the next screen, you will need to type in a strong password you want to use for this user account.

8. Answer the Account Security Questions
Then you will need to answer three security questions in case you forget your password and get locked out of your computer. Pick memorable answers from the dropdown list. Record these answers somewhere safe just in case you lose your primary login credentials.

9. Disable Privacy Tracking Features
On the next screen, you can choose which privacy settings you want to disable or leave enabled. We usually like to disable all of them unless you have a specific reason to leave one or more enabled. After you make your changes, click on the Accept button to continue. Windows will then configure your user profile, which can take a few minutes to finalize.

Post-Installation Setup and VMware Tools
1. Reconnect the Network Interface
Once you log into your new Windows 11 IoT VM, you can go back to the virtual machine settings. Enable the network adapter and make sure to check both boxes to restore your internet connection. This bridges the hypervisor connection back to your host machine immediately.

2. Mount the VMware Tools Installer
You should then install VMware Tools on your virtual machine to enhance things such as the VM’s video resolution and mouse movement functionality. To do so, click on the VM menu at the top of the window and then choose Install VMware Tools. You should see a notification pop up from the lower right corner of the screen asking what to do with the VMware Tools virtual DVD.

3. Run the Installation Setup File
If you click on this notification, you can then choose the option to Run setup64.exe to start the installation. If you missed this step, you can simply open File Explorer, navigate directly to the CD/DVD drive, and run the setup file from there. Installing VMware Tools is very simple and works the exact same way it does for other programs you install.

4. Complete the Typical Setup
You should be perfectly fine using the Typical option for the setup type. Click Next and follow the on-screen prompts to finish loading the drivers. You must reboot the virtual machine for the display drivers to activate.

Exploring Your Debloated Windows 11 IoT System
1. Inspect the Clean Start Menu
Now that Windows is set up, you can click on the Start button and you will see exactly how bare the Start menu is. This is because Windows 11 IoT is a basic or stripped-down version of the operating system. It lacks all the bloatware games and sponsored links found in the consumer builds. It will even have older versions of the Windows Calculator and Notepad apps installed by default.

2. Restore the Microsoft Store Manually
You will also notice that the Microsoft Store is completely missing. If you want to install apps from there, you will need to add it back to Windows manually. To do so, open an administrative command prompt and type the following command: wsreset.exe -i
3. Wait for the Background Installation
You will not see anything happen on the screen right away. You need to wait a few minutes for the Microsoft Store installation to complete silently in the background and then reboot the virtual machine. After it comes back up, you will have the Microsoft Store right there on your Start menu ready to use.
For additional training resources, check out our online IT training courses.
Check out our extensive IT book series.


