
Last Updated on July 7, 2026
Now that Windows 11 has been out for some time, you have probably noticed that Microsoft is constantly updating their latest operating system. They love adding new features and replacing older apps with modern versions. But as you probably know, newer is not always better. You might even apply that exact thinking to Windows itself!
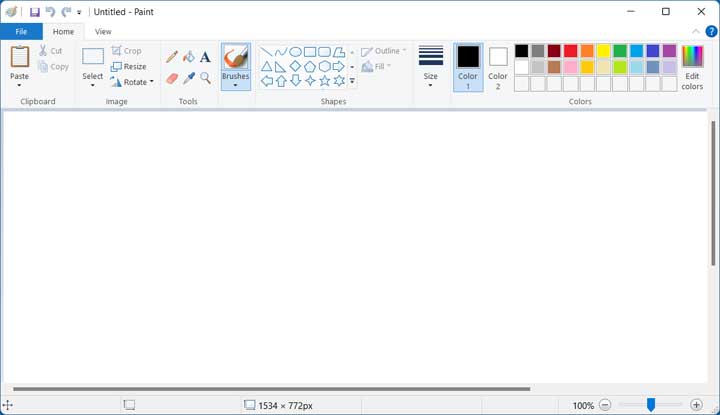
The MS Paint app has been around since the very early days of Windows and hasn’t changed much throughout the years. But with Windows 11, Microsoft updated it in an attempt to bring it into the modern age. They even introduced a Paint 3D app where you can do things like create transparent backgrounds.

If you prefer the original version, we will show you exactly how to install the classic MS Paint app in Windows 11. The best part is that you will be able to use both the new and classic versions side by side.
Why Do Users Prefer Classic MS Paint?
1. Speed and Simplicity
While the Windows 11 version of Paint introduced layers and AI-powered background removal, many long-time users find the new interface a bit clunky. The classic version is preferred by many for its nearly instantaneous load times. It also retains the familiar Ribbon interface and the simplicity of its standard selection tools.
2. File Format Reliability
Furthermore, the new version sometimes struggles with specific file formats or Copy/Paste behaviors that were rock-solid in older builds. By following the steps below, you can regain that speed without losing the new features of the modern app.
How to Install the Classic App
1. Download and Run the Installer
To install the classic MS Paint app in Windows 11, all you need to do is download the classic version and run the installer. Once you download the installer .exe file, double-click on it. You will install the Paint app just like you would with any other standard Windows software.
2. Open the Settings Menu
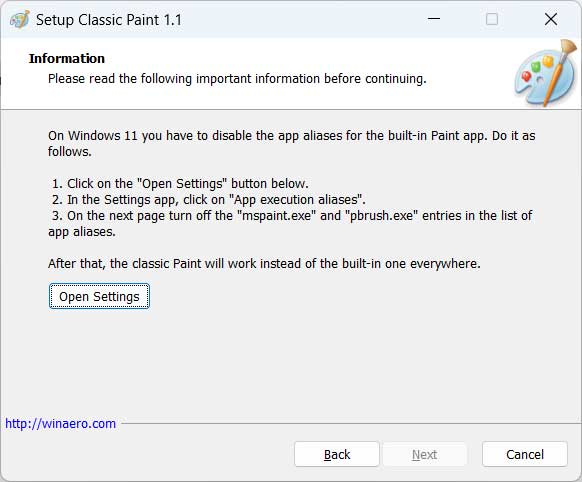
However, you will need to make a couple of changes in your Windows settings to run the new and classic Paint apps side by side. Fortunately, you will be able to make these changes while installing the Paint app itself. During the setup, you will reach a screen that says you have to disable app aliases for the built-in Paint app. Click on the Open Settings button right on that screen.
Understanding App Execution Aliases
1. What Are Execution Aliases?
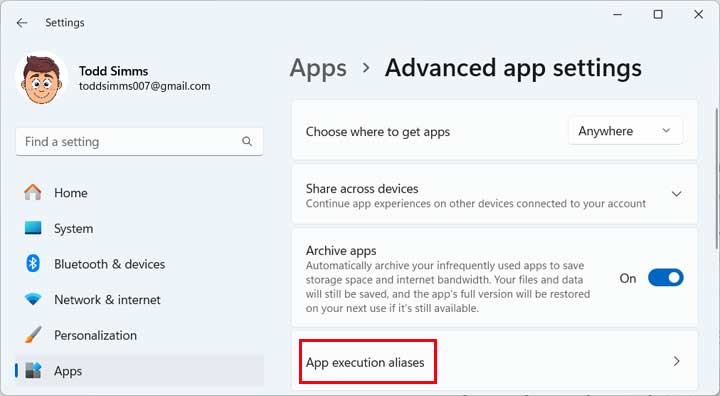
This will take you to the exact appropriate section in your Windows 11 settings to make the change. This is the most technical part of the installation, but it is very straightforward. Windows 11 uses Aliases to tell the computer what to do when you type mspaint.exe into a search box.
2. Prevent App Conflicts
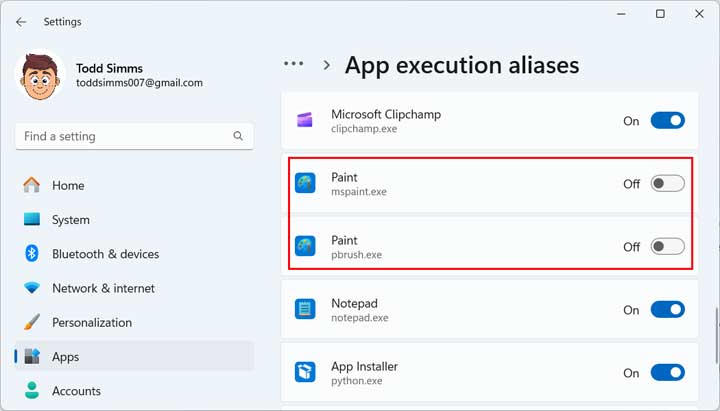
By default, it is programmed to open the new Store-based version of Paint. If we don’t disable these aliases, the classic version we are installing might get blocked or overridden by the modern version. By toggling these switches to Off, we are essentially telling Windows to stop and ask which version of the app we actually want to use.
3. Disable the Paint Aliases
When you get to the Advanced app settings section, click on the App execution aliases setting. You will see a list of applications. Scroll down until you see two Paint options. One should say mspaint.exe and the other should say pbrush.exe. Once you find these two items, you will need to turn the sliders for each one of these to Off.
Using the Classic App in Windows 11
1. Search for the App
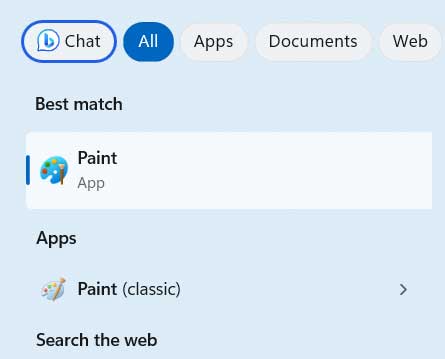
Now when you do a search for Paint in the taskbar, you will have the new version as well as the classic version show up in your search results. You can then easily open whichever version you wish to use for your current project.
2. Verify the Classic Interface
When you choose the classic version, you will be greeted by the exact familiar interface that came with older versions of Windows, such as Windows 10. You can now use all your standard keyboard shortcuts.
3. Use the Context Menus
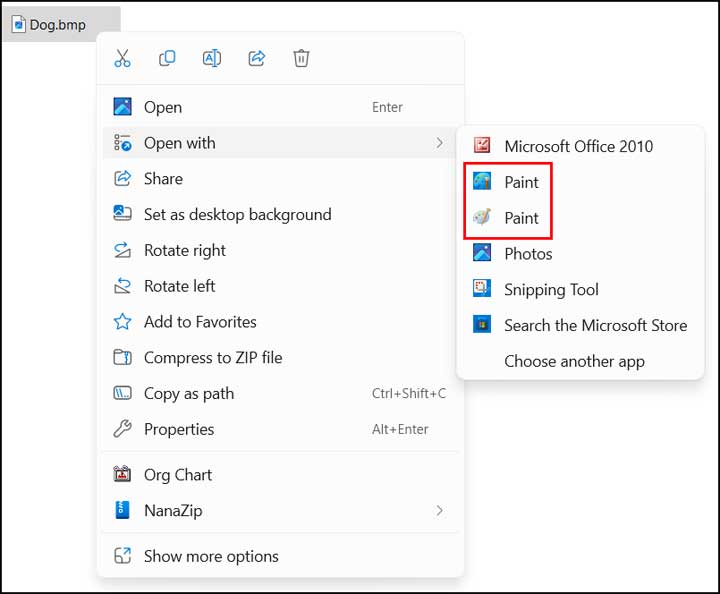
Another great thing you will notice is how Windows handles your image files. When you right-click on an image (like a .bmp or .png file) and choose Open with, you will have both versions of Paint to choose from in the flyout menu.
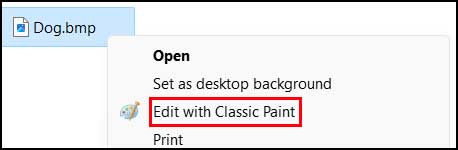
4. Jump Straight to Editing
Additionally, when you click on the Windows 11 Show more options submenu, you will see a new context menu choice. You can simply click Edit with Classic Paint to jump straight into the older app. This bypasses the default viewer completely.
How to Set Classic Paint as Your Default
1. Open the Default Apps Menu
Many users install this because they want the Classic app to open automatically every time they double-click a picture. To do this, open your Windows Settings and go to the Apps section. Click on Default apps to load the file extension manager.
2. Change the File Extension
Type the file extension you want to change into the search bar (for example, type .jpg or .png). Click on the app that is currently assigned to that file type. A menu will pop up allowing you to select Classic Paint from the list.
Classic Paint vs. Windows 11 Paint
1. When to Use the Classic App
Once you have both installed, you will notice a few key differences in how they operate. Classic Paint uses the traditional Windows header and is famous for its low system resource usage. It is absolutely the best choice for quick cropping, simple text annotations, and fast pixel-level edits.
2. When to Use the Modern App
On the other hand, the modern Windows 11 version uses the newer “Mica” design language. The modern app is much better for complex tasks like removing backgrounds, using layers, and it fully supports dark mode. Having both installed allows you to use the Classic version for 90% of your daily tasks while keeping the Modern version available for heavier edits. If you ever want to remove the classic version of the MS Paint app from Windows 11, simply uninstall it just like you would any other software in your Control Panel.
Classic MS Paint FAQ
1. Will Windows Update remove the Classic version?
Generally, no. Because the Classic version is installed as a separate executable, Windows Update will continue to update the “Modern” Store app without touching your Classic installation.
2. Can I pin Classic Paint to my Taskbar?
Yes. Simply search for “Paint” in your start menu and identify the “Classic” version (usually indicated by the older icon). Right-click it, and select Pin to taskbar.
3. Is the Classic version safe to use?
Yes, as long as you download the installer from a trusted source. The classic version is essentially the same code that shipped with Windows 7 and Windows 10, simply repackaged to run on the Windows 11 architecture. Check out this article if you are looking for a way to get WordPad back in Windows 11.
For additional training resources, check out our online IT training courses.
Check out our extensive IT book series.


