Last Updated on May 7, 2026
Microsoft Windows uses online time servers to keep the date and time on your computer current and accurate. By default, Windows should be configured to set the time automatically as well as adjust for daylight savings time. But if you have the need to set the date and time manually, you can do that yourself. You can also change the time zone if needed or if it’s incorrect to begin with.
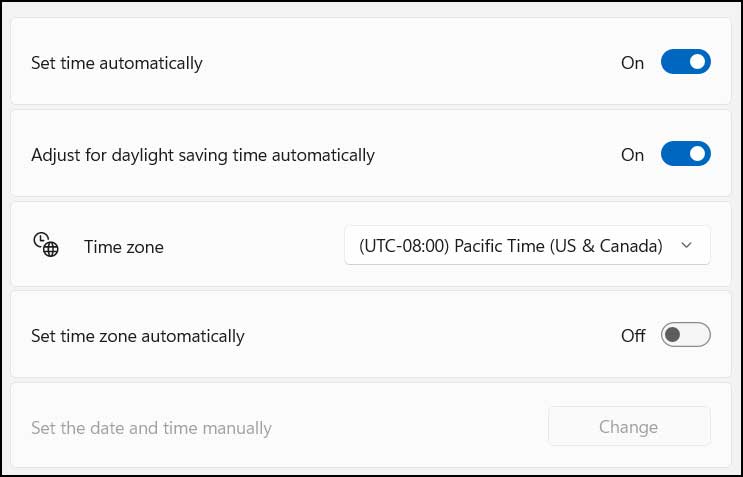
You might come across a situation where Windows is not configured to set the time zone automatically. If you go into your date and time settings by right clicking the clock and choosing Adjust date and time, you might see that the option to Set time zone automatically is greyed out and is off. When this happens, you are unable to move the slider to the on position. In this article we will be showing you how to fix the set time zone automatically greyed out issue in Windows.

1. Identify the Greyed Out Setting
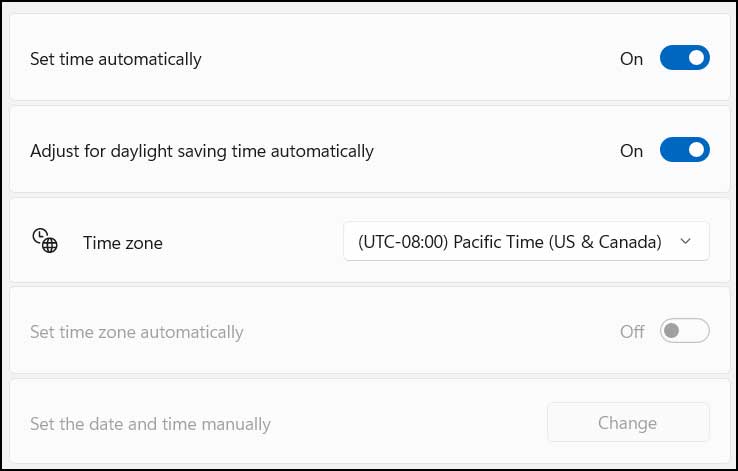
As you can easily see in the image below, the “Set time zone automatically” setting is completely greyed out and unclickable. This frustrating issue often persists even though the standard “Set time automatically” setting is currently enabled at the very top of the menu. It is incredibly common for users to get stuck on this specific screen when trying to quickly correct their system clock.
2. Test the Master Time Switches
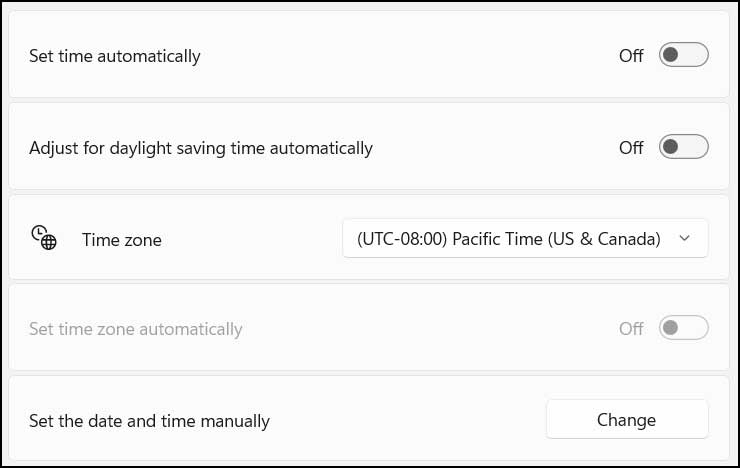
Some users try to fix this error by flipping the other available switches on this menu, but it rarely solves the core problem. Even if you completely disable the “Set time automatically” and “Adjust for daylight saving time automatically” settings, it will still not enable you to change the greyed-out time zone toggle. You will notice that doing this only causes the “Set the date and time manually” button to become enabled, leaving the automatic time zone feature totally locked out.
3. Navigate to Your Location Settings
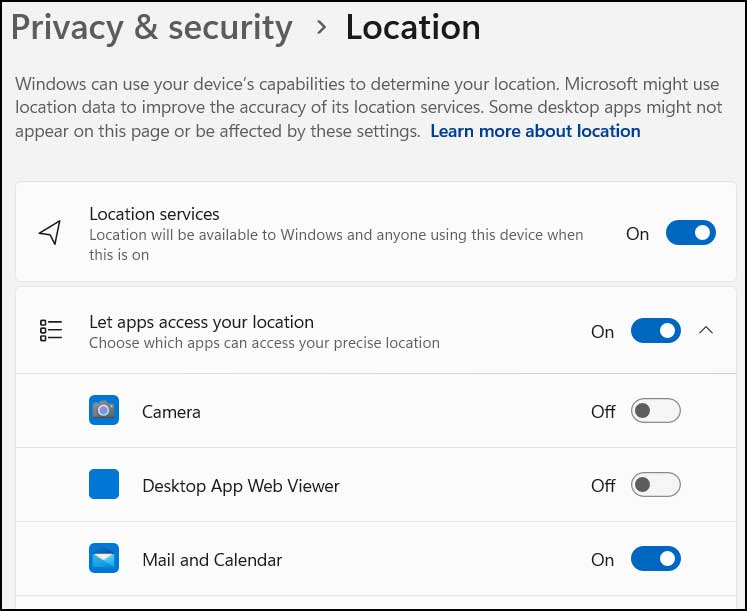
Fortunately, this is a very simple fix assuming this standard procedure applies to your specific computer and Windows configuration. What you need to do is close out of the broken date and time menu and open up your main Windows settings window instead. From there, you will need to navigate directly to the “Location” settings, which are securely located under the “Privacy and Security” section in the menu.
4. Enable Global Location Services
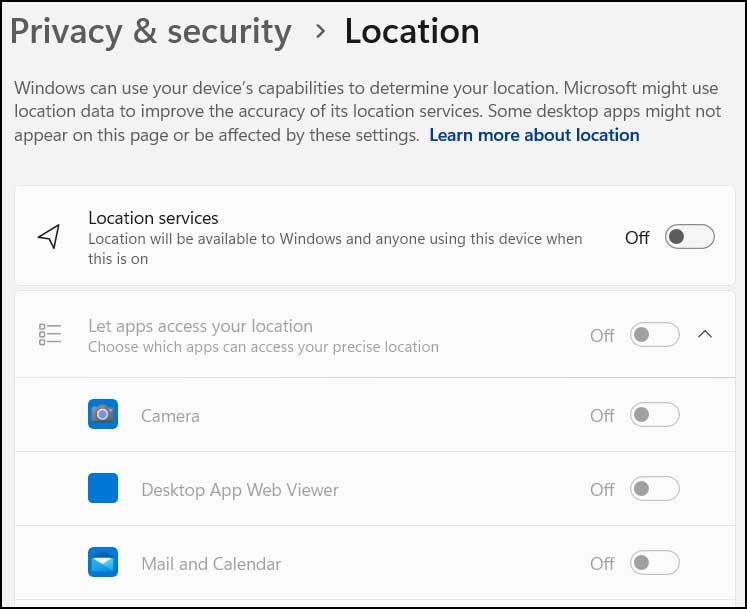
Once you are finally on the Privacy and Security page, you will need to look closely at your system’s location permissions. You must make absolutely sure that the primary “Location services” setting is toggled on and fully enabled for the entire computer. You will also need to verify that the specific sub-option for “Let apps access your location” is turned on so that Windows can properly detect your region.
5. Allow Mail and Calendar Access
In addition to the global settings, there are specific application permissions you need to check on this exact same page. You will also need to explicitly enable the location services for the built-in “Mail and Calendar” app from the provided software list. Once you flip this particular switch, Windows finally has the necessary backend permissions to accurately pinpoint your regional time zone automatically.
6. Verify Your Location Permissions
Before leaving this important privacy menu, take a quick moment to verify that all of your switches match the required configuration. Once you have all of the proper settings enabled, your screen should look very similar to the reference image provided below. Having these exact toggles set correctly is the secret to unlocking your previously frozen date and time menu.
7. Return to the Date and Time Menu
Now that the system has proper location access, you can safely go back to your original Date & time settings page. You should immediately see that the “Set time zone automatically” setting is no longer greyed out and is finally interactive. You can then simply click the toggle to switch it from Off to On, allowing Windows to seamlessly fix your clock based on your geographical region.
8. Understand Why Location Services Matter
If you ever decide to disable your location services in the future, you will immediately notice that the “Set time zone automatically” option will once again be greyed out until you enable them again. Some people really like to have their location settings disabled for extreme privacy, but this might be entirely unnecessary in reality. It’s not as though Microsoft is constantly watching where you are going, or actively tracking your every move using this specific Windows setting.
9. Keep Your Location Settings Enabled
If you are using a heavy desktop computer, it’s not like you will be moving from location to location to begin with, so leaving the location service on is perfectly harmless. Plus, these background location services are strictly needed for things such as map applications and basic weather widgets. Those convenient apps fundamentally need to know exactly where you are in order to do things like give you accurate driving directions or local forecasts.
For additional training resources, check out our online IT training courses.
Check out our extensive IT book series.