
Last Updated on July 3, 2026
The Windows desktop is where most people keep their most commonly accessed files, folders and program shortcuts. In fact, some people use it so much that they sometimes fill it up completely!
If you were to right-click on the desktop and choose View, you would have options to do things such as auto arrange the icons or align them to the “invisible” grid, so they stay in line with each other.
You may have an issue where you made a system change or your computer crashes or hangs, and then you notice that all of your desktop icons are spread apart. Then when you try to move them closer together and back in order, they move to random places on the desktop or even on top of each other.
This can be incredibly frustrating. In this article, we will be showing you exactly how to fix the spread apart desktop icon issue in Windows.

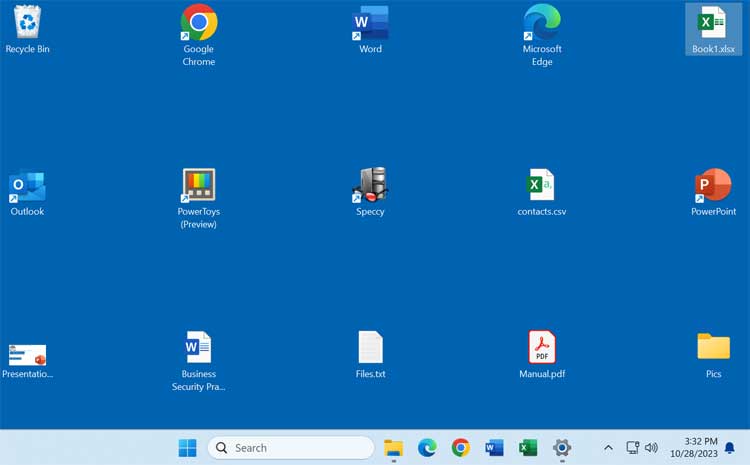
The image below shows an example of how the spread apart desktop icon issue can look like. As you can see, this doesn’t leave much space for additional icons if they have to be this far apart from each other.
Before You Begin: Back Up Your Registry
Because this fix involves the Windows Registry, it is always a good idea to create a quick backup before making changes. While the steps below are safe, the Registry is the “brain” of your computer, and having a backup ensures you can easily revert changes if you make a mistake.
To do this, simply open the Registry Editor, click on File in the top left corner, and select Export. Save the file to your desktop as “RegistryBackup.” Now you are completely ready to proceed with the fix.
1. Open the Registry Editor
Start by pressing the Windows Key + R on your keyboard to open the Run dialog box. Type regedit into the text field and hit Enter to launch the utility. If a User Account Control prompt appears asking for permission, simply click Yes to continue.
2. Navigate to WindowMetrics
Once the Registry Editor is open, you need to find the specific folder that controls how your desktop looks. Use the left-hand sidebar to navigate through the folders, or paste the following path directly into the address bar at the top:
HKEY_CURRENT_USER\Control Panel\Desktop\WindowMetrics
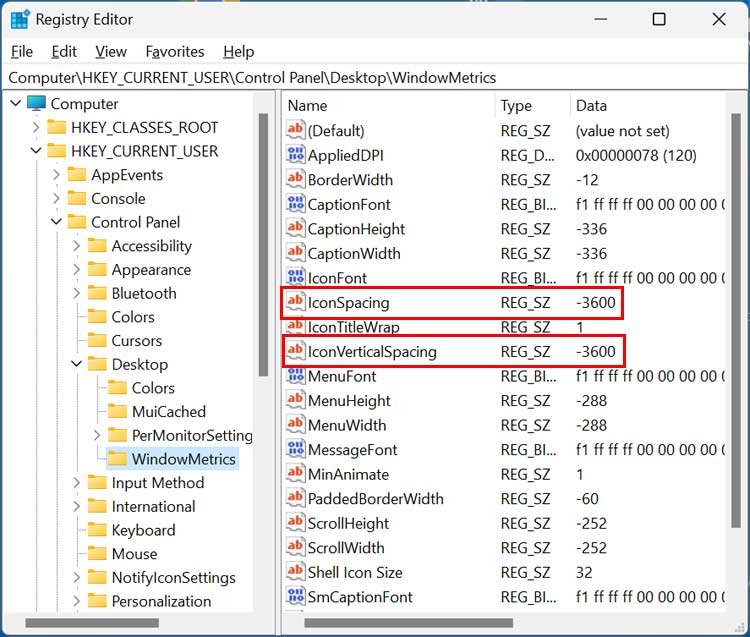
3. Adjust the Horizontal IconSpacing
Look for the value named IconSpacing in the right-hand pane. This specific string controls the horizontal distance between your desktop icons. Double-click it to open the editing window and change the value data to the Windows default of -1125.
4. Adjust the IconVerticalSpacing
Next, look right below that and find the value named IconVerticalSpacing. This controls the distance between the top and bottom of your icons. Double-click it to open the prompt and change this value data to -1125 as well, then click OK to save your changes.

How to Make the Changes Take Effect
You will notice that your desktop icons don’t move immediately after you click “OK” in the Registry. To see the results, you need to refresh your user profile and force the Windows shell to reload. You can accomplish this in a few different ways.
5. Open the Task Manager
The fastest method is to restart Windows Explorer. To do this, right-click on your taskbar and choose Task Manager. Alternatively, you can press Ctrl+Shift+Esc to open the utility directly.
6. Restart Windows Explorer
Scroll down the active processes list until you find Windows Explorer. Right-click on it and choose Restart. You will then see your taskbar disappear for a moment and then come back. If you have any File Explorer windows open, you might have more than one entry in Task Manager, so you might want to close File Explorer first to avoid confusion.

7. Alternative Refresh Methods
If restarting the Windows Explorer process does not immediately fix the grid, you have two other options. You can sign out of your Windows account and sign back in, or you can perform a full system restart, which is the absolute most reliable way to force registry changes to apply.
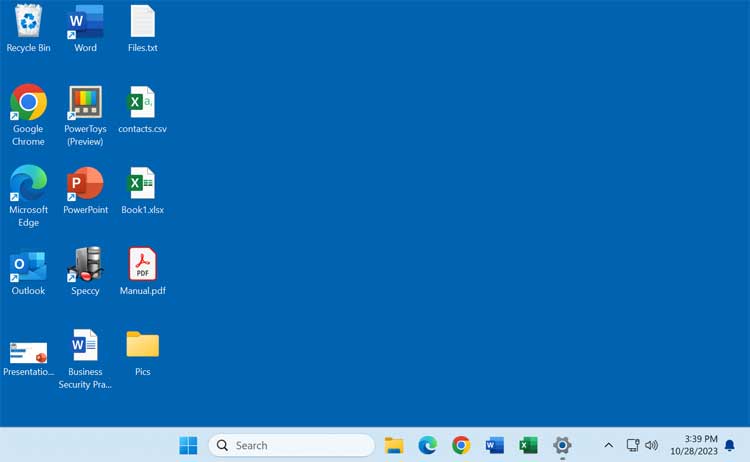
After restarting your computer or Windows Explorer, you should now have your icon spacing back to normal. You can safely rearrange your files, folders, and shortcuts exactly as needed.
Windows Desktop Icon Value Reference
If you want to customize your icons further rather than just using the defaults, you can easily modify these registry values to your liking. Here is a quick guide on how the spacing numbers work.
Standard Default Spacing
The standard default value for both horizontal and vertical spacing is -1125. This provides the classic, compact grid layout that most Windows users are accustomed to out of the box.
Moving Icons Closer Together
If you want to pack more icons onto your screen, use a number closer to zero. For example, setting the value to -900 will tighten the grid significantly. The absolute minimum spacing Windows allows is -480.
Spreading Icons Further Apart
If you prefer a more open layout or have a very large high-resolution monitor, use a larger negative number. For example, changing the value to -1500 will space them out comfortably. The absolute maximum spacing allowed by the operating system is -2730.
Here is another video that shows an app you can use to fine tune your desktop icon spacing.
For additional training resources, check out our online IT training courses.
Check out our extensive IT book series.


