Last Updated on July 25, 2026
Whenever you call technical support for an internet outage, or you try to set up a shared printer in your office, the very first question you will be asked is: “What is your IP address?” Think of an IP address as your computer’s digital mailing address. Every single device connected to your Wi-Fi or wired network needs its own unique identification number so data packets know exactly where to go.
Without it, you wouldn’t be able to load a webpage or send an email. Whether your computer was assigned a permanent static address by an IT administrator, or it automatically grabs a dynamic address from your router, finding that string of numbers only takes a few seconds. Here are the two fastest ways to find your IP address in Windows.
Method 1: Use the Command Prompt (The Fastest Way)
1. Open the Command Prompt
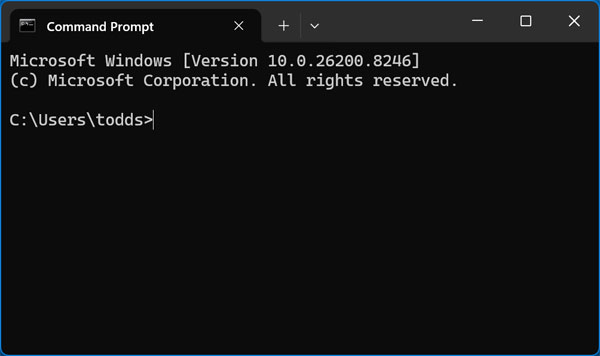
The absolute fastest way to find your network information is by using the Windows Command Prompt. Start by pressing the Windows Key on your keyboard or simply clicking the Start button on your taskbar. Next, type the letters cmd into the search bar and hit the Enter key.
2. Execute the IPConfig Command
A black window with a blinking white cursor will immediately appear on your screen. Inside that black box, type the exact command ipconfig and press Enter. Your screen will instantly populate with your active network connection details.
3. Read the Output Table
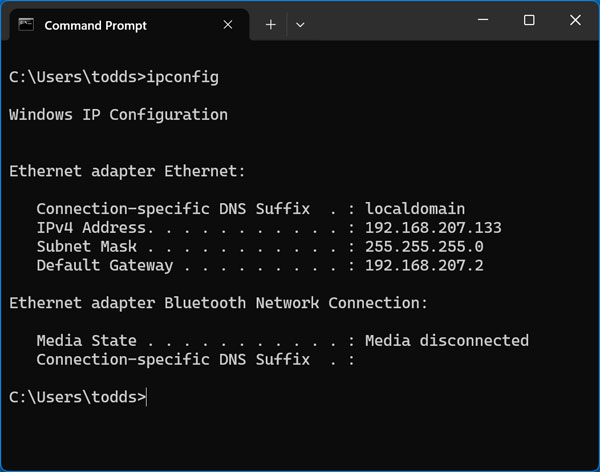
If you have both Wi-Fi and a wired Ethernet cable connected at the same time, you will see a separate block of text for each active adapter. You only need to pay attention to three specific lines of information here to find what you need.
4. Locate Your Local Address
The IPv4 Address line is your computer’s actual local IP address on the network. It usually starts with 192.168 depending on your specific router brand. The Subnet Mask line determines the specific size and segment of your local network. The Default Gateway is the IP address of your actual internet router.
5. Find Your MAC Address
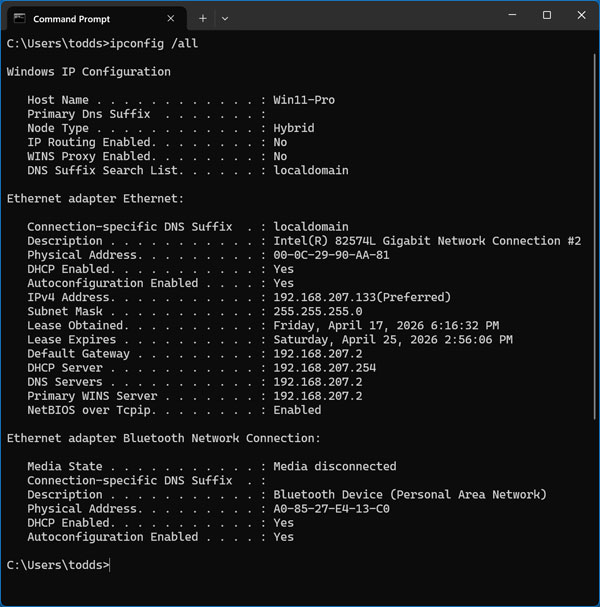
If your IT department needs your physical hardware address (MAC address)) or your DNS server info, the standard command will not show it. Instead, you need to type ipconfig /all and press Enter to generate a highly detailed network report. This advanced option gives you critical information such as your host computer name, DNS details, and WINS information.
Method 2: Use the Classic Network Connections Menu
1. Launch the Network Connections Panel
If you prefer clicking through visual menus rather than typing text commands, you can find the exact same information buried inside the Windows Control Panel. First, press the Windows Key and the R key at the exact same time to open the Run dialog box. Type ncpa.cpl and hit Enter. This is a brilliant little shortcut that instantly opens the classic Network Connections panel in both Windows 10 and 11.
2. Open the Adapter Properties
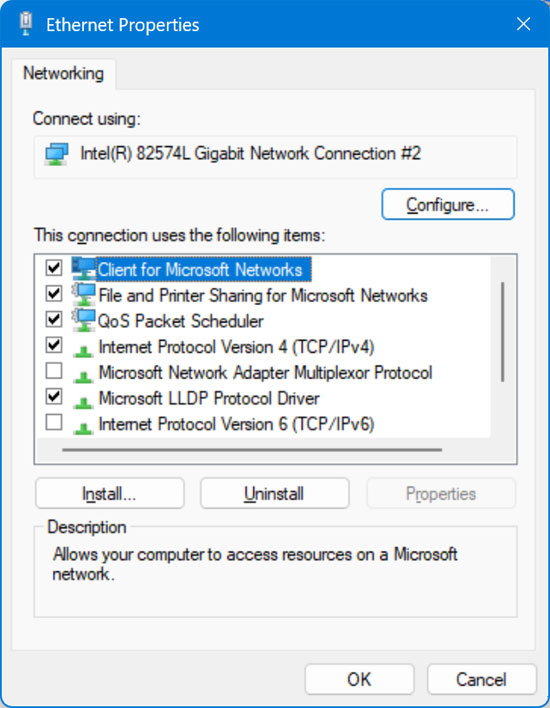
From there, right-click on your active internet connection, which will be either Wi-Fi or Ethernet. Select Properties from the context menu. A small configuration window will appear on your screen.
3. View the IPv4 Settings
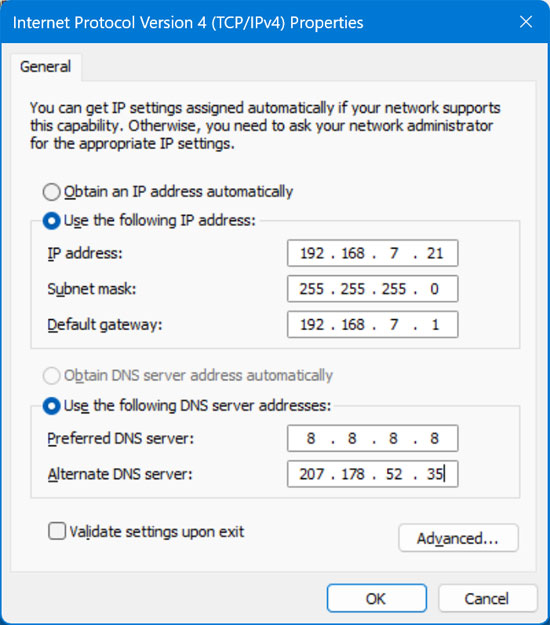
In the list of items, double-click on Internet Protocol Version 4 (TCP/IPv4). If your computer was manually assigned a permanent IP address by an administrator, it will be clearly typed out in the boxes on this screen. However, if the bubble for “Obtain an IP address automatically” is selected, all the text boxes will be completely blank!
4. View the Dynamic Details
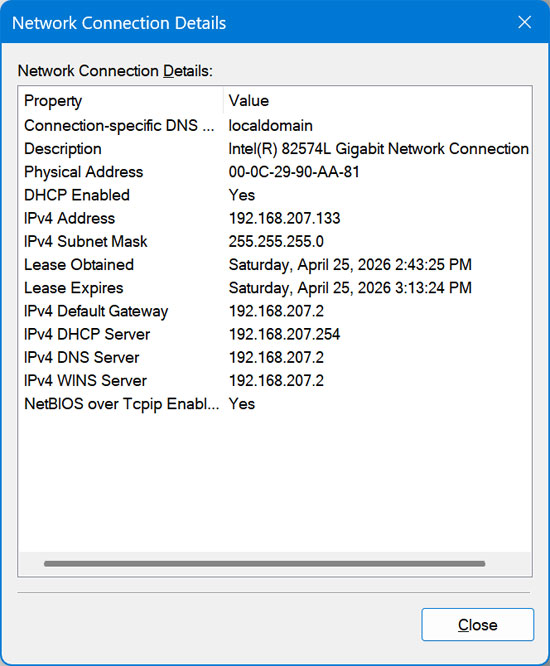
Do not panic if you see this. This simply means your internet router is managing your IP dynamically using a service called DHCP. To find out what IP address your router secretly handed you, close out of the Properties menu. Instead, just double-click on your active network adapter icon to open its status window.
5. Check the Status Window
In modern versions of Windows, click the Details button to view your active network assignment. If you are on an older legacy version of Windows, this will be located under the Support tab instead.
Finding Your Public IP Address
1. Understand Public vs Local Addresses
The numbers you found using the steps above represent your Local IP Address. This is a strictly private number that only exists inside your house or office building. Your router acts as a massive shield for your network. To the outside world, all the devices inside your house share one single Public IP Address.
2. Search Google for Your IP
If you are trying to host a Minecraft server, set up a remote desktop connection over the internet, or whitelist your computer for a corporate VPN, they need your Public IP. Your local address will not work for these tasks. Finding your public-facing address is incredibly easy. Simply open your preferred web browser, go to Google, and type “What is my IP” into the search bar. Google will immediately print your current public IP address right at the very top of the search results.
Troubleshooting APIPA Errors
1. Identify the 169.254 Address
If you ran the ipconfig command earlier and noticed your IPv4 address starts with 169.254, you currently have a network error. This is called an APIPA (Automatic Private IP Addressing)) assignment. It means your computer shouted out to your router asking for a valid IP address, but the router completely ignored it.
2. Reboot Your Router
Because your PC couldn’t get a real address, it assigned itself a temporary “169” address as a fallback. A computer with a 169.254 address cannot connect to the internet. To fix this common glitch, physically unplug the power cable from your internet router. Wait at least 30 seconds, and then plug it back in to power it up. Once the router fully reboots, restart your computer so it can successfully request a fresh, valid IP address from the network.