Last Updated on July 25, 2026
Dynamic IP addresses are IP addresses that change over time and are usually allocated automatically by a DHCP (Dynamic Host Configuration Protocol) server. These are common for workstations and home computers. Static IP addresses are IP addresses that are assigned manually and do not change unless that change is done manually. They are commonly used for servers and other devices that need to have the same IP address all the time although there are many reasons to have a static IP address on your workstation.
Many people who take their laptop from home to the office may run into a problem. You might have to use a dynamic IP address at home and a static IP address at the office. This can become somewhat of a pain to have to change the type of IP address back and forth each time you change locations.
There is a way to have both settings in your configuration so you do not need to change them manually ever again. This built-in Windows feature acts as an automatic failover system for your network adapter.
Accessing the IPv4 Adapter Settings
1. Open the Windows Settings App
In modern operating systems like Windows 10 and Windows 11, you start by opening the main Settings app. Navigate to the Network & internet section. Click on Advanced network settings to view your active adapters.
2. Launch the Classic Network Connections Menu
Scroll down and click on More network adapter options. This will launch the classic Control Panel interface for your network connections. You can also get here by searching for “View network connections” directly in your Start menu.
3. Open the Adapter Properties
From there you can right-click your active Local Area Connection or Wi-Fi adapter. Choose Properties from the context menu. Scroll down the list of items and double-click on Internet Protocol Version 4 (TCP/IPv4.).
4. View the Current IP Configuration
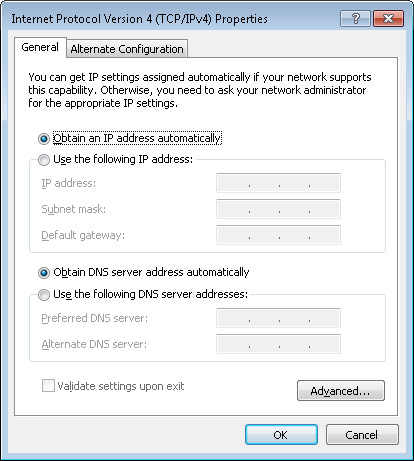
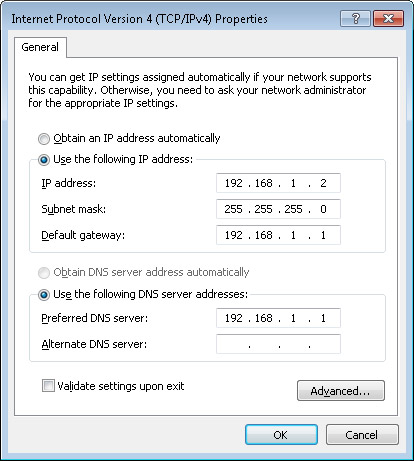
You will see a window similar to one of the following images. It will show your current IP address assignment. It will be set to either obtain an IP address automatically or use a specific manually assigned address.
Configuring the Alternate IP Address
1. Enable Automatic DHCP Assignment
To setup an alternate IP address, you first need to ensure the primary setting is dynamic. Make sure the radio button for Obtain an IP address automatically is selected on the General tab. Note that if you do not have this option selected, then you will not even see the Alternate Configuration tab.
2. Switch to the Alternate Configuration Tab
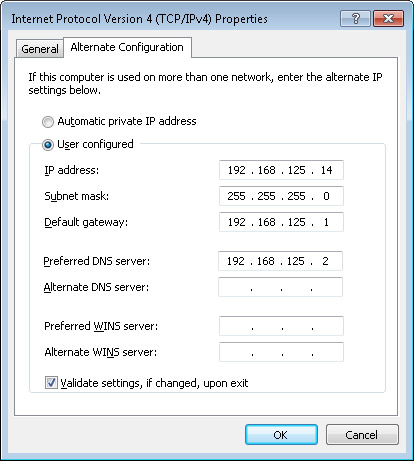
Click on the Alternate Configuration tab at the top of the window. This is where we will program the failover static IP address. Select the User configured radio button to unlock the text boxes.
3. Enter Your Static IP Information
Enter your specific static IP information in the boxes. You will need to provide the exact IP address, Subnet mask, Default gateway, and Preferred DNS server for your office network. Click OK to save the dual configuration.
4. Understand the Failover Delay
One side effect of using this type of configuration is that it will take a little longer for Windows to completely establish your network connection. This happens because it will first look for an IP address from a local DHCP server. Only after that initial request times out will it fail over to using the alternate static configuration you just programmed.