Last Updated on March 22, 2026
Check out this updated article on how to connect to shared files and folders on the network.
Shares are used to share information over a network between computers and other networked devices. Once you learn how to share your files and printers on your network you may want to know how to access them from another computer to make use of those newly created shares. Shares can be things such as shared files, folders, printers and so on.
This comes in handy so you don’t have to go over to the other computer to get the files you need off of it. Plus it gives you a central location to share files so that everyone on your network can access them if you give them permission to do so. There are many ways to access your shares and in this tip we will explain how to gain the access you need.
Permissions
First of all If you don’t have the proper permissions to access your shared resources then you are not going to be able to use them. When setting up your shares make sure to check the permissions so you won’t run into this problem. Windows tends to be fairly relaxed with default permissions so you should be ok most of the time. You can right click on your shared folder on the computer sharing that folder and choose Properties or Security to view and manage permissions. Keep in mind that there are share permissions as well as file level permissions.
Browsing for Shared Network Resources
1. Open Windows File Explorer
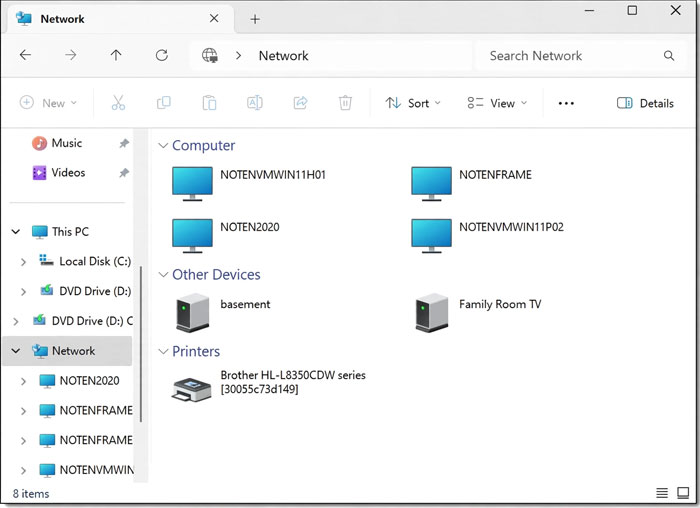
One of the most common ways to find and access your shares is to browse for them. There are several approaches to doing this depending on your version of Windows. One of the easiest ways is to open File Explorer and click on the Network icon located in the left navigation pane.
2. Enable Network Discovery
If you have never used this feature before, Windows might prompt you with a yellow banner at the top of the screen. You will need to click on it and enable Network Discovery and File Sharing for your current network profile. Ensure you are on a private home or work network before doing this.
3. View the Connected Computers
Once enabled, you should see a listing of the computers currently broadcasting on your local network. If it is a work environment you may see a listing of other workgroups or domains. Double click on the specific computer name that holds the files you want to access.
4. Access the Shared Folders
When you click on a computer that has shared resources it will show exactly what folders or devices it has shared. From here you could view the contents of the shared folder as well as copy and paste files to and from the folder assuming you have the proper permissions.
5. Install Shared Printers
If there are any shared printers broadcasting from that host machine, they would show up here as well. You can double click them to automatically install the network drivers onto your computer. Keep in mind that in order for you to print to a shared printer connected to another computer that host computer must be powered on. If it’s a standalone networked printer connected directly to the router, then that is not the case.
Using Direct Search Methods to Find Shares
1. Use the Windows Run Box
There are other ways to find your shared resources besides browsing for them in File Explorer. If you know the exact computer name and the share name you can go directly to that share. Press the Windows Key + R to open the Run dialog box.
2. Enter the UNC Path
Type in the Universal Naming Convention (UNC) path to the share. For example if the computer you are trying to reach is called Sales and the shared folder is called reports, from the Run box you would type \Sales\reports and click ok. This would then take you directly to that folder bypassing the network discovery process.
3. Search by IP Address
If browsing for a computer using its hostname is not working for whatever reason, which happens frequently in Windows, you can do a direct search. You can search for the computer by using its specific IP address. In the Run box or the File Explorer address bar, type the IP address with the preceding slashes, such as \192.168.1.50. Press enter to force Windows to connect directly to that specific network node.