Last Updated on June 5, 2026
If your Windows computer is suddenly showing a yellow warning triangle over your Wi-Fi icon, telling you there is an “IP Address Conflict,” or saying “Connected, no internet,” you are likely dealing with a router miscommunication. Every single device on your network relies entirely on your router’s DHCP server to hand out a temporary dynamic IP address. This internal system usually works perfectly in the background without any human intervention.
Sometimes the physical router gets confused and accidentally hands the exact same IP address to two completely different devices. A digital “lease” can also abruptly expire and fail to reconnect properly to the network. Before you walk across the house to unplug your router for the fifth time, you can force your computer to drop its current network configuration.
You can simply ask the router for a fresh working IP address instead of manually rebooting your hardware. This specific software process only takes a few seconds using the built-in Windows Command Prompt. We will show you the exact command line sequence to reset your connection immediately.
Fixing Your Windows IP Address Configuration
1. Open the Command Prompt Utility
To run these specific networking commands, we need to open the built-in Windows command line. Click the Start button located directly on your Windows taskbar. Type the letters cmd directly into the search bar to find the hidden tool.
You will immediately see Command Prompt appear right at the top of the search results. Click that specific shortcut to open the black console window on your desktop. Note that you do not strictly need to run this as an Administrator for these specific commands. It never hurts to do so if you want to elevate your local privileges anyway.
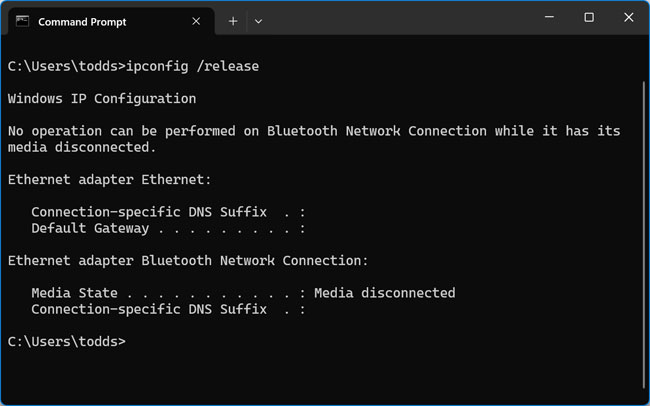
2. Release Your Current IP Address
First, we must forcefully command the computer to abandon its current broken network connection. Click directly inside the black terminal window to activate the text cursor. Type the following command exactly as written and press Enter: ipconfig /release.
Your screen will instantly populate with a few fast lines of diagnostic text. Do not panic if your internet connection completely drops right now. Your streaming music will stop playing. By running this specific command, your computer has successfully dropped its active IP address. This leaves the machine totally disconnected from the local network.
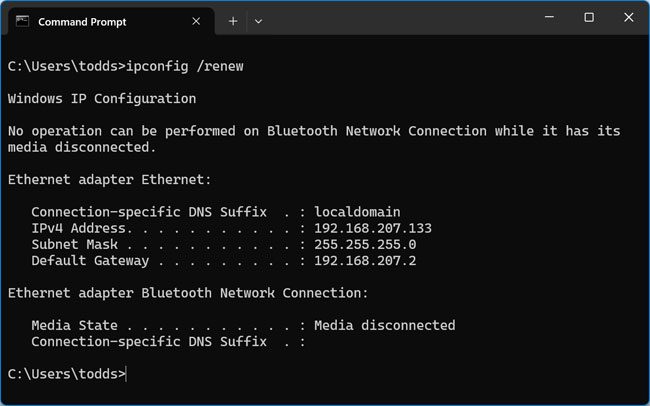
3. Renew Your IP Address
Now that the computer has a completely blank slate, we need to establish a new handshake. We must tell the machine to reach back out to the router and request a fresh network lease. In that exact same black window, type the following command and press Enter: ipconfig /renew.
The text cursor will blink rapidly. The terminal window might actually appear to freeze for about five to ten seconds. This is completely normal behavior. The computer is actively negotiating a brand new secure connection with your router hardware.
Once the background process finishes, the screen will output your new active IPv4 Address. It will also display your Subnet Mask and your Default Gateway routing numbers. Your internet connection should instantly come back online. Test your web browser to confirm the fix worked.
Understanding DHCP Lease Behaviors
1. Review Your DHCP Lease Results
People are often extremely confused when they successfully run the renew command. They wait patiently for the results and realize the router handed them the exact same IP address they had five minutes ago. If this happens to you, the underlying process did not fail.
This exact scenario happens entirely because of how DHCP leases function in the background. When you politely ask for a new IP address, the router actively looks at your computer’s physical hardware MAC address. It instantly recognizes your specific machine on the network.
2. Understand the Digital Lease Reset
The router remembers your device and sees your old IP address sitting available in the reserved pool. It simply gives that exact same number sequence right back to you. Even though the numbers look completely identical, the underlying digital “lease” has been totally reset.
This fresh digital timestamp is usually enough to completely fix most local connection errors. You will typically only get a completely different set of numbers if you physically connect to a completely different router. Taking your laptop to a local coffee shop forces a brand new network assignment.
Advanced Network Reset Commands
1. Flush Your DNS Cache
If releasing and renewing your IP address did not fix your active network error, your local IP address is probably not the main culprit. Your computer might actually be holding onto a highly corrupted map of the internet. To fix this specific issue, you need to forcefully clear out your local DNS cache.
While you still have your Command Prompt window open, run this extremely powerful command and press Enter: ipconfig /flushdns. You will immediately get a quick success message printed on the screen. It explicitly states the DNS Resolver Cache was successfully flushed.
2. Reset the Winsock Catalog
You can completely reset your physical network adapter’s software stack back to factory defaults as a final troubleshooting step. Type this exact final command into the terminal and hit Enter: netsh winsock reset. This deeply cleans the core Windows Sockets API configuration.
After successfully running that final command, you absolutely must restart your computer. The operating system requires a fresh boot cycle to apply these core networking changes. Your Windows machine will boot up with a perfectly clean network connection.