Last Updated on July 22, 2026
The term networking may scare many novice computer users but these days networking has a more widespread meaning. 10 years ago it meant complicated messes of routers, switches and cabling which it still does today but it also includes things like the connection to your wireless router and other computers connected to that router at home. Networking has become a household term, for some households at least and if you do any kind of file sharing, wireless printing or media streaming then you most likely have had to deal with it.
Windows has a place in the Control Panel where you can change your wireless settings, add wireless networks and diagnose problems with your computer’s network settings. This place is called the Network and Sharing Center and it’s a good area to get yourself familiar with. Modern Windows versions also allow you to perform these same management tasks directly through the Settings app under Network & Internet.
Navigating the Classic Network and Sharing Center
1. Overview of Network Status and Troubleshooting
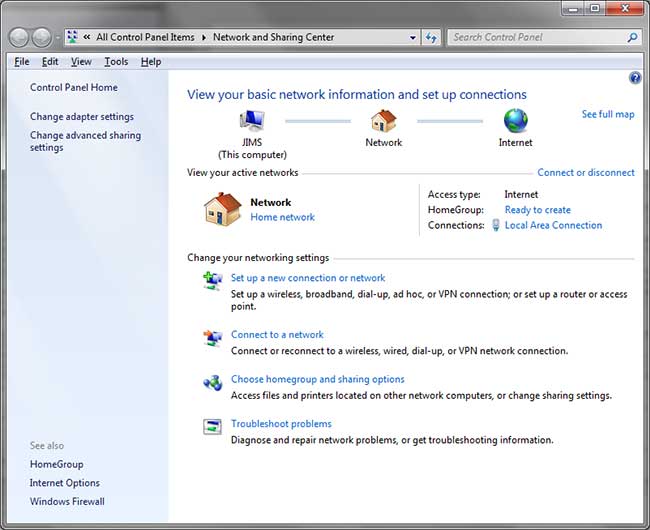
The main area will show your basic network configuration in the form of a diagram. It will also display the name of the network you are on. There are options to setup a new connection or network such as a wireless, VPN or wired connection. Clicking on the link will bring up a wizard that will walk you through making the particular type of connection. Clicking on Connect to a network simply brings up the network connections in range of your computer allowing you to connect to a particular network assuming you have permission to access that network. If you are having connectivity problems then you can run the network troubleshooter by clicking on Troubleshoot problems. This procedure checks your computer’s settings and tries to determine why you can’t connect to your given network.
2. Manage Wireless Networks and Connections
There are also additional tools listed on the left side of the window you can use to further configure your network. The first area is the Manage wireless networks section and here you can view wireless networks within range of your computer as well as add additional wireless networks. Sometimes you may not want your connection to be broadcast so you can setup private networks to give you more privacy and security. You can even setup what is called an ad-hoc network to share files between 2 computers with wireless capabilities. If you need to manage the properties of your wireless adapter you can do that from here as well. Profiles can be setup which will let you limit what connections can be accessed by users of your computer and allow users to make their own connections. This won’t be shown if you don’t have a wireless adapter in your computer.
3. Modify Adapter Settings and IP Configurations
The Change adapter settings area is commonly used to change IP addressing info for various connections. If you use a static IP address for your connection you can enter it here otherwise DHCP is the default connection setting. This area is also where you will go if you want to disable or enable a network connection. You can also rename your connections from here to make them easier to identify.
4. Access Advanced Adapter Binding Properties
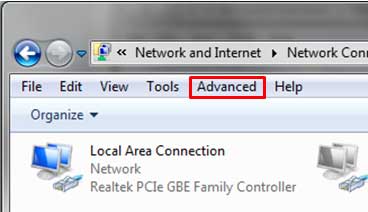
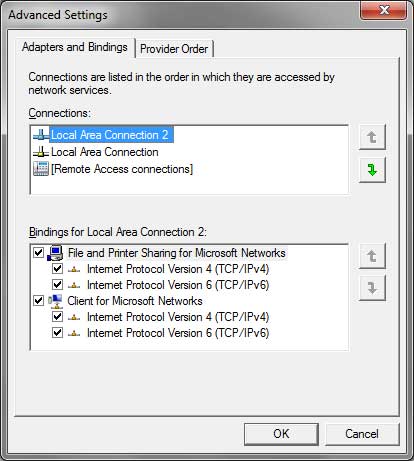
If you have the menus enabled you will see an Advanced menu that you can click on which will have an Advanced Settings option. From there you can change more advanced settings such as the order that your network connections are accessed as well as the bindings for your network connections themselves.
5. Configure Profile Sharing Settings and Navigation Links
The Change Advanced sharing settings is where you can do things such as change properties for the various network profiles which consist of Home or Work, Public and Domain. There are various features you can turn off or on such as network discovery, file and printer sharing, public folder sharing, media sharing and file sharing connections. The See also section on the bottom will show you some other related areas you can go to that might come in handy such as firewall settings and Internet Explorer internet options. The Network and Sharing Center can be accessed by clicking on Start and then Control Panel or from single clicking on your network connection in your system tray and choosing Open Network and Sharing Center.
Managing Network Options in Windows Settings
1. Access the Network and Internet Settings App
You can manage all your network connections using the modern Windows Settings app. Press Windows key + I on your keyboard to open Settings, then click on Network & Internet from the left sidebar. This menu centralizes status indicators, Wi-Fi connections, Ethernet properties, and VPN configurations in one modern window.
2. Configure Wi-Fi Properties and Adapter Properties
To view or adjust your wireless connections, select Wi-Fi or Ethernet from the Network & Internet menu. Clicking on your active connection reveals detailed properties such as your local IP address, MAC address, and network profile type. You can easily switch between Public and Private network profiles from this screen to manage your local firewall rules.
3. Change Advanced Network Settings and Sharing Choices
Scroll down on the main Network & Internet page and click Advanced network settings. This section allows you to edit network adapters, perform a network reset, or access Advanced sharing settings directly. Here you can toggle network discovery and file and printer sharing options without having to navigate through the legacy Control Panel interface.