
Last Updated on June 22, 2026
Most Windows users love customizing their desktop background. Instead of staring at a solid color or the default Windows logo, people generally prefer high-quality photos. Some people even like to use animated desktop wallpapers to bring their screens to life.
You can use the default images that come with various Windows themes. You can also use the native Windows Spotlight feature. Windows Spotlight automatically changes your background daily based on a rotating gallery of photos curated by Microsoft.

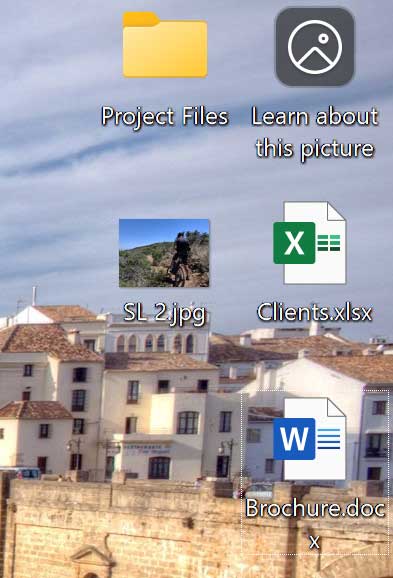
However, one annoying thing you may have noticed when using Windows Spotlight is a new desktop shortcut. Microsoft recently added an icon that says “Learn about this picture” directly on your desktop. This shortcut sits right alongside your personal files. It might not be something you want cluttering up your workspace.
Why Does Microsoft Force This Icon on the Desktop?
1. The Push for Bing Traffic
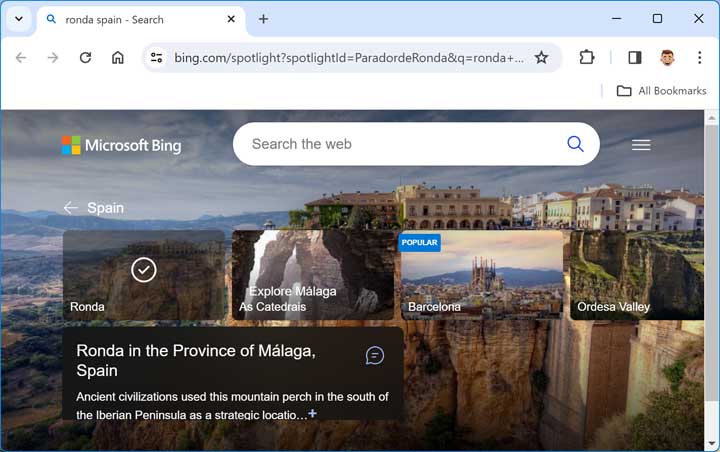
If you click on this icon, whether on purpose or accidentally, it opens your web browser. You are immediately taken to a website showing trivia and information about the background image currently displayed on your screen. The “Windows Spotlight” feature was originally designed exclusively for the lock screen. But in recent Windows 11 builds, Microsoft decided to bring it to the main desktop.
2. The Unremovable Shortcut
While the high-quality 4K nature photography is beautiful, that “Learn about this picture” icon is essentially an advertisement. It is a baked-in shortcut designed specifically to drive search traffic to Microsoft Bing. Because it is deeply integrated into the Windows Explorer shell, you cannot simply right-click and delete it. You also cannot drag it to the Recycle Bin like a standard software shortcut.
Important: Create a Quick Registry Backup
1. Understand the Risks
To remove the “Learn about this picture” icon from your desktop, we will perform a basic registry edit. You always need to be careful when editing the registry. Making a random mistake here can cause Windows to become unstable. Since we are modifying the CurrentVersion Explorer hive, a typo could potentially reset your taskbar or hide your standard desktop icons.
2. Export Your Current Settings
I highly recommend backing up this specific section first. To do this, open the Registry Editor and click on File in the top menu bar. Select the Export option from the drop-down menu. Save the file to your Documents folder and name it something easy to remember, like DesktopIconBackup. If anything goes wrong later, you can just double-click this backup file to instantly restore your layout.
Opening the Registry Editor and Finding the Key
1. Launch the Registry Editor
To get started, type regedit into your Windows taskbar search box. Click on the Registry Editor app option that appears in the search results. You will need administrative privileges to open this system tool. Click yes on the User Account Control prompt if it appears on your screen.
2. Navigate to the HideDesktopIcons Folder
Next, you will need to navigate to a specific area of the Registry Editor. You can manually click through the folders on the left side of the window. You can also simply copy and paste the text below directly into the Registry Editor address bar at the top of the screen.
3. Paste the Registry Path
Highlight and copy this exact folder path. Paste it into the address bar and press Enter. HKEY_CURRENT_USER\Software\Microsoft\Windows\CurrentVersion\Explorer\HideDesktopIcons\NewStartPanel
What if the Registry Folders Are Missing?
1. Check for Missing Keys
Depending on your specific version of Windows 11, you might navigate to that path and realize the HideDesktopIcons or NewStartPanel folders do not exist. Microsoft does not always generate these folders by default on every single PC. If they aren’t there, you will have to create them yourself.
2. Create the HideDesktopIcons Folder
To do this, right-click on the Explorer folder in the left pane. Select New, and choose Key. Name this new key exactly HideDesktopIcons without any spaces.
3. Create the NewStartPanel Folder
Then, right-click on your newly created HideDesktopIcons folder. Select New, and choose Key again. Name this second folder exactly NewStartPanel.
Creating the Registry Value to Hide the Icon
1. Generate a New DWORD
Once you are inside the NewStartPanel folder, right-click on any empty space on the right side of the window. Select New, and then choose DWORD (32-bit) value from the context menu. A new blank entry will appear in the list.
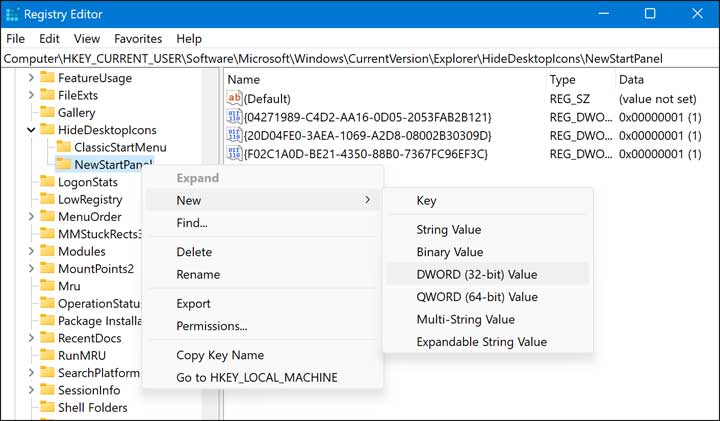
2. Name the Value with the Target CLSID
You need to name this new value exactly as follows. Ensure you include the curly brackets at the beginning and end of the string. Type or paste {2cc5ca98-6485-489a-920e-b3e88a6ccce3} into the name box and press enter.
3. Understand the CLSID Code
You might be wondering what this long code actually means and why we are pasting it into Windows. This string is called a CLSID (Class ID). In the Windows operating system, unique system icons like the Recycle Bin, the Control Panel, and this Spotlight icon are assigned a specific GUID (Globally Unique Identifier). Windows uses this ID rather than a standard file path like a normal program would use. By adding this specific CLSID to the HideDesktopIcons registry folder, we are targeting that exact shortcut.
Hiding the Icon and Refreshing the Desktop
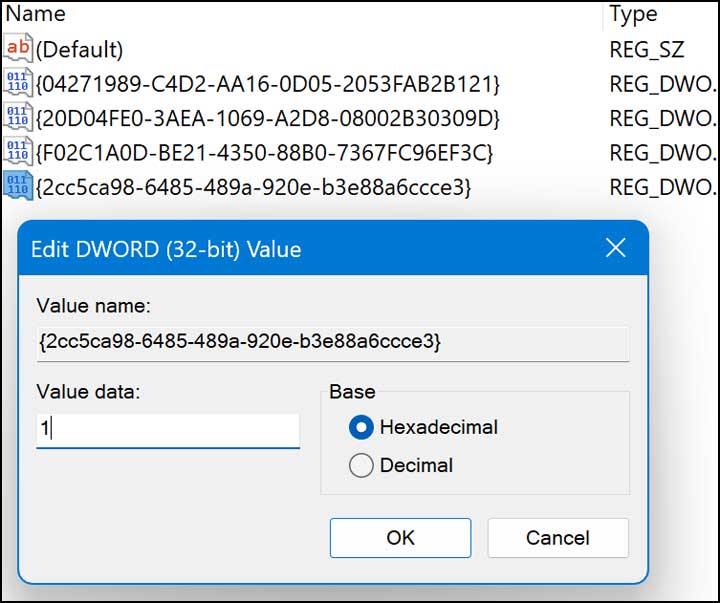
1. Edit the Value Data
Now you will need to double-click on the new {2cc5ca98-6485-489a-920e-b3e88a6ccce3} value you just created. A small window will pop up on your screen. Change the Value data box from 0 to 1.
2. Save Your Registry Changes
Setting this value to “1” (True) specifically tells the Windows shell to suppress this single icon from rendering on your screen. Click OK to save your changes. You can now safely close the Registry Editor window.
3. Refresh Your Screen
Finally, right-click on any empty space on your desktop and select Refresh. The “Learn about this picture” desktop icon should instantly vanish. Your workspace is now clean and free of Microsoft Bing advertisements.
Windows Spotlight Desktop FAQ
1. Restoring the Shortcut
How do I get the icon back if I want to use it? If you decide you actually want to know more about the daily wallpapers, it is very easy to reverse this trick. Simply return to the Registry Editor and find the {2cc5ca98…} DWORD you created. Double-click it and change the Value Data back from 1 to 0. Refresh your desktop, and the icon will reappear immediately.
2. Windows Updates Resetting the Icon
Will a Windows Update bring the icon back? It is definitely possible. Major Feature Updates like moving to a completely new version of Windows 11 will often reset registry keys back to their factory defaults. If the icon randomly comes back after a massive overnight update, just repeat these steps to hide it again.
3. Impact on the Lock Screen
Does this affect the Lock Screen Spotlight images? No, it does not. This registry edit strictly targets the HideDesktopIcons policy for your main workspace. Your Windows Lock Screen will continue to cycle through the beautiful new Spotlight images and show the trivia links normally.
4. Removing Old Background History
If you go back to the default Windows picture background setting and use your own custom pictures, you may find that you are unable to remove them from the Windows personalization settings. If that is the case, then you can use this method to delete your Windows desktop background image history.
For additional training resources, check out our online IT training courses.
Check out our extensive IT book series.


