Last Updated on April 6, 2026
Virtualization is not a new technology, but it is a great way to do things such as test out different operating systems or test out software without risking causing issues with your main computer. When you work with your virtual machines, you normally work in the virtual machine’s console screen or maybe you even work in full screen mode.
VMware Workstation is one of the most popular and best desktop virtualization platforms you can use at home or even at the office to run virtual machines. One feature of Workstation that many people don’t know about is called KVM mode which stands for keyboard, video, mouse. You are probably familiar with KVM hardware devices that allow you to use the same keyboard, monitor and mouse for multiple physical computers.

The VMware Workstation KVM mode will let you start virtual machines from the command line without needing to run the Workstation software itself. They will then open in a full screen mode as if you were sitting in front of a physical computer. You can also do things such as power off these VMs from the command line and make desktop shortcuts to quickly start a particular VM in KVM mode.
Using KVM Mode
To use KVM mode, you will need to open a command prompt and navigate to your VMware Workstation installation directory which should be as follows assuming you installed it to the default location.
C:\Program Files (x86)\VMware\VMware Workstation
To see the KVM Mode options you would run the following command.
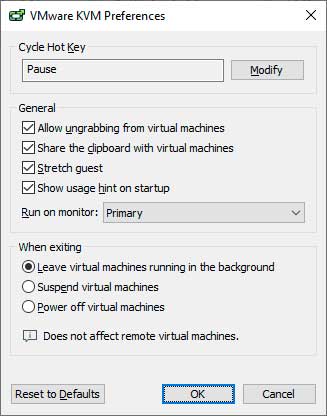
vmware-kvm.exe –preferences
This will show you the KVM hot key which is used to exit KVM mode and bring you back to your physical desktop. It will not affect the state of the virtual machine and if you press it again it will bring the VM screen back on your monitor. The default hot key is Pause but you can change this to another key or combination of keys.
If you have more than one monitor, you can tell it which one to use for KVM mode. You can also set the state of the VM when you use the hot key to exit the KVM mode. The default is to keep the virtual machine running in the background.
To start a virtual machine in KVM mode you will need to find the path to the VMs VMX file. And if you have the VM open in a tab in Workstation then you will need to close that tab first. Here is an example of the command used to start a VM.
vmware-kvm.exe “D:\VMware VMs\Windows 11 New\Windows 11 Pro.vmx”
Here is an example of a command used to power off the VM. Make sure to use 2 dashes in front of power-off.
vmware-kvm.exe –power-off “D:\VMware VMs\Windows 11 New\Windows 11 Pro.vmx”
If you want to release the VM from KVM mode to use it in Workstation, you can use the detach command. Then you can open it in Workstation.
vmware-kvm.exe –detach “D:\VMware VMs\Windows 11 New\Windows 11 Pro.vmx”
To exit KVM mode, use this command.
vmware-kvm.exe –exit
Here are some additional options you can use with the KVM mode. Make sure to use two dashes at the beginning of the command.
–power-off[=hard] – Powers off the specified virtual machine.
–suspend[=hard] – Suspends the specified virtual machine.
–reset[=hard] – Resets the specified virtual machine.
Creating Shortcuts to Launch VMs in KVM Mode
Another nice feature of the VMware Workstation KVM mode is the ability to create desktop shortcuts that you can simply double click on to start a virtual machine in KVM mode. To do so, simply navigate to your installation directory in File Explorer which is most likely-
C:\Program Files (x86)\VMware\VMware Workstation
Then look for a file called vmware-kvm.exe and right click on it and choose Copy. Then right click on your desktop or anywhere else you want to place the shortcut and choose Paste shortcut. You can then rename your shortcut to match the name of the virtual machine it will power on.
To assign a VM to your shortcut, right click on your shortcut and choose Properties. From there you will need to paste the path of the VMX file from the virtual machine AFTER the information that is already in the Target box which should be-
“C:\Program Files (x86)\VMware\VMware Workstation\vmware-kvm.exe”
So the text in the Target box should look similar to what is shown below but you would change the path to your VMX file to match your environment. Just be sure to use the quotes before and after the path.
“C:\Program Files (x86)\VMware\VMware Workstation\vmware-kvm.exe” “D:\VMware VMs\Windows 11 New\Windows 11 Pro.vmx”
For additional training resources, check out our online IT training courses.
Check out our extensive IT book series.