
Last Updated on July 4, 2024
Mount an ISO Image File in a VirtualBox VM
Oracle VirtualBox is a free virtualization platform you can run on your desktop computer that allows you to create virtual machines (VMs) that run as software on your computer and use the same hardware that your physical computer uses. To see how to create a VM in VirtualBox check out our write up on how to do so here.
Once you have a VM or VMs created you will need to install an operating system on them in order have them run and be of any use to you. Or once you have an operating system installed you might want to install some software on your VM that came in the form of an ISO (International Organization for Standardization) file.

ISO files are single files that contain the contents of something like a CD or DVD or even an operating system. Most newer operating systems recognize the format and can open them to view their contents. If not then you can use a third party program like WinRAR to open them and even extract their contents to a folder.
Mounting an ISO file in a VirtualBox VM is an easy process and we will walk you through the exact steps on how to do so. The first step is knowing exactly where your ISO file is located. It should be downloaded and saved on your local physical computer and not on the VM itself.
Mounting the ISO Image File
1. Open the Virtual Machine Settings
Next you will go to the settings of the VM. Select the specific VM you want to modify from your list of VMs on the left side of the main interface. Then click on the yellow Settings gear icon at the top of the window.
2. Navigate to the Storage Section
Then go to the Storage section located on the left side menu of the settings window. You should see that you have your virtual hard drives listed as .vdi files under the storage devices tree. You then should have an icon that looks like a CD that represents your virtual optical drive.
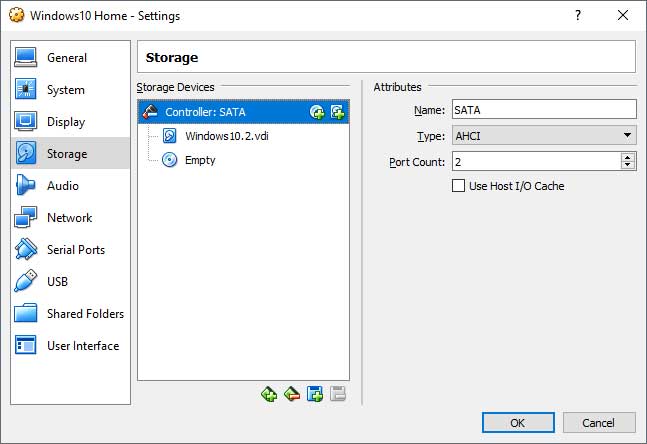
3. Add an Optical Drive if Missing
If you don’t have an optical drive installed then click on the storage controller in the Storage Devices box. Then click the icon of the CD with a green + symbol over it located at the bottom of that specific box. That will immediately install a brand new blank optical drive on your VM.
4. Select the Virtual Optical Disk File
Once that is setup it’s time to actually mount your ISO file on your optical drive. To do so select the empty optical drive under Storage Devices. Then click on the small CD icon in the Attributes section next to Optical Drive. Finally click on Choose Virtual Optical Disk File from the drop down menu.
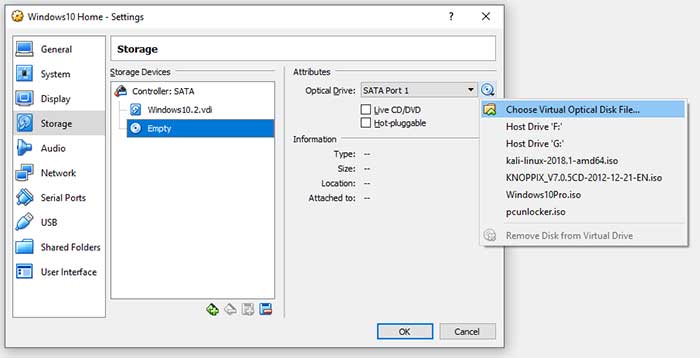
5. Browse for Your ISO File
If you have some previously used ISO files or drives then they will show up in this list automatically. This makes it very easy to reconnect to them. Otherwise you would just browse for the ISO file on your hard drive like you would with any other file. Once the file is connected simply click on OK to save your configuration.
Booting From the Mounted ISO
1. Access the VirtualBox Boot Menu
You are ready to go the next time you start the VM. Depending on your specific configuration, the VM may or may not boot right to the ISO file. If it does not boot from the CD automatically, then press F12 while the VM is booting up. This will force the system to drop into the boot device menu.
2. Select the CD-ROM Option
A black screen with white text will appear displaying all detected hard disks and boot devices. Choose the CD-ROM option by pressing C on the keyboard. This tells the virtual BIOS to completely ignore the hard drive and boot directly from your mounted ISO file.
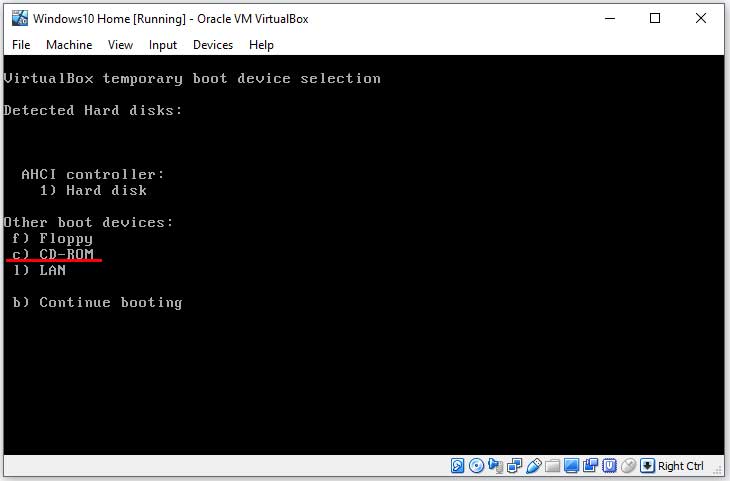
3. Run Your Installation Media
Then your VM will boot to the ISO image assuming it’s an actual bootable image. You can then run whatever operating installation or utility that is contained in that ISO file. You can install Windows, run a Linux Live CD, or execute a bootable repair toolkit.
For additional training resources, check out our online IT training courses.
Check out our extensive IT book series.






