
Last Updated on June 28, 2026
If you have multiple computers on a network, then it makes sense that you would want to share your printers between them rather than have each computer require its own printer.
Many times when you connect to a printer over the network, it will be a shared printer hosted on another computer, otherwise you would just connect to it wirelessly or even by its IP address.

Understanding the Windows Printer Error 0x0000011b
Understanding the Windows Printer Error 0x0000011b
When this error appears, it usually indicates a breakdown in how Windows handles authentication between the client computer and the system sharing the printer. Recent Windows updates tightened printer security to address known vulnerabilities. Those changes also introduced compatibility issues on some local networks, especially in mixed environments or older setups.
As a result, a perfectly functional shared printer may suddenly become unreachable, even though nothing obvious has changed in your network configuration. Understanding why this happens makes it easier to decide whether a quick workaround or a more permanent fix is the better solution.
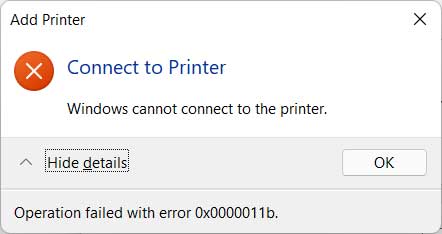
You might come across a situation where you are trying to connect to a printer, and you get an error that says Windows cannot connect to the printer. Operation failed with error 0x0000011b. This can be a common problem on Windows 10 and Windows 11 computers and is often related to security issues.
Common Registry and Update Fixes
Sometimes you can get around this with a common registry fix that involves creating a specific DWORD value. Open your registry editor and navigate to HKEY_LOCAL_MACHINE\System\CurrentControlSet\Control\Print. Create a DWORD value called RpcAuthnLevelPrivacyEnabled and set its value to 0.
Unfortunately, often this does not fix the problem. Other times, uninstalling certain Windows updates can fix the problem but once again, it’s rare. We need a more reliable workaround.
Manually Adding the Printer as a Workaround
1. Open the Add Printer Wizard
What you can do to get around the problem is install a printer like you normally would. Open the Windows settings app and navigate to the printers and scanners section. Click the button to add a new device.
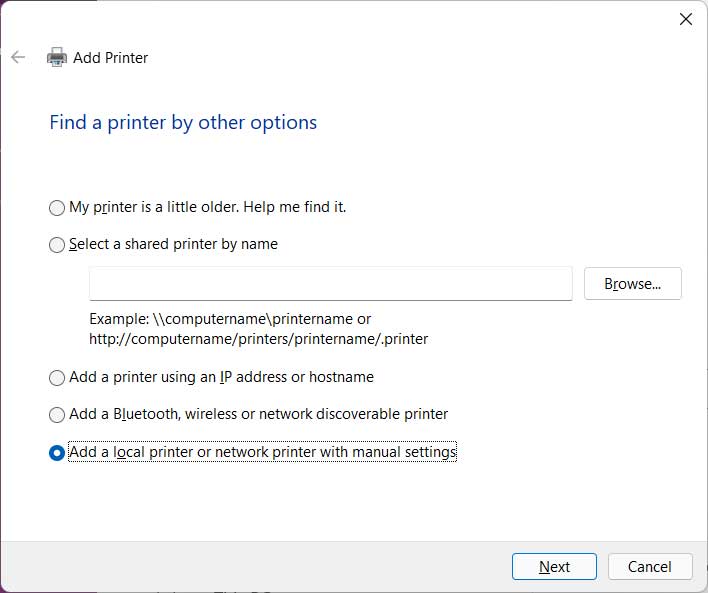
2. Select the Manual Settings Option
Wait for the initial scan to finish. When you get to the manual options screen, choose the one that says Add a local printer or network printer with manual settings. Click Next to proceed.
Creating a New Local Port with a UNC Path
1. Create a New Local Port
On the next screen where it asks you to choose a printer port, choose the Create a new port option. Use the dropdown menu to set the port type to Local Port. Click Next.

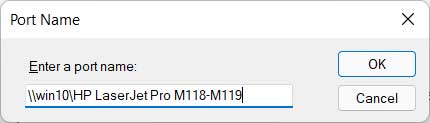
2. Enter the UNC Path
A small dialog box will appear on your screen. For the port name, you will need to enter the UNC (Universal Naming Convention) path of the shared printer. Type it exactly as it appears on the host computer.
3. Find the Correct Network Path
If you don’t know the exact path, then you can easily find it. Open File Explorer and type in \hostname where hostname is the name of the computer sharing the printer. This will list the available shares on that computer.
Installing the Printer Driver
1. Provide Network Credentials
Depending on your user account and its permissions, you might be prompted to enter a name and password to access the remote computer. Enter the credentials for an account that has permission to access the host machine.
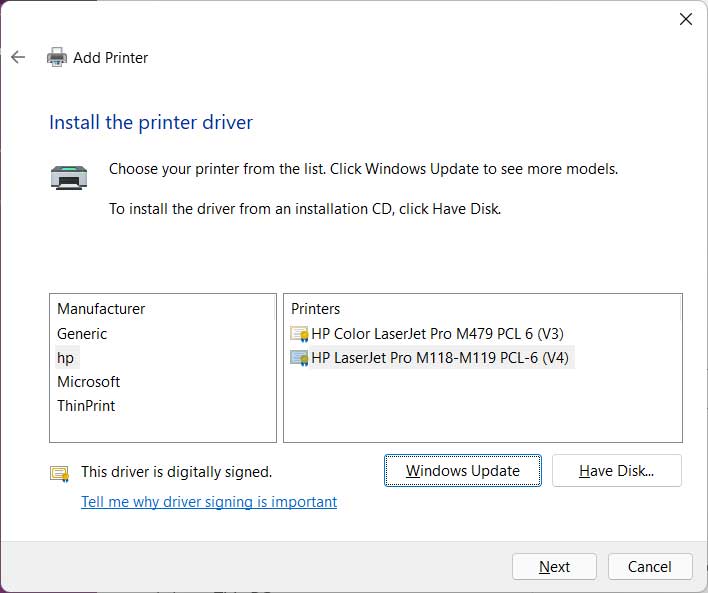
2. Locate the Printer Drivers
Once you get past that point, you will need to tell Windows where to find the specific driver for the printer. You can try Windows Update to see if it finds it automatically. You can also click the Have Disk button to browse to the location of the driver files on your hard drive.
3. Select the Matching Driver
If you are lucky, you can select the printer manufacturer and see if you already have the driver installed on your computer. Select the exact model number from the list and click Next.
Finalizing the Printer Setup and Port Settings
1. Name the New Printer
You can then type in a custom display name for the printer. You can also simply leave the default name that Windows takes from the shared printer itself. Click Next to install the device.
2. Configure Local Sharing Options
Windows will then install the printer and may ask you if you want to share this printer yourself. If you do share it yourself then others can connect to your computer to access the printer. This may present itself as a problem since you are already accessing the printer from a different computer yourself. It is usually best to select Do not share this printer.
3. Print a Test Page
Finally you will get the option to print a test page if you like. You will then see this new printer listed with any other printers you might have configured on your computer.
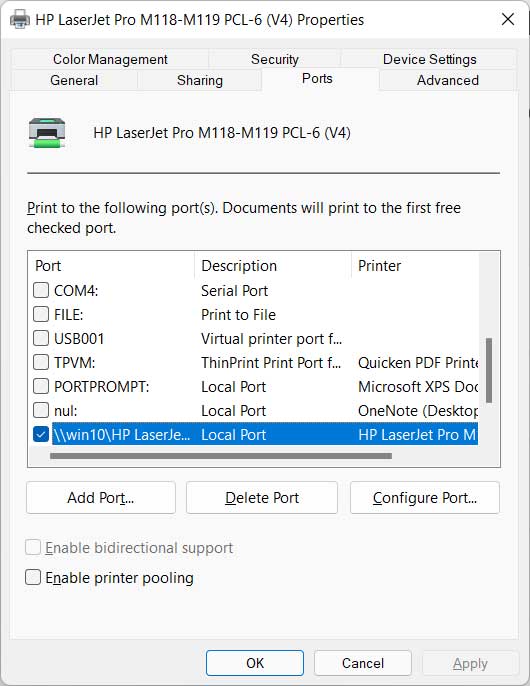
4. Verify the Port Settings
If you go to the printer properties on your computer and then click on the Ports tab, you will see the new port that you have created along with its settings. Now you should be able to print to this shared printer assuming the computer its being shared on is running and connected to the network. Check out this article on fixing jammed printer jobs if you run into any printing errors.
For additional training resources, check out our online IT training courses.
Check out our extensive IT book series.


