Last Updated on March 27, 2026
Learn how to create, format, print and save a Microsoft Word document
Microsoft Word is the most popular word processing program in use today. It is used throughout the world and is available in many different languages. Since Microsoft makes both Word and Windows you can see why it is so widely used. There is even a version that runs on Macintosh and Linux operating systems. Word is not the only word processing software available of course. There are other applications such as WordPerfect, Google Docs, SoftMaker FreeOffice and Open Office among many others.
If you need to make a simple document such as a letter or a resume then it’s fairly easy to create them without major adjustments. In this tutorial we are going to go over how to make a document, perform simple formatting, and saving and printing your document. This tutorial will be using Word 2016 so if you have a different version it may vary a little.
Navigating Word
First we will go over the ribbon items available to you in Word. The ribbon is basically a graphical representation of what you can do from the menu items in older versions of Word. The ribbon is segmented into tabs that correlate with different functions you can perform within Word such as adding pictures, formatting text and adjusting page layout. These function are combined into groups which are labeled a the bottom of each section. For example on the Home tab the area where you change font settings is called the Font group.
The first tab is the Home tab and it is where you can do things such as change the font and font size, make words bold, centered or underlined and also change letter characters. As you can see under the Paragraph section you can also add numbered and bulleted lists as well as change align text centered, to the right or left of the page and also justified. There is also a find and replace feature you can use from the Home tab. As you can see there are many buttons/icons on the toolbar to choose from. If you hold the mouse over a toolbar item it will show a tooltip explaining what the button is used for.

Next is the Insert tab and here is where you can do things like insert pictures, tables, clipart, shapes, videos, links to web pages and other items into your document. It’s also where you would add headers, footers and page numbers to your document. And if you want to get fancy you can even insert mathematical equations. The insert tab is also where you would go to add comments to certain areas of your document.

The Design tab is used to change themes that are applied to your document which will change things like the font, font size, title and header look and paragraph setup. You can choose from predefined themes or just change the color or font theme. If you want to add a watermark to your document, change the page color or add a page border you can do that here.

Next is the Layout tab where you change settings for how the page layout is configured. You can change margins, page orientation, page size and create columns and page breaks. Other things you can do on the Layout tab include changing the page indent and line spacing. If you have objects such as images in your document you can adjust the object image position and have text wrap around the object.

The References tab is used to add things like your sources of information for your document, add a table of contents or index, create a bibliography, insert captions and mark citations. This would mostly be used for people writing books or articles where they would need to cite references and so on.

If you need to do things such as a mail merge where you would send one document to multiple people or create labels or envelopes you can do those sort of things from the Mailings tab. You can also run the Mail Merge Wizard which will walk you step by step through the process of creating a mail merge.

The Review tab is where you would to go to do things such as check your spelling and grammar if you prefer not to correct mistakes noted by red or blue underlines as you type your document but would rather do it all at once from one place. If you want to see information about how many words are in your entire document or just a paragraph for example you can see that information as well as pages, lines and paragraphs your document contains. There is also a section for adding comments and showing existing comments if you have any. If your document gets reviewed by multiple people you can track the changes as well as accept and reject these changes. The Compare section will let you compare 2 different documents to see how they differ. And if you want to protect your document from being edited that is an option as well.

The View tab lets you decide how your document is displayed on the screen. There are many views to choose from such as Read Mode, Print Layout and Web Layout and each one displays the document differently. If you want to add tools like a ruler or gridlines you can enable them from here. It’s also possible to zoom in and out or show your document as one page or multiple pages depending on what you prefer.

Creating a new document
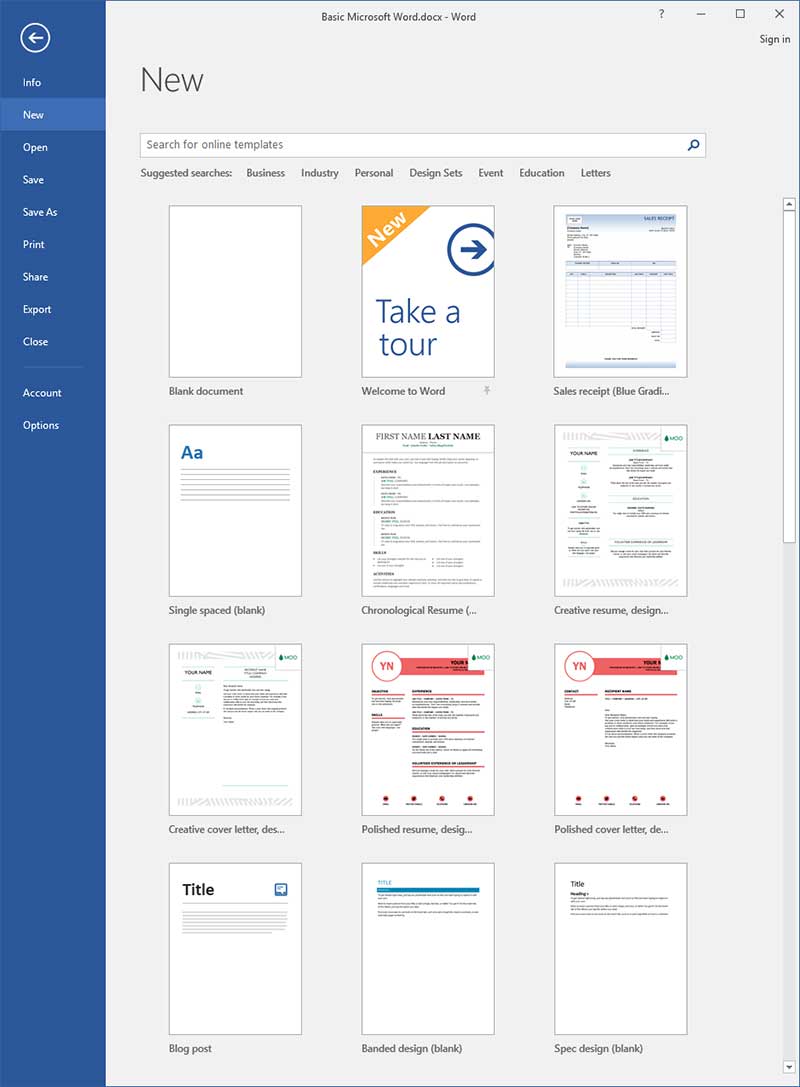
To create a new Word document you simply click on File and then New or the New Blank Document button on the upper left if you have it available. If you go to File and New you get more options compared to just clicking on the New Blank Document toolbar button. Word has built in templates you can use to get started creating various types of documents.
Formatting your document
As you type you may want to make sections of your document stand out from the rest. This can be done by making words bold, underlined, italicized or colored. To do this simply highlight your word or words and clicking on the appropriate button on the Home tab. You will notice there is a B, I and underlined U for bold, italics and underline. There is also a button with an A on it with a dropdown list allowing you to choose the color you want for your type. Next to the A there is an option for highlighting your text to make it really stand out.
If you want to align your text to the right, left, center or justified it’s as easy as a click of the mouse. Simply highlight your text and choose one of the alignment buttons on the Home tab under the Paragraph group that corresponds to what you want to do. The text alignment buttons look like lines of text on top of each other.
Microsoft Word also has a nice feature to make numbered or bulleted lists if you want to organize your information in a list or table of contents type fashion. There is a button for numbered lists which has a 1, 2 and 3 on it, and next to that is the button for bulleted lists, which has 3 bullets on it. These features can be customized by clicking on the down arrow next to the type of list you want to change and changing it to suit your needs.
If you make a mistake such as deleting some text or want to undo a formatting change you can click on the Undo button, which looks like a left pointing curvy arrow on the toolbar above the ribbon. A shortcut is to press Ctrl-Z on the keyboard. You can redo a change as well by using the right pointing curvy arrow on the toolbar.
Word shares the same cut, copy and paste features that most other Windows programs use so if you want to add text or images from other documents you can simply copy and paste them right into word. These options are available on the Home tab in the Clipboard group. Of course you can also use the standard Ctrl-C for copy and Ctrl-V for paste.
When you are finished with your document and want to print it or email it out you should use the spelling and grammar checker to make sure you don’t have any mistakes. By default Word will check your spelling as you go by underlining misspelled words in red and grammar errors in blue. To check your whole document simply go to the Review tab and click on the Spelling and Grammar button which has a checkmark and ABC above it. We have noticed that Word suggests grammar changes that may not be correct or that don’t make much sense so you can simply ignore them. During the spell check you can have word correct all instances of a misspelled word by clicking on Change All or have it ignore all instances by clicking on Ignore All to speed up the process. Or if it’s a word you don’t want marked as misspelled then click on the Add button.
Printing documents
Printing from Word is a very easy process, assuming you have a printer to print to! You may want to preview your document before printing to make sure everything looks the way you want it to. As you are working on your document there are several ways to view it such as changing the size percentage from the Zoom on the View tab. You can use one of the predefined sizes or type in whatever percentage you wish in the box. Another trick which works with a lot of Windows programs is to hold down the Ctrl key and scroll with your mouse wheel to zoom in or out. On the View tab you have the options of what layout you want to use such as read, web, print, outline and draft.
To get an overall view of how your document will look when its printed you can click on the Print Preview icon which looks like a sheet of paper with a magnifying glass on it assuming it has been added to your Quick Access Toolbar. This option is also available under the File menu when you go to print. You can zoom in and out of the document and scroll up and down the pages. When you are finished with the preview click the back arrow to get back to the main page. If everything looks good and you want to print then all you need to do is click on the print button on the Quick Access Toolbar if you have one or go to the File tab and then to Print to print your document. There is one very important thing to know about the print button. When you click on the Quick Access print button it will print all the pages to your default printer. You will not be prompted to pick a printer or tell Word what pages you want printed. To get these options click on the File menu and then Print.
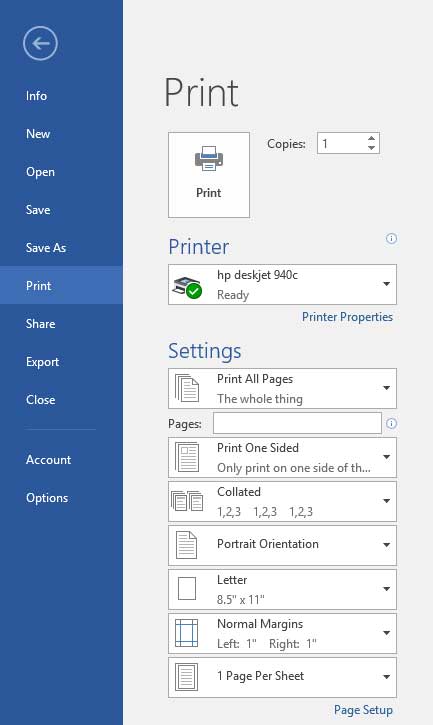
Now you will be able to select a different printer if you have more than one as well as choose what pages you want printed. You can also go to the printer properties to make any changes to the way the printer will print before proceeding. You can also select how many copies of your document to print from here as well as change other options.
Saving documents
If you need to save your document so you can access it later or send it to someone else Word makes the process very easy. If you are used to saving files in other Windows programs then it is pretty much the same process with Word. There is a Save button on the toolbar which looks like a floppy disk. You can also get to the save option from the File menu. If you want to save a copy of your document with a different name then you can choose the Save As option from the File menu. This will allow you to have 2 copies of the same document but with different names or save the file as a different types such as an html document or text document.
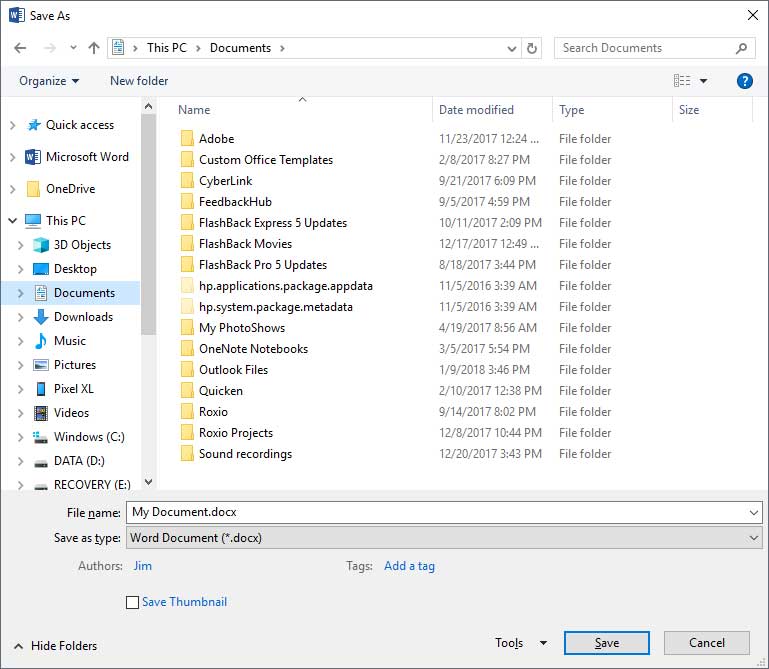
From the save dialog box you can browse to where you want to save your document. Most of the time the default location is My Documents. In the File name box you will type the name of your document. If you want to make a new folder to store your document then you can click the New Folder button on the top left.
Now you know how to create, format, print and save a basic Microsoft Word document. Just remember if you need to know how to do something in Word to use the overlooked help feature!