Last Updated on May 13, 2026
Hard drives are the component of your computer that stores your files as well as what your operating system is installed on. If you didn’t use a hard drive you would not be able to run your computer unless you temporarily booted it up from something like a CD or USB flash drive.
In order for a hard drive to be recognized by an operating system such as Windows, the computer needs to know that it exists, is connected properly, what size it is and so on. For IDE devices such as hard drives and CDROMs you need to make sure the jumpers are set correctly or else the computer won’t recognize the drive and you won’t be able to use it in your system.
1. Why Jumper Settings Are Still Relevant Today
Although IDE hard drives have been entirely replaced by modern SATA and NVMe drives which offer significantly faster data transfer rates, there are still many older computers out there that use IDE drives. Today, you will most commonly encounter these jumper settings when doing data recovery on an old family hard drive using an external IDE-to-USB adapter. Retro PC gaming enthusiasts also frequently need to configure these exact pins when restoring vintage Windows 98 or Windows XP desktop computers.
2. Identifying the IDE Cable Connectors
If you ever have to replace an IDE hard drive, or a classic CD/DVD optical drive for that matter, you may have noticed that there are small physical jumper settings that have to be set to make the computer recognize the drive correctly. A standard IDE ribbon cable will typically have two distinct connectors on it designed to support exactly two IDE devices on a single chain. Some older or specialized cables may only come with one connector though, which limits that specific IDE channel to a single drive.
3. Configuring the Primary Operating System Drive
Most vintage computers come with two distinct IDE controller ports directly on the motherboard that will support two drives each, allowing for a maximum total of 4 IDE drives in the computer. The only time you really need to heavily worry about which drive is set to master and which is set to slave is when you are actively setting up your main operating system drive on the primary IDE controller port. You should always firmly set the OS drive as the master and connect it to the primary IDE port so the motherboard boots the computer correctly.
4. Setting the Secondary Drive as the Slave
When connecting more than one hard drive or other IDE storage device to a computer on the exact same IDE controller cable, you have to strictly assign one as the primary or “master” and one as the secondary or “slave” using the physical jumpers. The slave drive does not actively rely on the master drive for its operation, or vice versa, so they work entirely independently of one another. The master and slave designation is simply used so the computer’s storage controller knows exactly which drive to send the data to without signal collisions.
5. Locating the Jumper Diagram on Your Drive
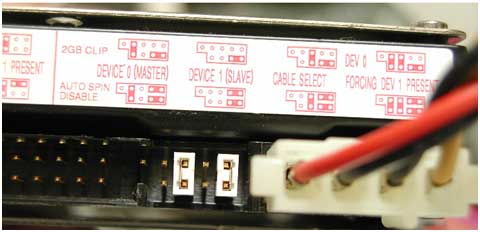
Because every manufacturer designed their hardware slightly differently back in the day, the exact placement of the tiny plastic jumpers will vary depending on the specific hard drive brand. However, almost every single IDE drive should have a clearly printed sticker or diagram located on the back or top of the drive’s metal casing. This helpful label will explicitly indicate exactly what physical position to put the small plastic jumpers in for what specific setting (Master, Slave, or CS).
6. Using the Cable Select (CS) Jumper Setting
Cable Select (CS) settings were eventually designed to make it much easier to connect hard drives by creating a system where you didn’t have to manually worry about the strict Master or Slave jumper settings. You simply set the physical jumper to the Cable Select position on both drives that are sharing the ribbon chain. Depending entirely on where you connected them to the physical plugs on the cable, the computer would automatically know which connector was Master and which was Slave.
7. Utilizing the Correct Conductor IDE Cable
If you are actually going to use the convenient Cable Select method, you need to make sure you are using a special 40-conductor IDE cable that specifically supports this feature. This specially wired cable is what physically determines the master and slave connections based strictly on the position of the plugs. Fortunately, most modern IDE cables you buy today, including generic IDE-to-USB data recovery adapters, should automatically be of this compatible type.
8. Troubleshooting BIOS Recognition Errors
If you accidentally set both drives on the exact same IDE cable to master, or incorrectly set them both to slave, then the computer most likely won’t recognize the drives in the BIOS at all. Because of this conflict, you won’t be able to boot the computer with the drive or successfully install your operating system on it. You should always double-check your physical pin settings when installing a new drive or setting up a recovery adapter to avoid these frustrating recognition errors.
9. Replacing an Existing IDE Drive
When you are simply doing a 1-to-1 hardware swap to upgrade your storage capacity, the configuration process is actually incredibly straightforward. If you are replacing an existing drive that has died or simply run out of space, simply set the jumper on the brand new drive to perfectly match the pin setting on the old drive. This ensures the motherboard sees the new hardware in the exact same spot on the chain, allowing you to boot right up without making any BIOS changes.
For additional training resources, check out our online IT training courses.
Check out our extensive IT book series.