
Last Updated on March 6, 2026
Most computer users and music lovers completely enjoy the ability to burn their own custom music CDs directly from their MP3 collection stored securely on their computer. Many people blindly buy expensive third party software to do this exact task. You really do not need to waste your money. Windows Media Player natively has the absolute ability to burn music CDs directly from your existing music library or raw MP3s.
You can easily burn entire albums to a physical CD or creatively build your own mixed CDs straight from your massive music collection. It is incredibly easy to do. All you need are some completely blank CDs. You must also make absolutely sure your physical CD/DVD drive is actually a burner and not strictly a read-only player.

Setting Up Windows Media Player
1. Launch the Legacy Application
To create a music CD you simply need to open Windows Media Player directly from your Programs menu. If you are actively using the much newer Media Player app, you can absolutely still use the legacy Windows Media Player app hidden inside Windows 11. Click the Windows Start button. Type the word legacy into the search bar to quickly find the exact executable file.
2. Open the Burn Tab
Once the application fully loads onto your screen, look straight at the top right corner of the main interface window. Click directly on the Burn tab to switch the software into disk writing mode. A dedicated blank sidebar will instantly slide open on the right side of your desktop screen.
Building Your Custom Tracklist
1. Browse Your Local Music Library
If you already have your music library completely indexed within Windows Media Player, the process is incredibly fast. Click directly on the Music icon located specifically on the navigation list on the left side of the player. You can quickly browse through your entire collection to find the exact songs you want to add to your physical CD.
2. Drag and Drop Audio Files
Grab the specific audio tracks with your mouse cursor. Drag them straight over to the right side of the window right where the interface says Burn list. You can also completely bypass the internal library browser. Just drag and drop raw MP3s directly from Windows Explorer straight into the Burn list window to add them to the queue.
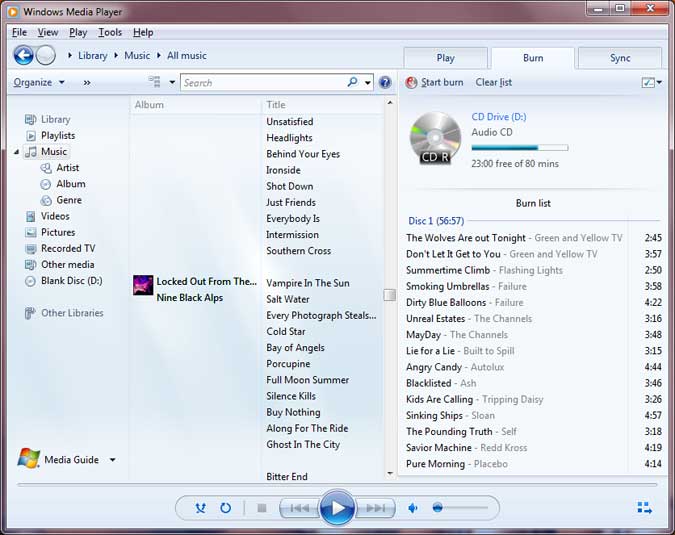
3. Monitor Your Disc Capacity
Look straight at the very top of the active burn list interface. You will immediately notice that it explicitly shows you exactly how long your current burn list actually is. It also accurately calculates exactly how many minutes you currently have free on your inserted blank CD. Blank CDs will safely hold exactly 80 minutes of uncompressed audio. Keep that hard limit in mind when actively creating your custom song list.
Finalizing and Burning the Disc
1. Verify Your Drive and Media
Once you are completely happy with your custom music selection, make absolutely sure you have a blank CD inserted properly. Push the blank disc straight into your recordable CD drive. Wait for Windows to spin it up and fully recognize the blank media.
2. Adjust Your Burn Settings
You can easily adjust the actual burning speed before starting the writing process. Click the tiny options icon located right above the active burn list. Selecting a slower burn speed actively prevents nasty audio skips and annoying playback errors on older car stereos.
3. Start the Burning Process
Click directly on the Start burn button located right at the top of the screen. Your physical music CD will instantly begin burning right in front of you. The software will automatically pop the disk tray completely open the exact second the writing process successfully finishes. You may definitely want to check out this CD burning app as well if you need more advanced audio mastering features.
For additional training resources, check out our online IT training courses.
Check out our extensive IT book series.


