Last Updated on February 9, 2026
Credential Manager is a built-in feature that comes with modern operating systems like Windows 10 and Windows 11. It stores the private credentials for your various user accounts all in one secure place. These can be specific user names and passwords that you use to log on to things like webmail accounts, frequently used websites, or other networked computers.
The main purpose of Credential Manager is that it allows Windows to automatically log you on to your saved websites and applications. You can do this without having to manually enter your login information or credentials every single time. This login information is securely saved on your computer in what is called a protected vault.
Accessing and Viewing Your Saved Credentials
1. Open the Control Panel Utility
To view and manage your stored credentials you must first open the legacy Windows Control Panel. You can easily find this by typing the name directly into your taskbar search box. Once the window opens, change your view to Large Icons and click directly on the Credential Manager icon.
2. Choose Your Credential Category
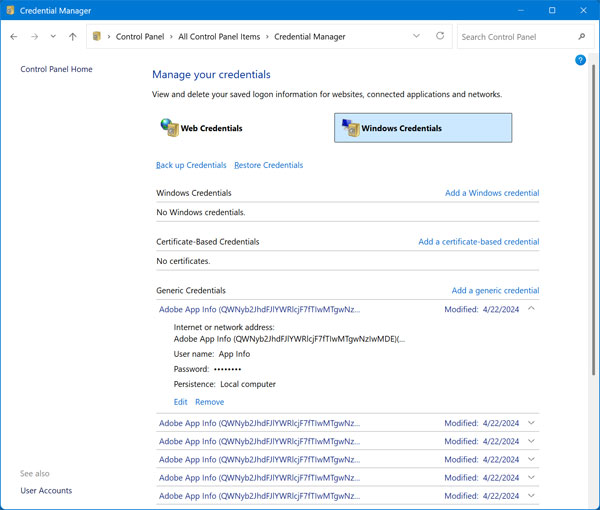
Here you will see the stored credentials that Windows currently has saved for your specific user account. The interface is split into two distinct sections for Web Credentials and Windows Credentials. Windows will often add application credentials to this manager without you knowing so you may want to check this list periodically.
3. Review Your Saved Application Data
In this specific example you can see that Credential Manager has some stored credentials for Adobe App Info. This data is automatically created and cached when you log into Adobe desktop software products. You might also see network router logins, mapped drive credentials, or Microsoft account data stored in this exact same list.
Editing and Backing Up Your Vault
1. Edit or Delete Existing Credentials
You can expand any saved credential to get more detailed information such as the stored username. You also have the option to edit this credential if you need to quickly change the username or password. You can also permanently delete the credential from your computer by clicking the appropriate Remove link.
2. Add a New Windows Credential
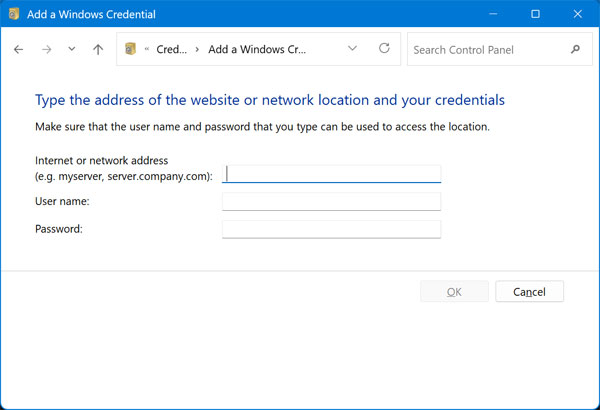
There is also an option to add a completely new credential by clicking the Add link under the appropriate category type. You will have slightly different options depending on what type of credential you want to manually add. In this example we clicked on Add a Windows Credential and are prompted to add an internet or network address as well as the username and password.
3. Backup Your Credential Vault
Once you have your credentials set up the way you want you can back up your secure vault to another physical location. You can easily export this data to a USB flash drive or a mapped network share just in case something happens to your computer. This allows you to quickly restore all your usernames and passwords back to your current machine or migrate them to a brand new computer.
4. Locate the Backup File
The export process bundles all of your sensitive login data into a single encrypted file. Backed up credentials specifically use the .crd file extension. Keep that unique file type in mind when looking for your backups in File Explorer later on.
For additional training resources, check out our online IT training courses.
Check out our extensive IT book series.