
Last Updated on April 28, 2026
A flash drive is like a helpful tool to keep your everyday files safe. It’s small, light, affordable, and works with lots of computers. A recent study by GlobeNewswire says that the market for these flash drives will probably grow by about 7.1% each year from 2022 to 2028. But even though you can take these drives anywhere, recovering important business documents, photos, videos, and stuff from them can be hard.
This article will talk about ways to recover data from USB drives, good methods for getting data back, and the step-by-step way to do it. And if you ever have tiny problems with your USB flash drives, the solutions here can help fix those problems too.
Part I. Three Proven Approaches for Flash Drive Data Recovery
1.1 Utilize Flash Drive Data Recovery Software [Simple]
For individuals with various levels of computer expertise, employing data recovery software is a straightforward way to retrieve lost files from flash drives. The process involves comparing available options to choose the most suitable software for your specific needs. Here are the key aspects to consider:
A. Preview Functionality: An effective USB flash drive recovery program allows you to preview damaged, lost, or deleted data, helping you quickly identify the files that require recovery. It can handle diverse data loss situations, including user errors, device formatting, partitioning errors, and malware attacks.
B. Recycle Bin Recovery: Ideally, the software should be capable of restoring files and documents from the emptied recycle bin.
C. Comprehensive Recovery: A reliable USB flash drive data recovery tool performs deep scans of your storage device, enabling the recovery of various types of documents, such as images, emails, Microsoft office files, videos, audio, and PDFs.
D. Customer Support: Efficient customer support or an integrated help manual enhances the software’s value.
After conducting a thorough comparison, we selected iBoysoft Data Recovery for Windows for testing and will guide you through the steps of recovering data from a USB flash drive using this software. This tool is proficient in recovering deleted files from formatted or unexpectedly unreadable/inaccessible RAW USB flash devices. Related blog post – RAW Photo Recovery: Recover Lost RAW Images from Camera
You could follow the steps below to recover data from USB drive on your PC:
Step 1: Connect your flash drive or pen drive to a USB port on your Windows computer.
Step 2: Download the free iBoysoft data recovery program from the company’s official website, install it using the provided Setup Wizard, and then launch the application.
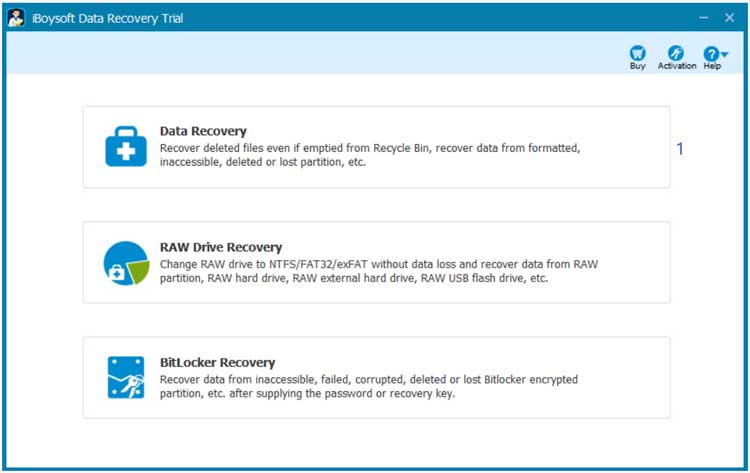
Step 3: Select the “Data Recovery” mode to initiate scanning. Choose your flash drive from the list of available disks and click “Next.”
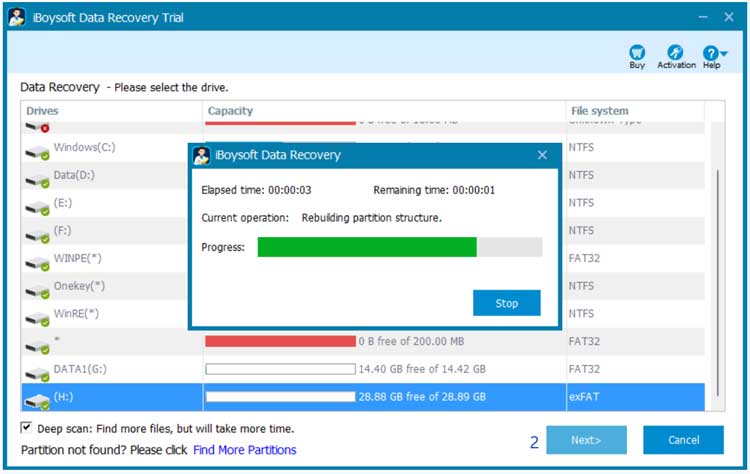
Step 4: Once the scanning process is completed, the software will display a list of detected files along with their paths.
Step 5: Double-click on each file to preview its content. If you identify the file you’re seeking, select a new location for saving the recovered file and click the “Recover” button.
1.2 Advanced Approach – Using Command Prompt for USB Flash Drive Data Recovery
Experienced computer users have the option to recover files from flash drives using the Windows command prompt, also referred to as CMD. Here are the step-by-step instructions for this advanced technique:
- Open the Run dialog on a Windows-based computer by pressing Windows + R. In the search bar that appears, type “CMD” and hit Enter.
- After typing, press Enter again, but this time type chkdsk “drive letter of your flash drive”: /f. (Take an example, if your portable USB drive is assigned as disk E, the command should look like chkdsk E: /f.)
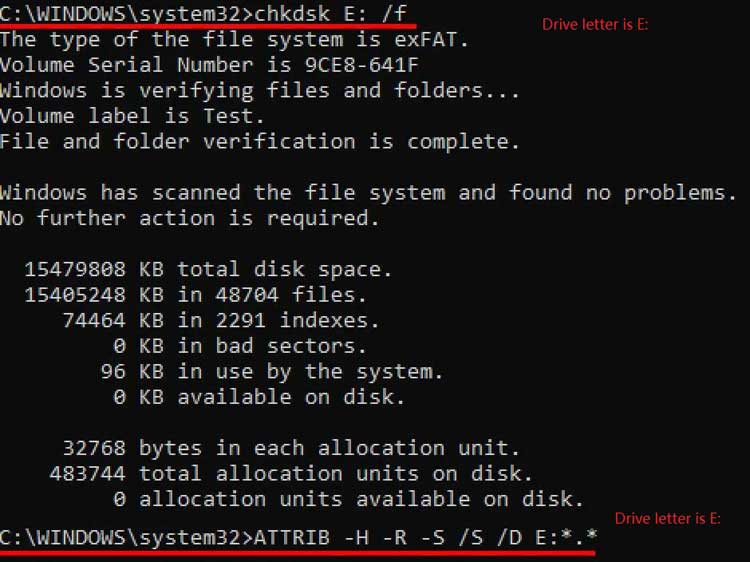
- Next, input the following command in the command prompt to initiate the recovery of deleted/lost files: Enter ATTRIB -H -R -S /S /D “the drive letter of your data storage device”:.. (For instance, if your flash drive is disk E, the command should be ATTRIB -H -R -S /S /D E:.)
Once the data recovery process is completed successfully, your computer will create a new folder on the flash drive to store the recovered documents. If the recovered files have a CHK extension, you’ll need to rename each file with the appropriate file suffix to open, view, and use them effectively.
1.3 Recovering Files from Your Flash Drive using the Windows Previous Versions Feature
The Previous Versions feature in the Windows operating system serves as a valuable troubleshooting tool for recovering important data that may have been unintentionally lost. If you had previously enabled the Previous Versions capability before the data on your USB flash drive went missing, you can use this feature to restore your crucial files to their previous state. Follow these steps to utilize this feature:
Step 1. Connect the USB drive to your Windows computer: Most desktop computers have USB ports located on either the front or back of the computer casing, while laptops often feature USB connectors on the left and/or right side.
Step 2. Open This PC: Navigate to This PC on your computer.
Step 3. Access the USB flash drive: Locate the USB flash drive that is connected to your computer. Right-click on it and then select “Properties”.
Step 4. Choose Previous Versions: Within the Properties window, select the “Previous Versions” tab.
Step 5. Check for the desired file: Browse through the list to see if the file you wish to recover is available in the most recent previous version.
Step 6. Restore the file: If you locate the desired file in the previous versions, click the “Restore” button to initiate the recovery process.
Part II: Frequently Encountered Problems with USB Flash Drives and Effective Resolutions
Issue A: USB Flash Drive Not Being Recognized (Most Common)
It’s quite common for our system to not recognize the USB flash drive, even after attempting to unplug and re-plug it. Here are a few steps you can try to fix this problem:
1. Turn off your computer and then restart it. Now, reconnect the USB flash drive and check if the computer can detect and recognize it.
2. If one USB port isn’t working, try inserting the flash drive into a different USB port or another person’s computer.
3. Format the USB flash drive to use it as if it’s new again.
Issue B: USB Drive Not Displaying Files and Folders
When files on your USB drive are hidden, they won’t be visible at first glance. If your USB drive doesn’t show files and folders, follow these steps to reveal them:
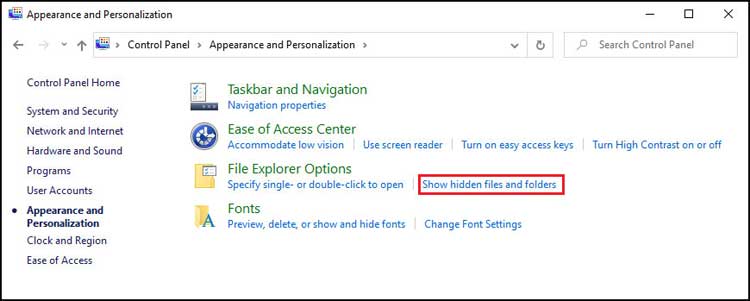
Step 1: Right-click the Start button on your Windows computer, select “Control Panel”, then click on “Appearance and Personalization”. Choose the option labeled “Show hidden files and folders” under File Explorer Options. (Refer to the example image below).
Step 2: Check the box next to Show hidden files, folders, and drives, and uncheck the box next to Hide protected operating system files (Recommended). Finally, click “OK.”
Issue C. Damaged or Incorrect File System on Your USB Drive
There are various reasons why your flash drive’s file system might become corrupted or incorrect, causing it to turn RAW. This can happen due to factors such as file system corruption, multiple faulty sectors, malware attacks, and more. When the file system is corrupted or if your USB drive is detected as RAW, you’ll encounter difficulties accessing or opening the files. When attempting to access the flash drive on your computer, you might receive one of these error messages:
“You need to format the disk before you can use it”
“The disk is not formatted”
“The volume does not contain a recognized file system”
Important Reminder: If your USB drive contains important documents, avoid formatting it right away. Converting from RAW to FAT32 or NTFS file systems at this point can lead to overwritten data, making recovery impossible.
A more effective approach is to utilize data recovery software like iBoysoft Data Recovery for Windows to retrieve vital files from the problematic flash drive. Once you’ve securely stored the files in a safe location, you can proceed with converting the RAW drive to the preferred file system.
For additional training resources, check out our online IT training courses.
Check out our extensive IT book series.


